Admin → Activity Management
Overview & Prerequisites
The Activity Module displays users' daily, weekly, and monthly activities and helps track daily working hours, activity percentage, and attendance details (linked with the Attendance Module).
Note: The Activity Module is a paid feature and requires a PRO subscription of the Simplified HR application.
Prerequisites:
-
PRO subscription to the Simplified HR application.
-
Activity Module enabled in System > Module Settings.
-
Appropriate user permissions for your role.
The My Activity Module Setting is accessible only to:
Access Module Settings
To access the module configuration, navigate to: System > Module Settings > My Activity.
View Employee Activity
Admins can track employee activities individually by navigating to: Control Center > Users > Members > Activity.
This allows the admin to monitor activity details for each employee separately.
Configure Web Attendance
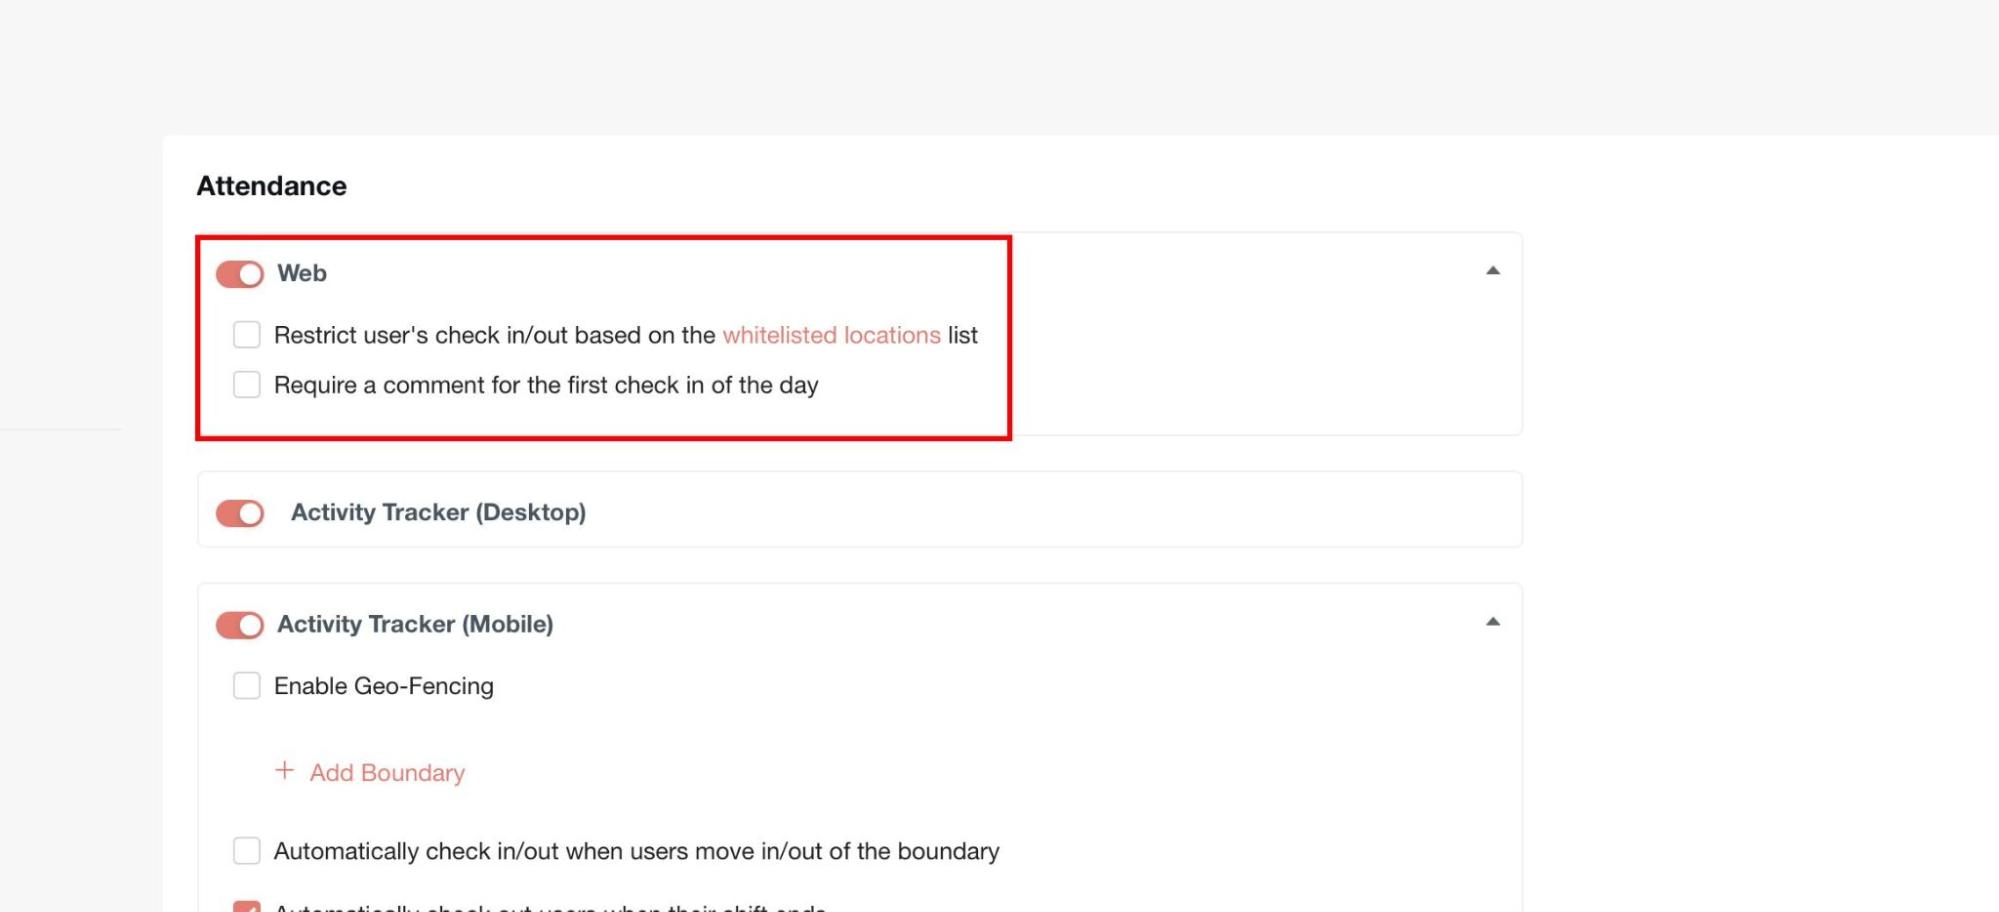
The Web attendance source controls whether users can check in/out through the web.
Additional Options
-
Restrict user's check in/out based on the whitelisted locations list — If selected, users can check in/out only when their location matches one of the whitelisted IPs/locations defined in the system. If not selected, users can check in/out from any location without restriction.
-
Require a comment for the first check in of the day — If selected, users must enter a comment while performing their first check-in of the day. If not selected, users can check in without providing any comment.
Configure Desktop Activity Tracker
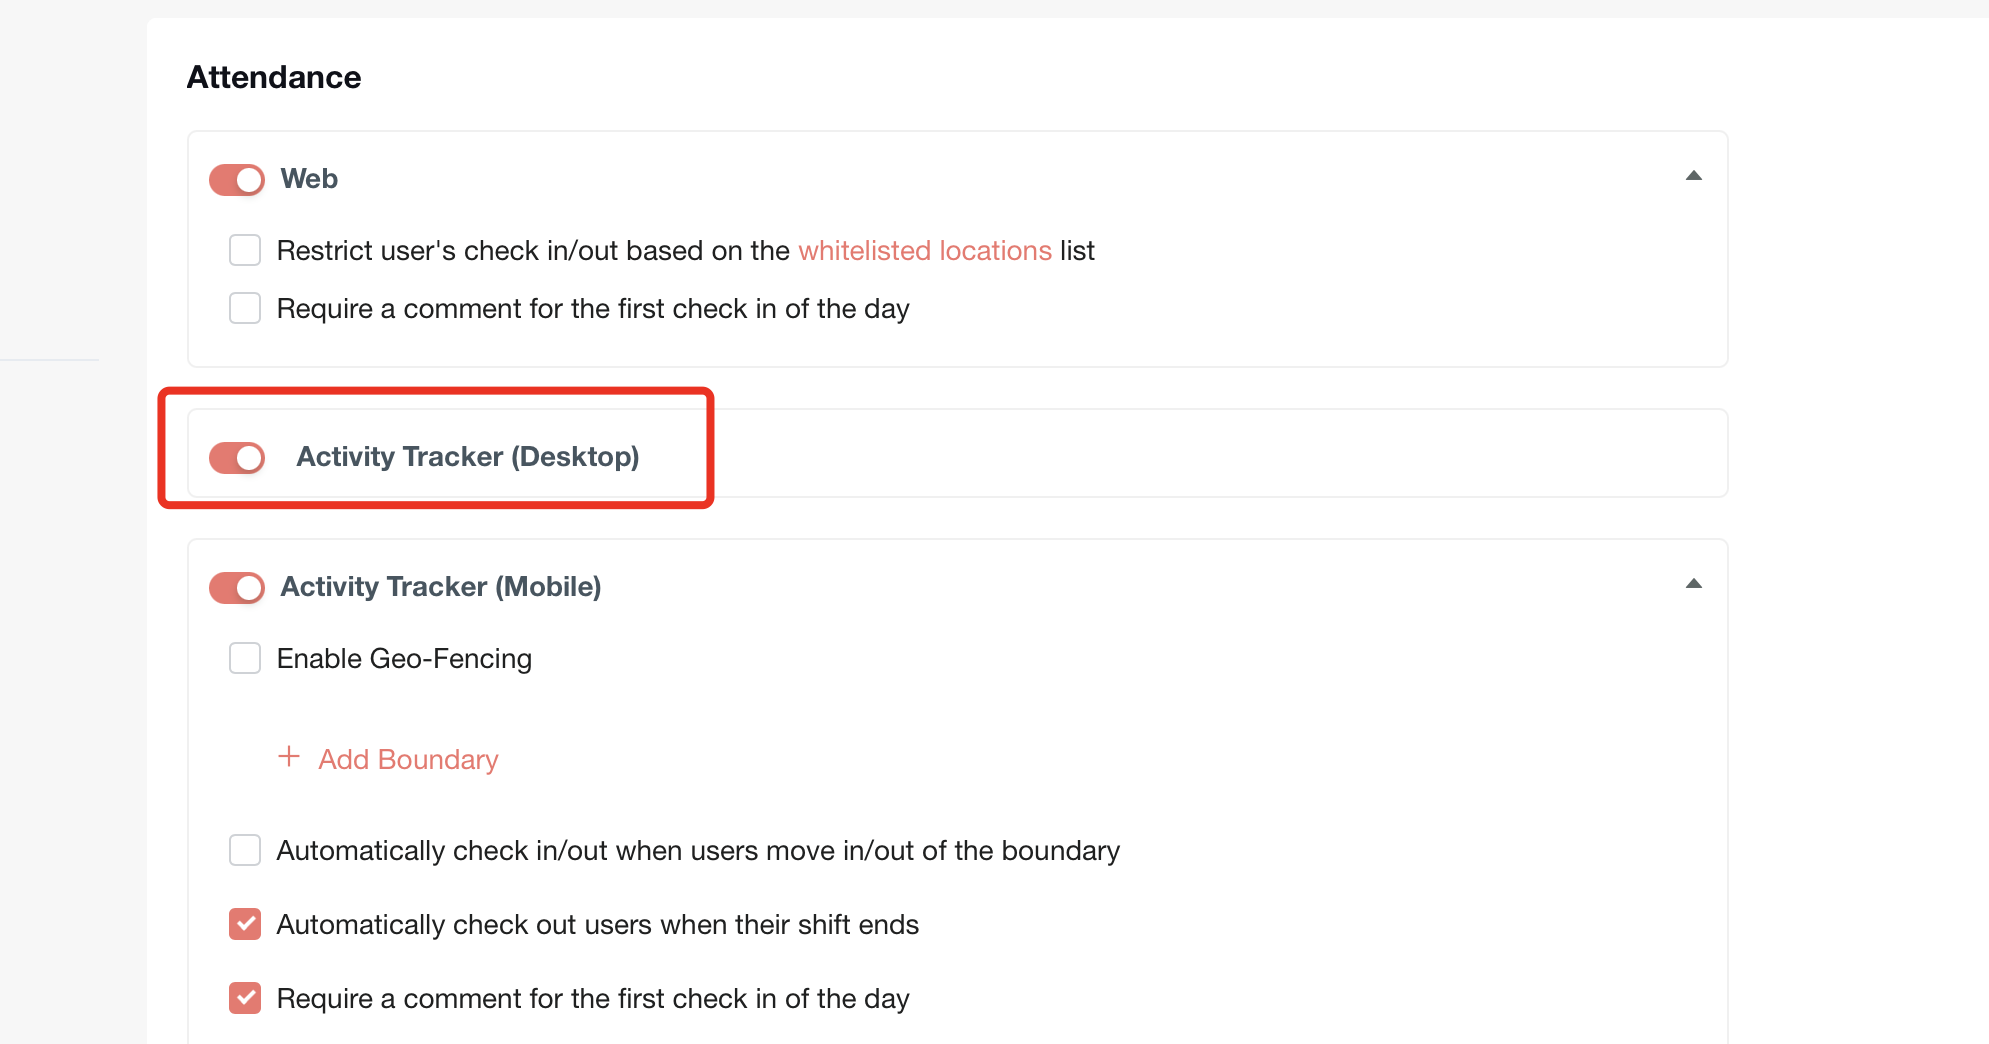
If Enabled:
-
The Activity Tracker (Desktop) option becomes visible in the Attendance Source list.
-
Admins can select it as an attendance source and assign its priority order among other sources (e.g., Mobile, Biometric, Web).
If Disabled:
- The Activity Tracker (Desktop) option will not appear in the Attendance Source list.
Configure Mobile Activity Tracker
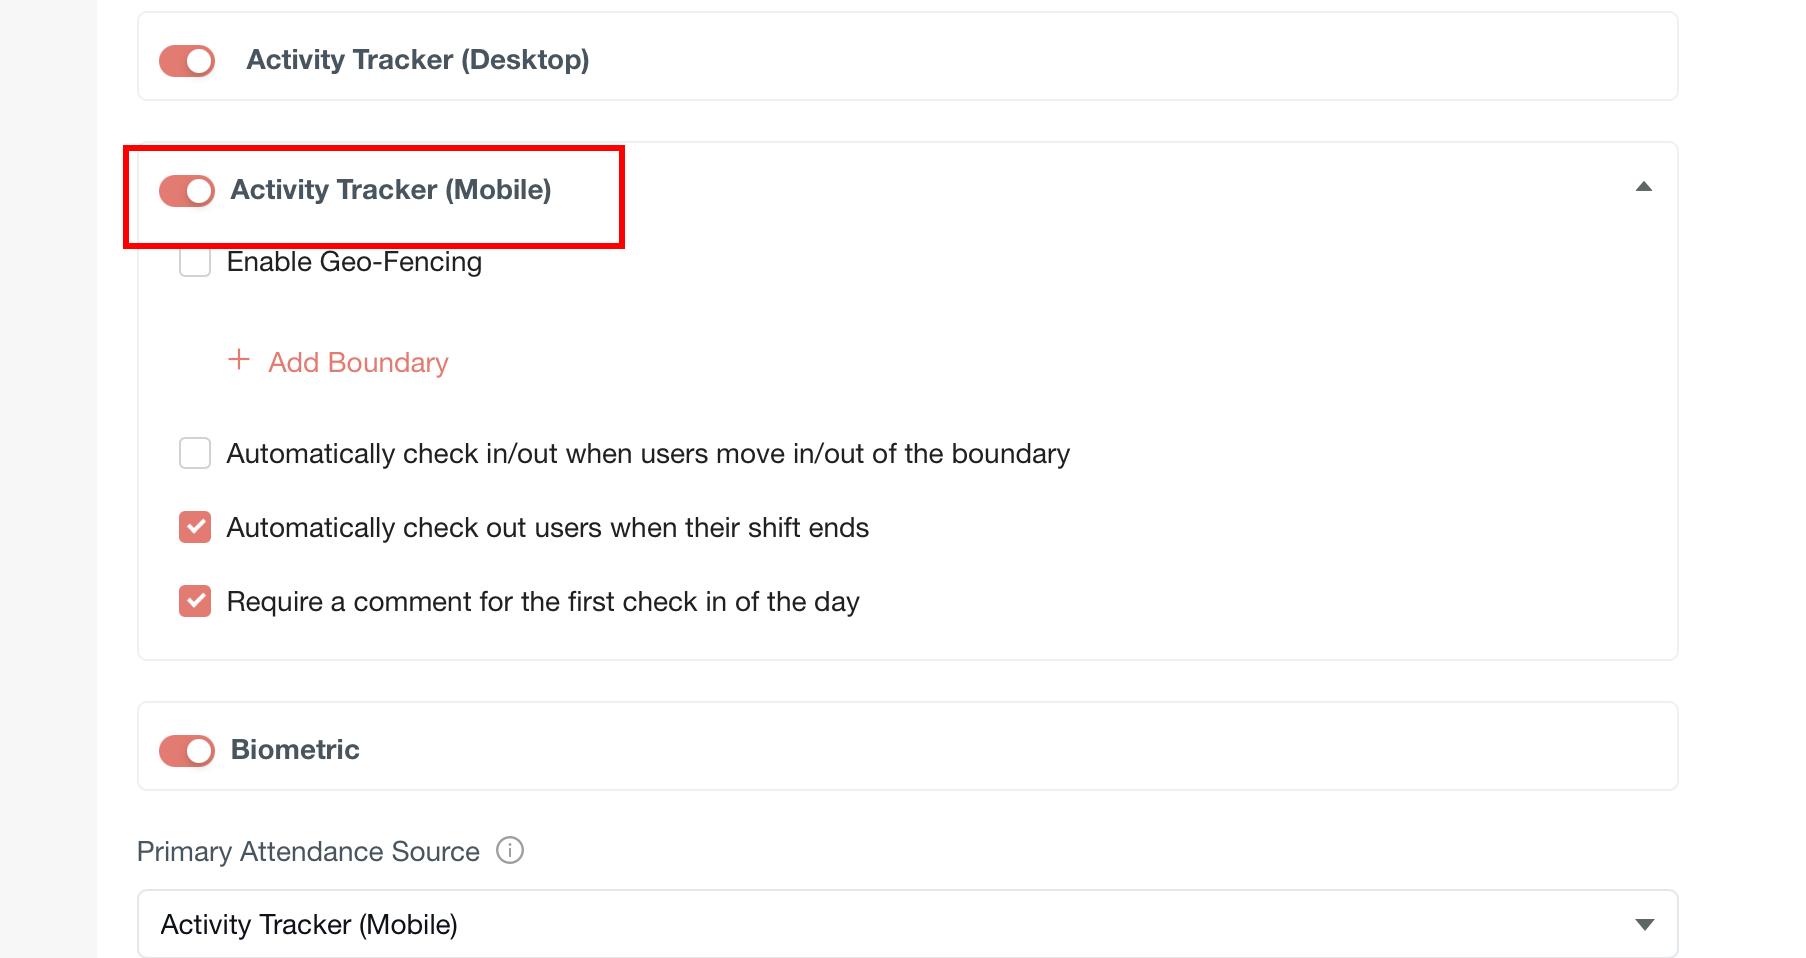
Enable Geo-Fencing
The Activity Tracker (Mobile) must be enabled first. If it is not enabled, the Geo-fencing section will not be displayed.
When enabled, the user's check-in/out is validated against their geo-location; when disabled, users can check in/out from anywhere without restriction.
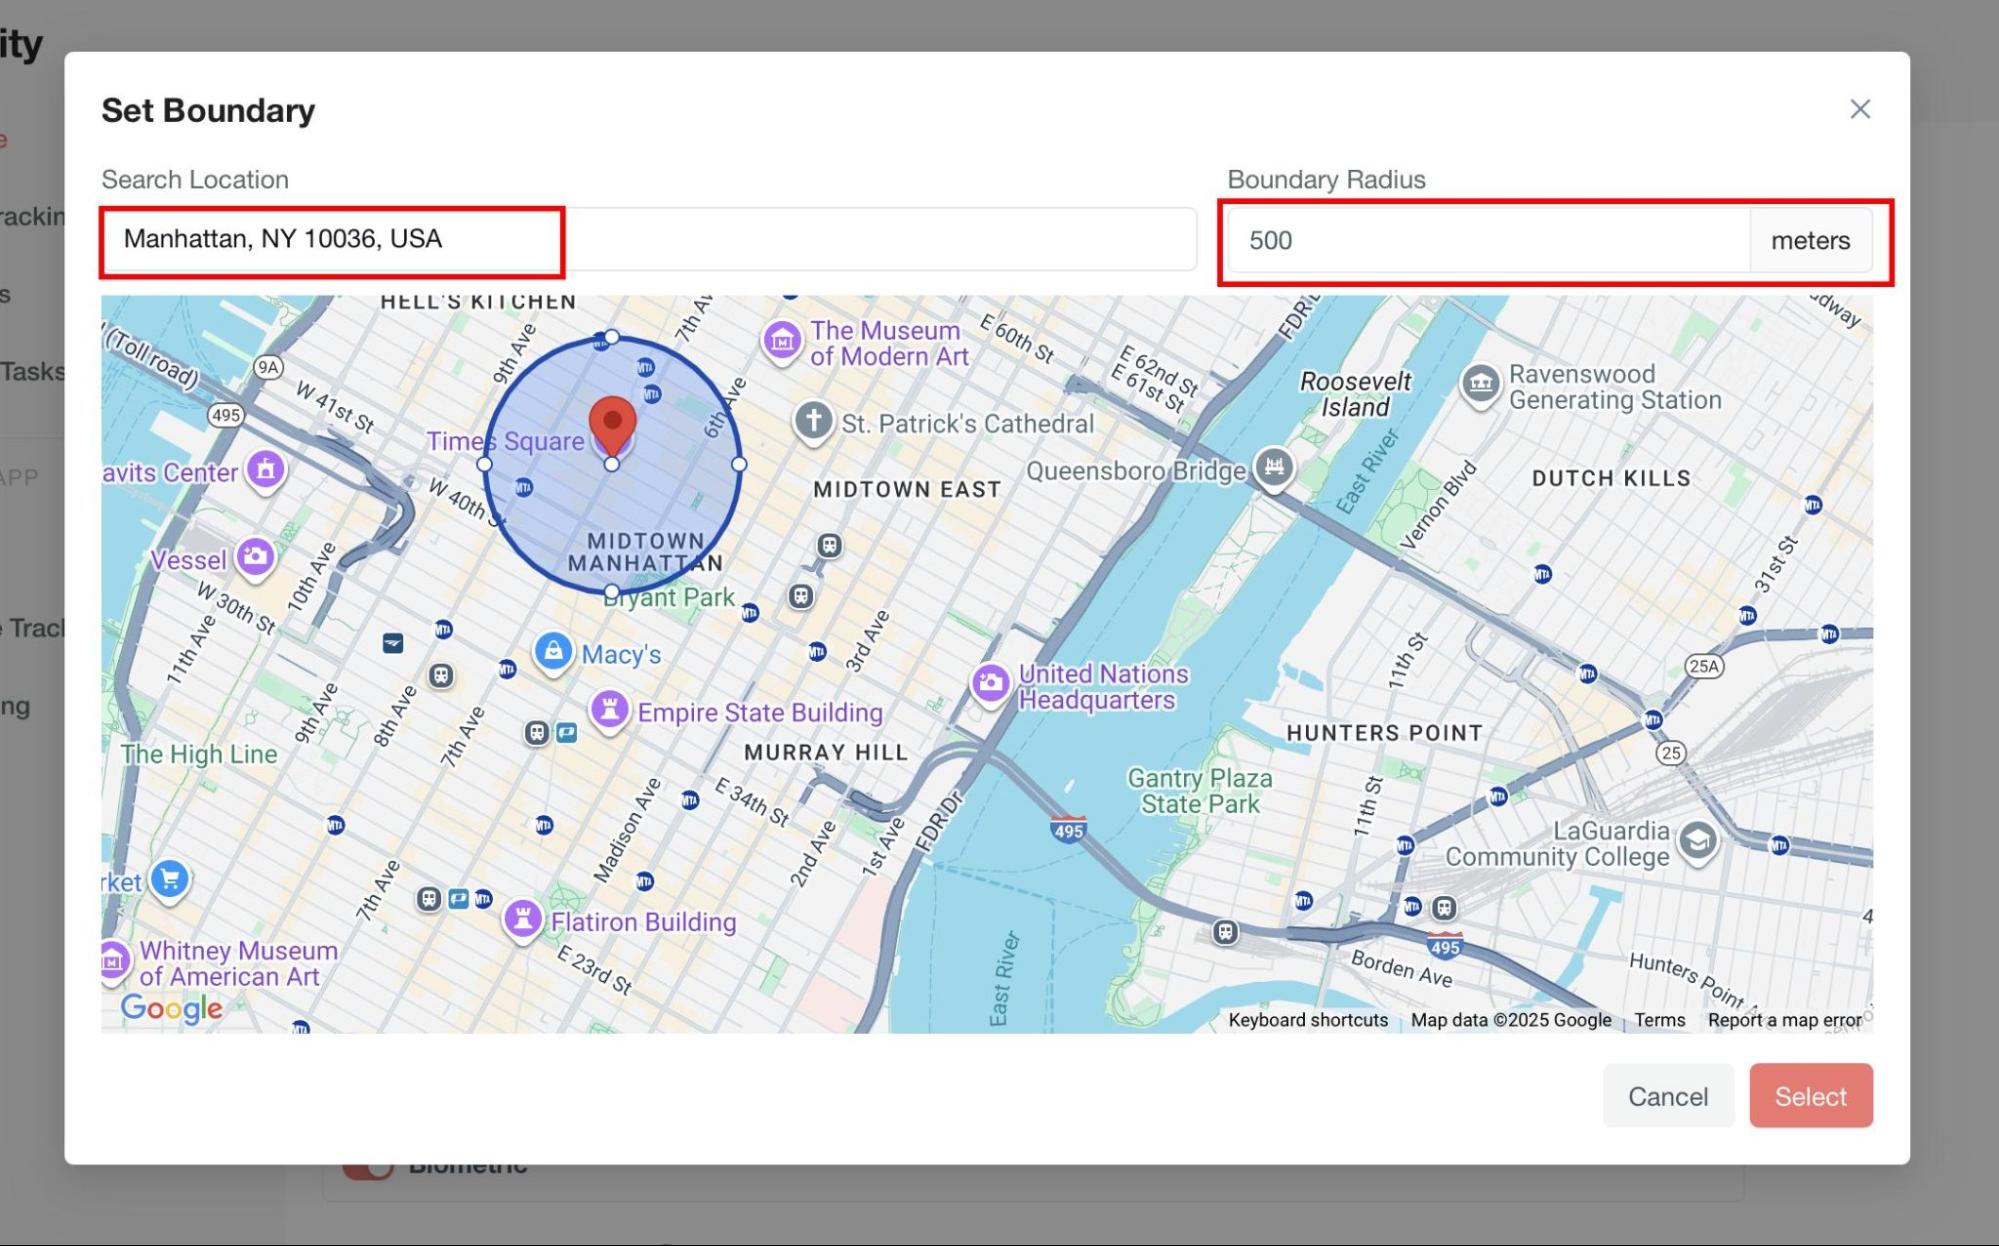
- Add Boundary: Admin can configure the boundary by selecting a location and setting the radius in meters. All geo-fencing–based settings apply within this defined boundary.
-
Automatically check in/out when users move in/out of the boundary — When enabled, the system auto check-ins when the user enters the defined boundary and auto check-outs when they exit; when disabled, users must manually check in/out.
-
Automatically check out users when their shift ends — When enabled, users are auto checked out at the end of their shift; when disabled, users must check out manually.
-
Require a comment for the first check in of the day — When enabled, users must provide a comment during their first check-in of the day; when disabled, no comment is required.
Configure Biometric Attendance
If Enabled:
-
The Biometric option becomes visible in the Attendance Source list.
-
Admins can configure biometric devices through the Biometric Module and select it as an attendance source with the required priority order.
If Disabled:
- The Biometric option will not appear in the Attendance Source list.
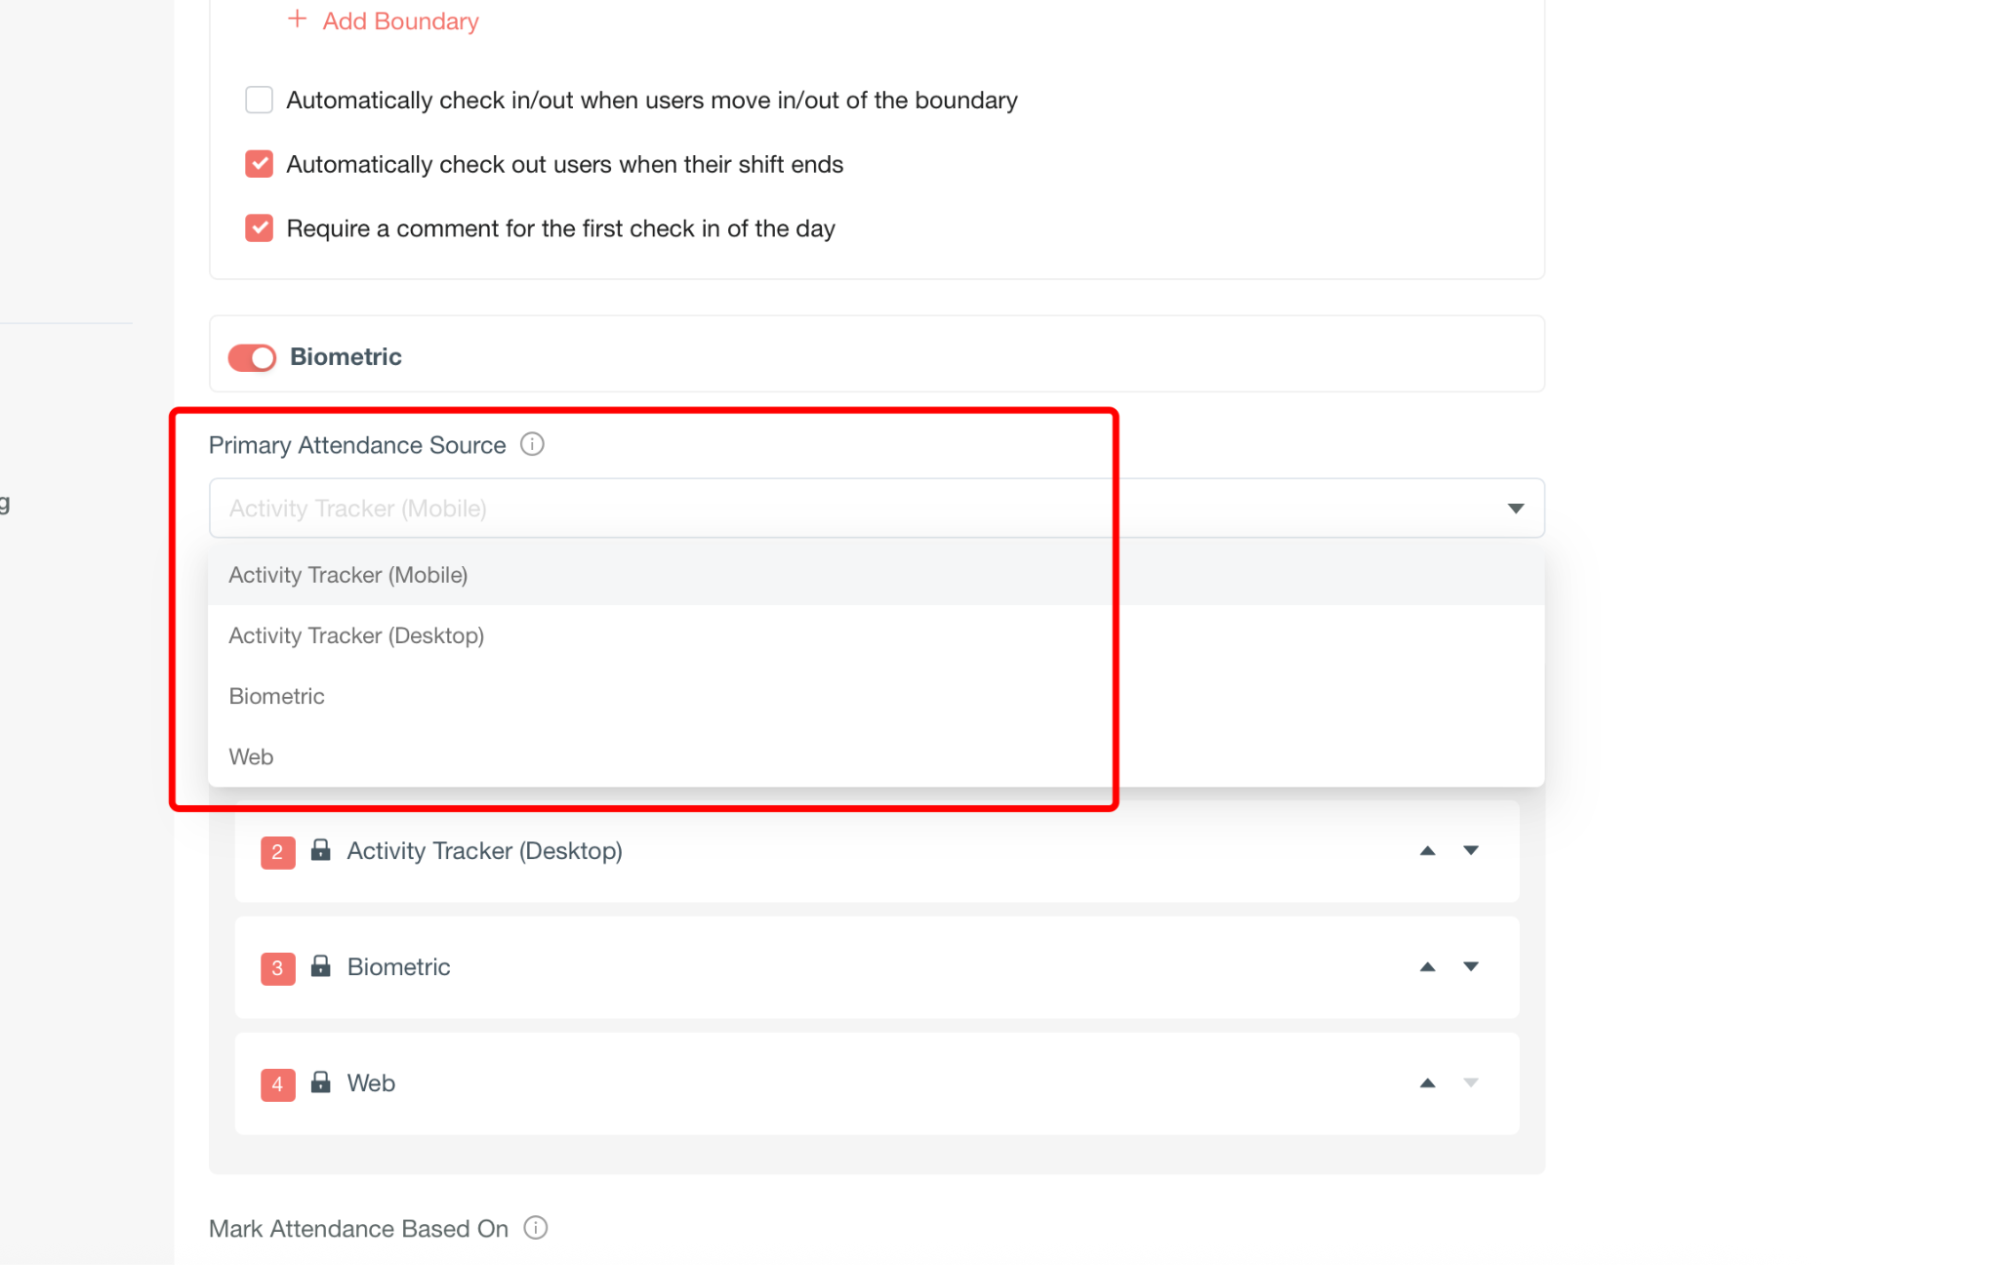
Configure Primary Attendance Source
Admins can define the main attendance source that will be used to mark user attendance. Options include:
The selected source will be labeled as Primary in the attendance source list.
Configure Attendance Fallback Sources
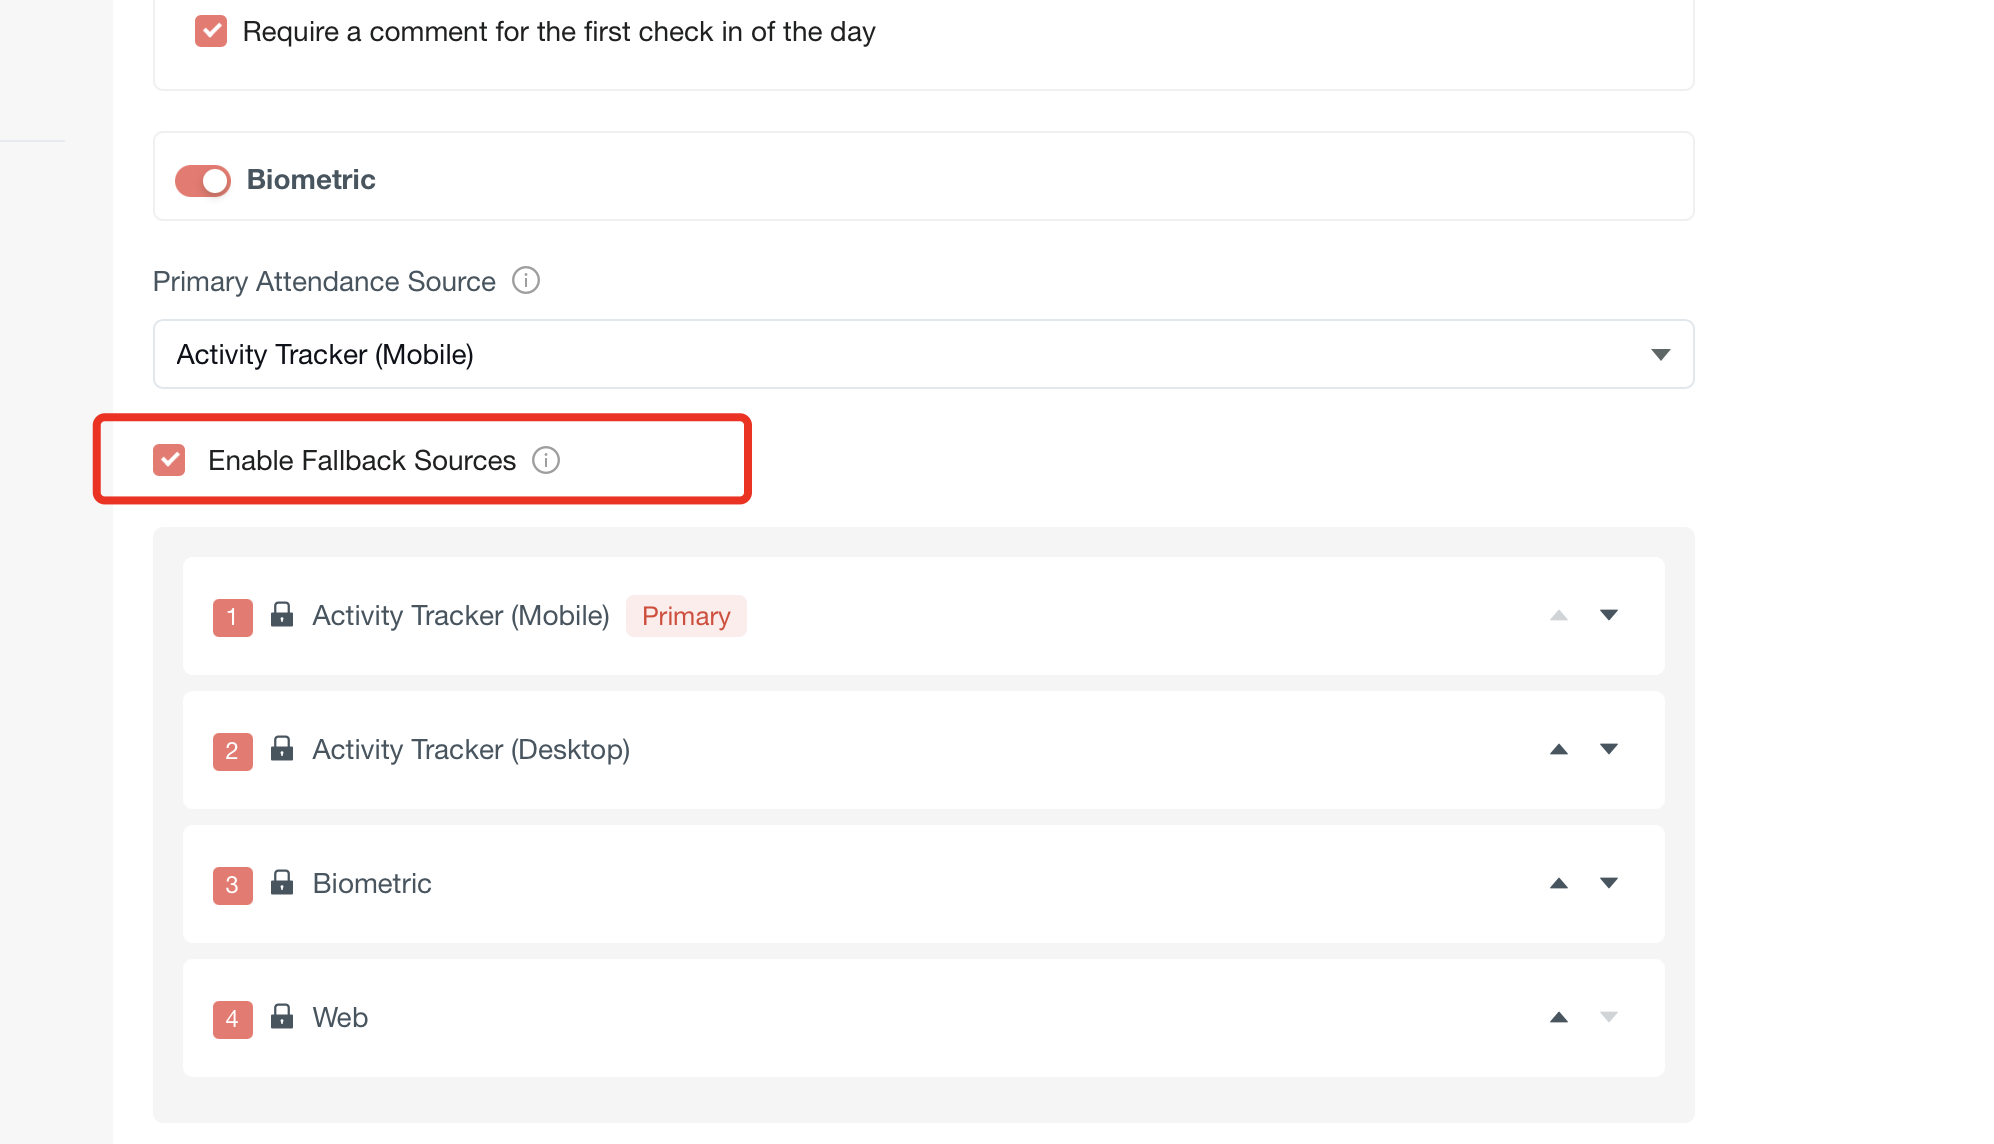
Enable Fallback Sources
When enabled, the system will use other configured attendance sources as backup if the primary source data is missing or unavailable. When disabled, attendance will only be marked from the Primary Source; no backups will be used.
Source Priority Order
-
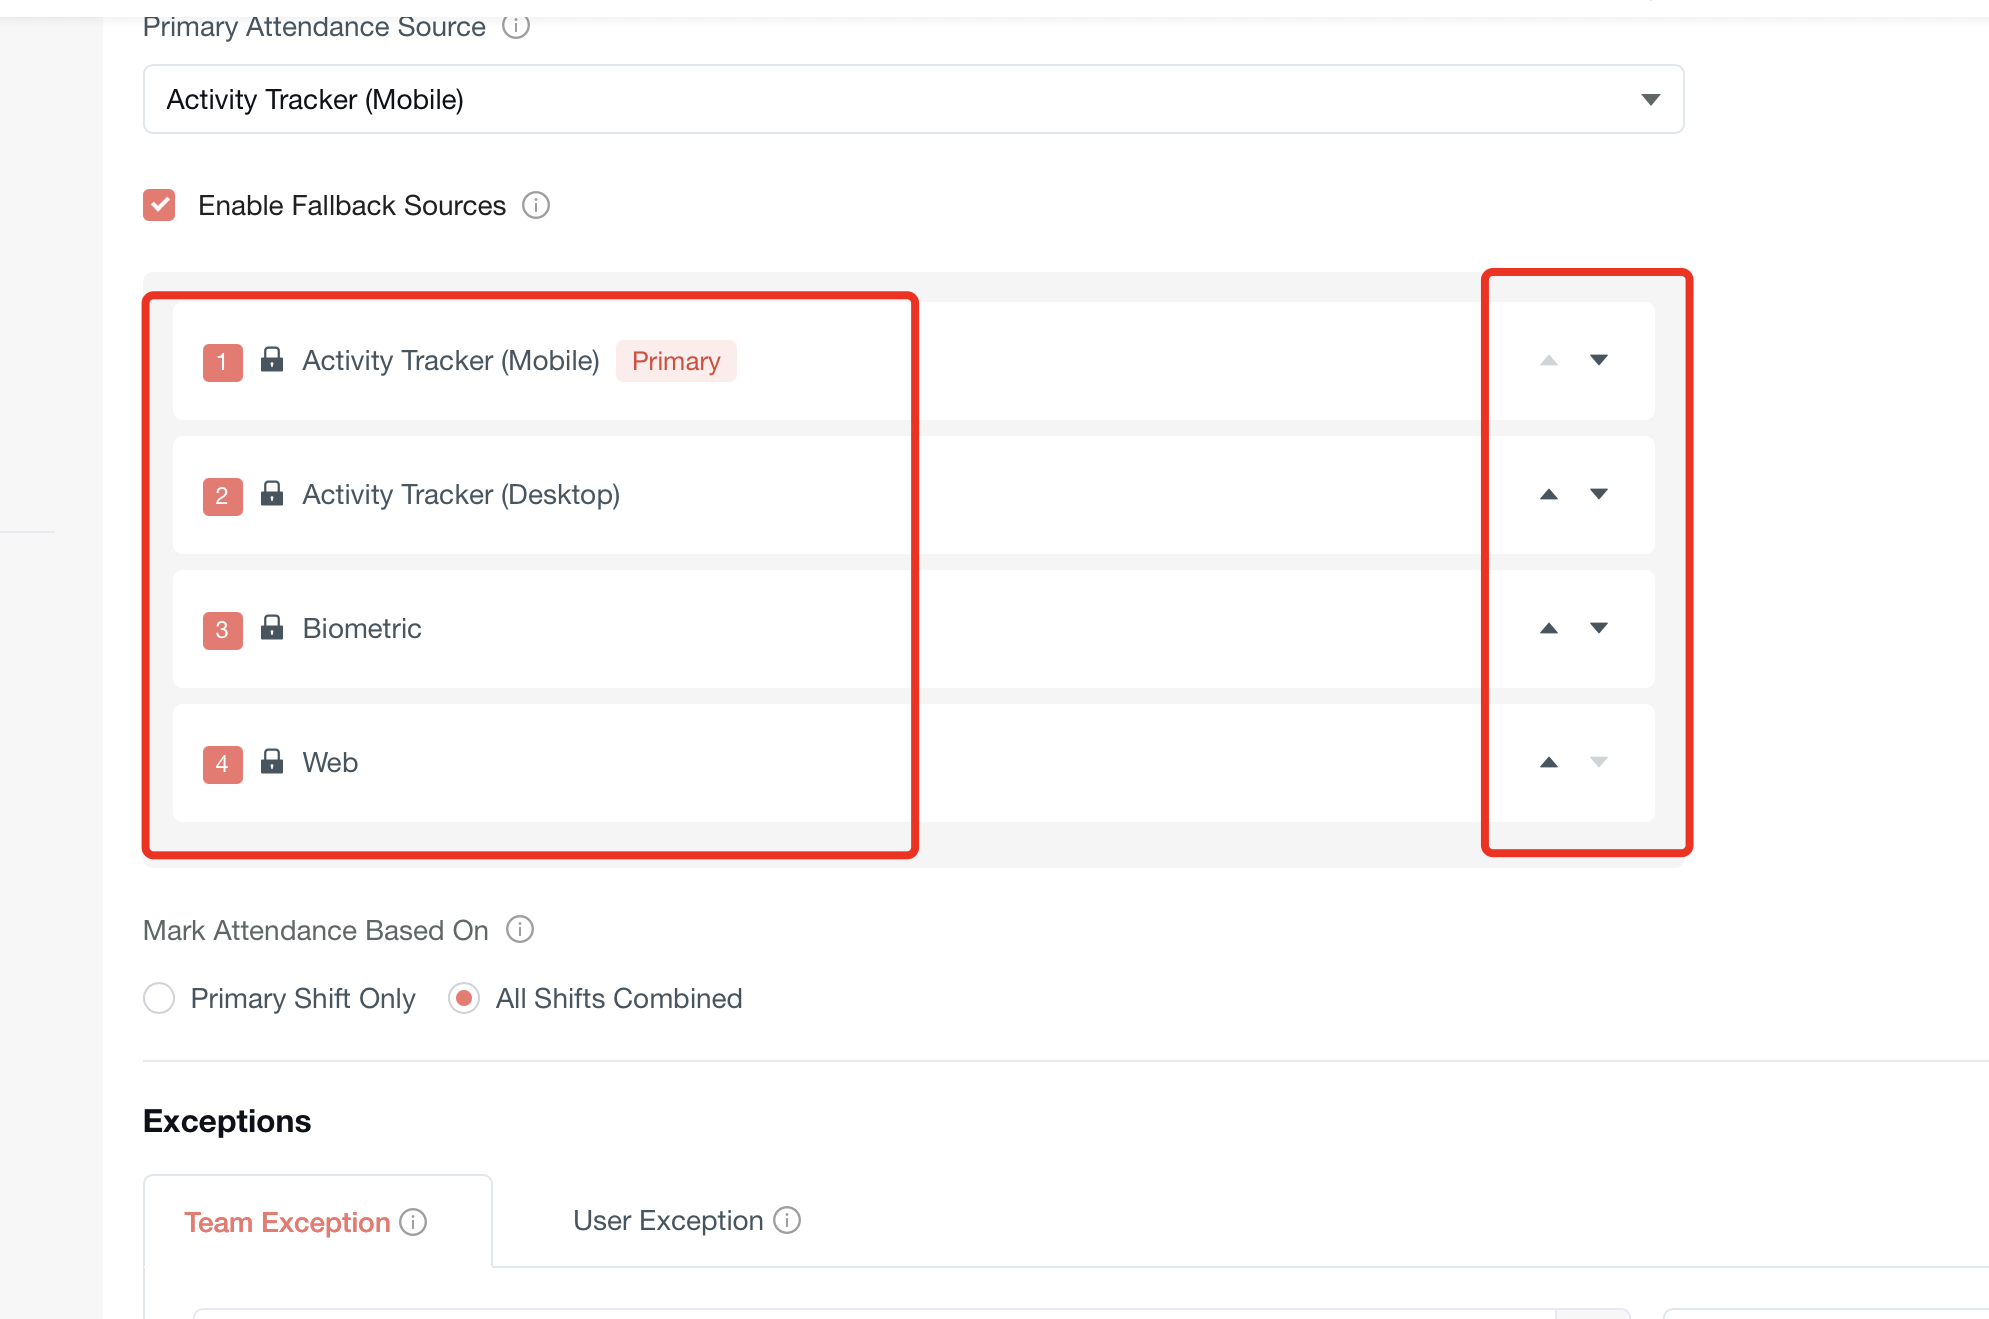
All available attendance sources are listed in order of priority.
-
Admins can adjust the order using the up/down arrows.
-
Example: Activity Tracker (Mobile) – Primary, Activity Tracker (Desktop), Biometric, Web.
-
If fallback is enabled and the primary source (e.g., Mobile) has no data, the system checks the next source (e.g., Desktop), and so on.
Important: If any attendance source is already configured, it cannot be disabled if it is being used globally, by teams, or for user exceptions.
Configure Attendance Calculation
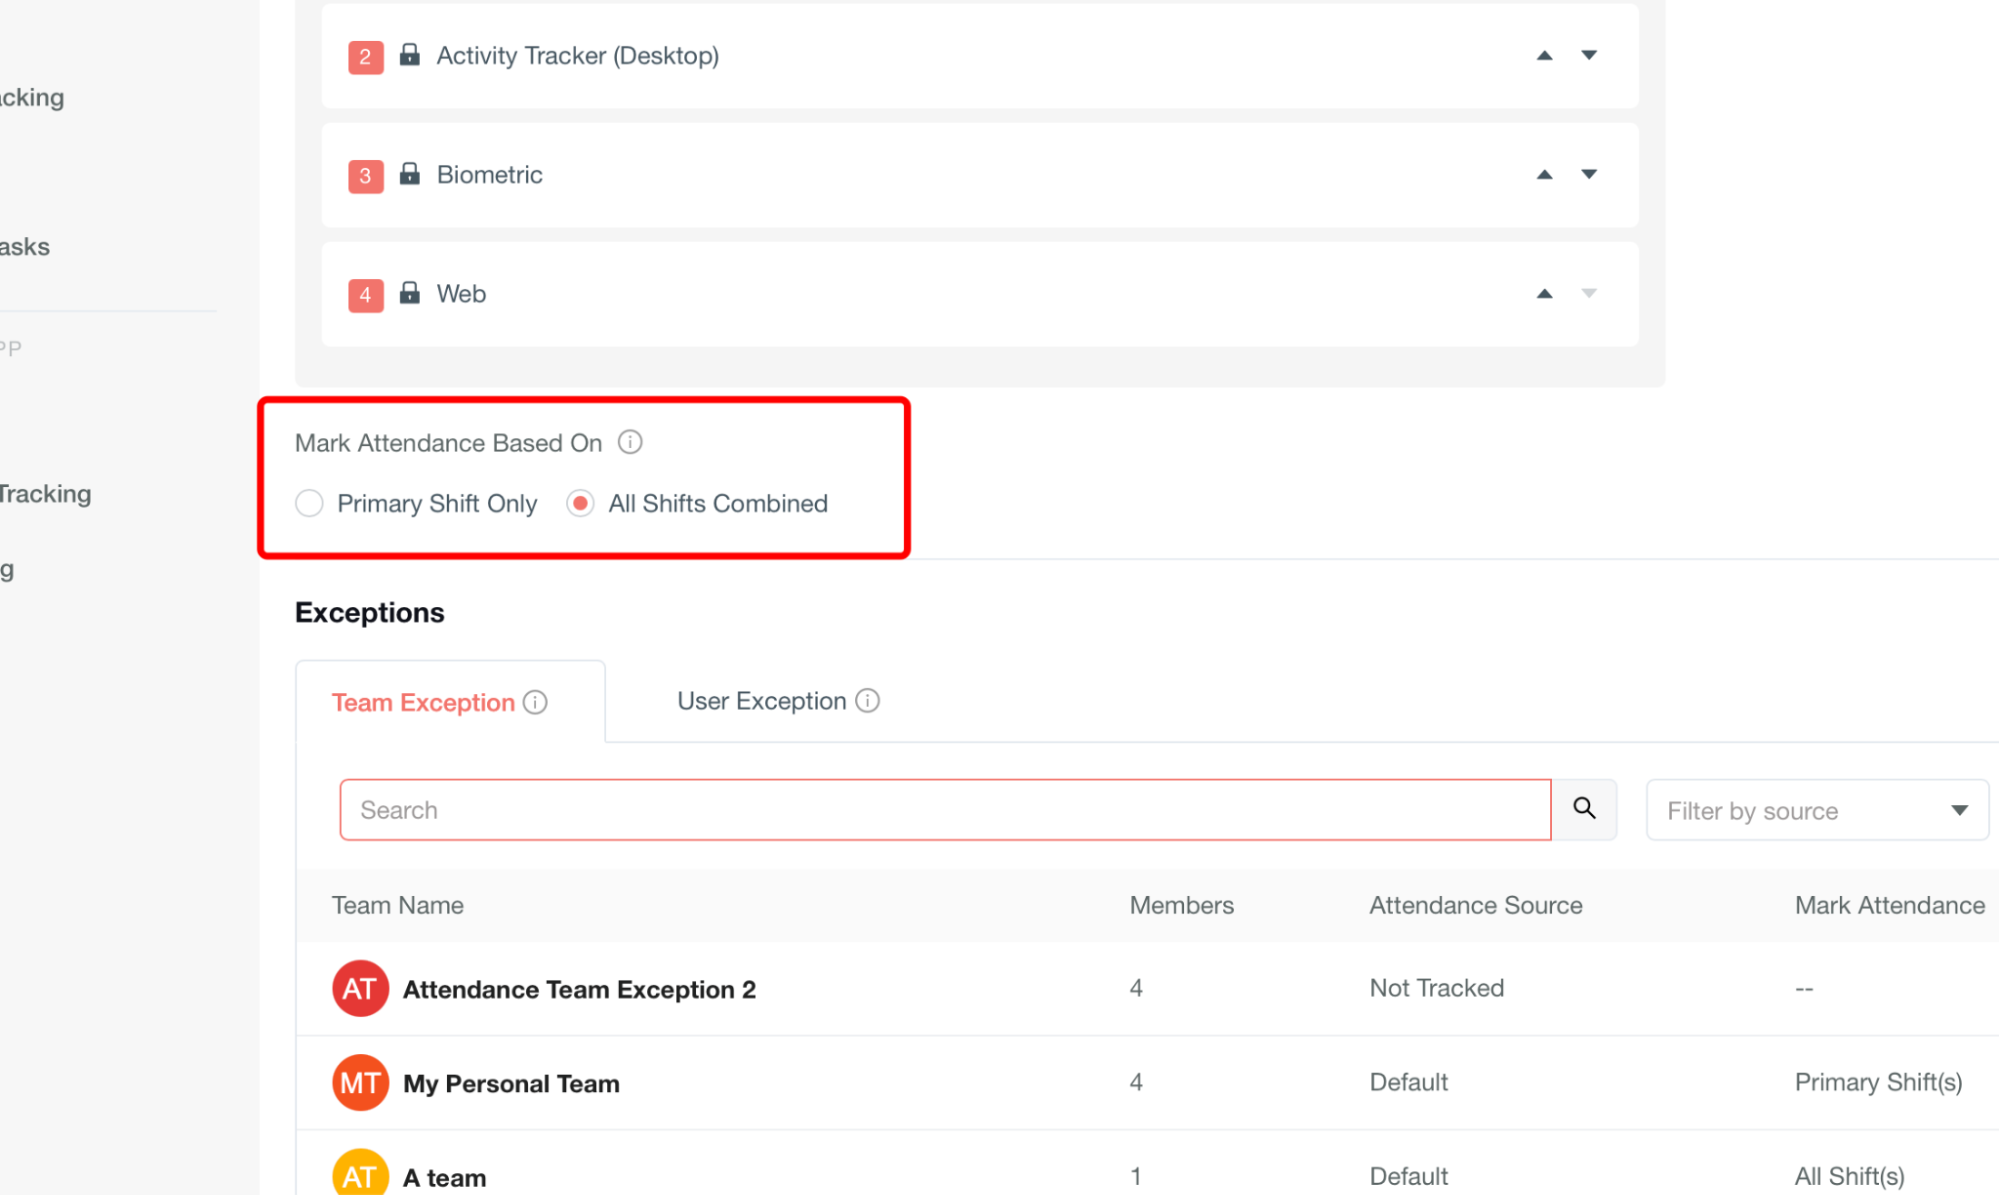
Mark Attendance Based On offers two options:
Primary Shift Only
If selected: Attendance is calculated only for the user's assigned primary shift. Any data outside the primary shift will not be counted for attendance.
All Shifts Combined
If selected: Attendance is calculated by combining data from all assigned shifts. Useful for employees who are assigned multiple shifts in a day.
Manage Team Attendance Exceptions
The Team Exception tab allows admins to configure attendance exceptions at the team level.
Header Controls
-
Search Field – Lets admins quickly find a specific team by typing its name.
-
Filter by Source – Dropdown filter to display teams based on their attendance source (e.g., Desktop, Mobile, Biometric, etc.).
-
Reset Button – Clears applied search or filters and reloads the full list.
-
Add Teams Button – Opens the interface to add new teams and configure their attendance rules.
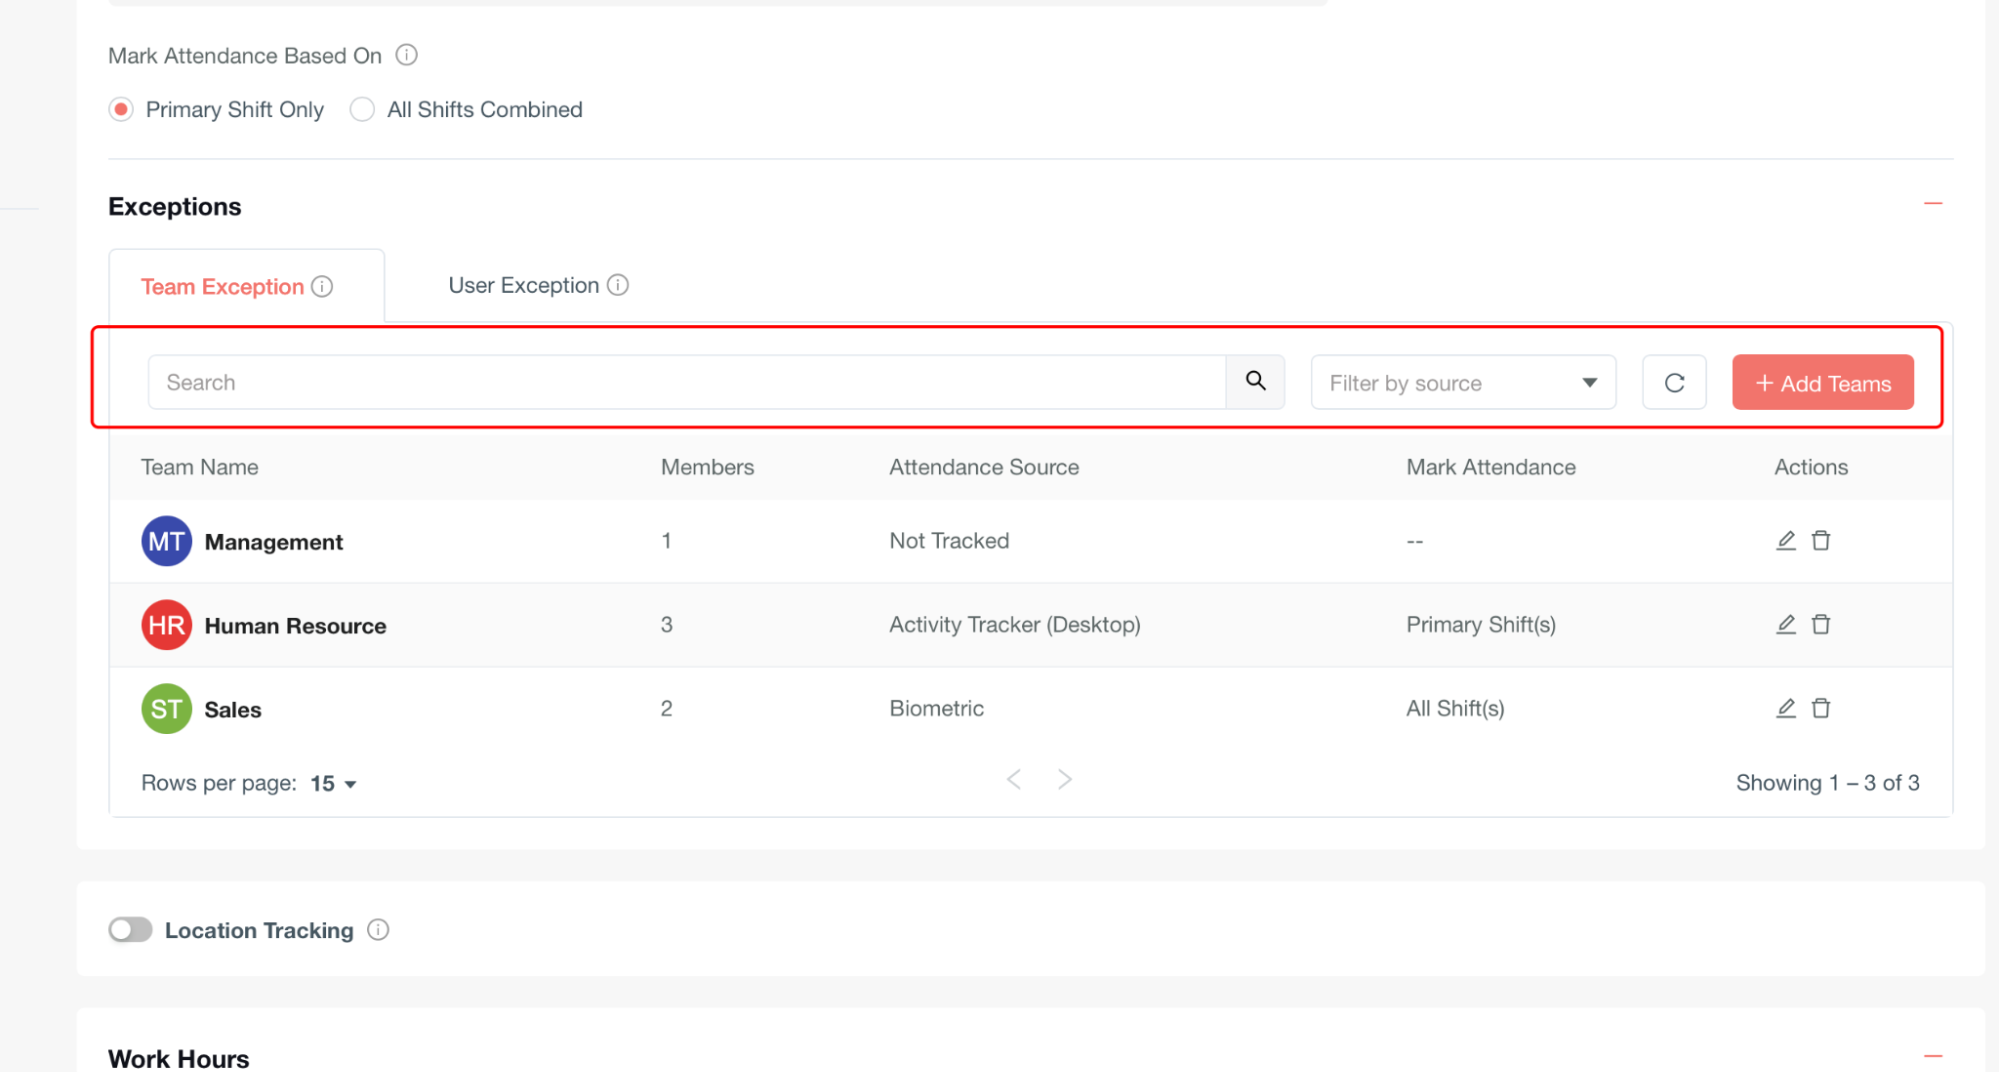
Table Columns
-
Team Name – Name of the team.
-
Members – Number of employees in that team.
-
Attendance Source – Selected method of tracking attendance (e.g., Not Tracked, Default, Activity Tracker (Desktop)).
-
Mark Attendance – Attendance calculation method (e.g., Primary Shift(s), All Shifts).
-
Actions – Options to Edit or Delete the team's configuration.
Add Teams to Attendance Exception
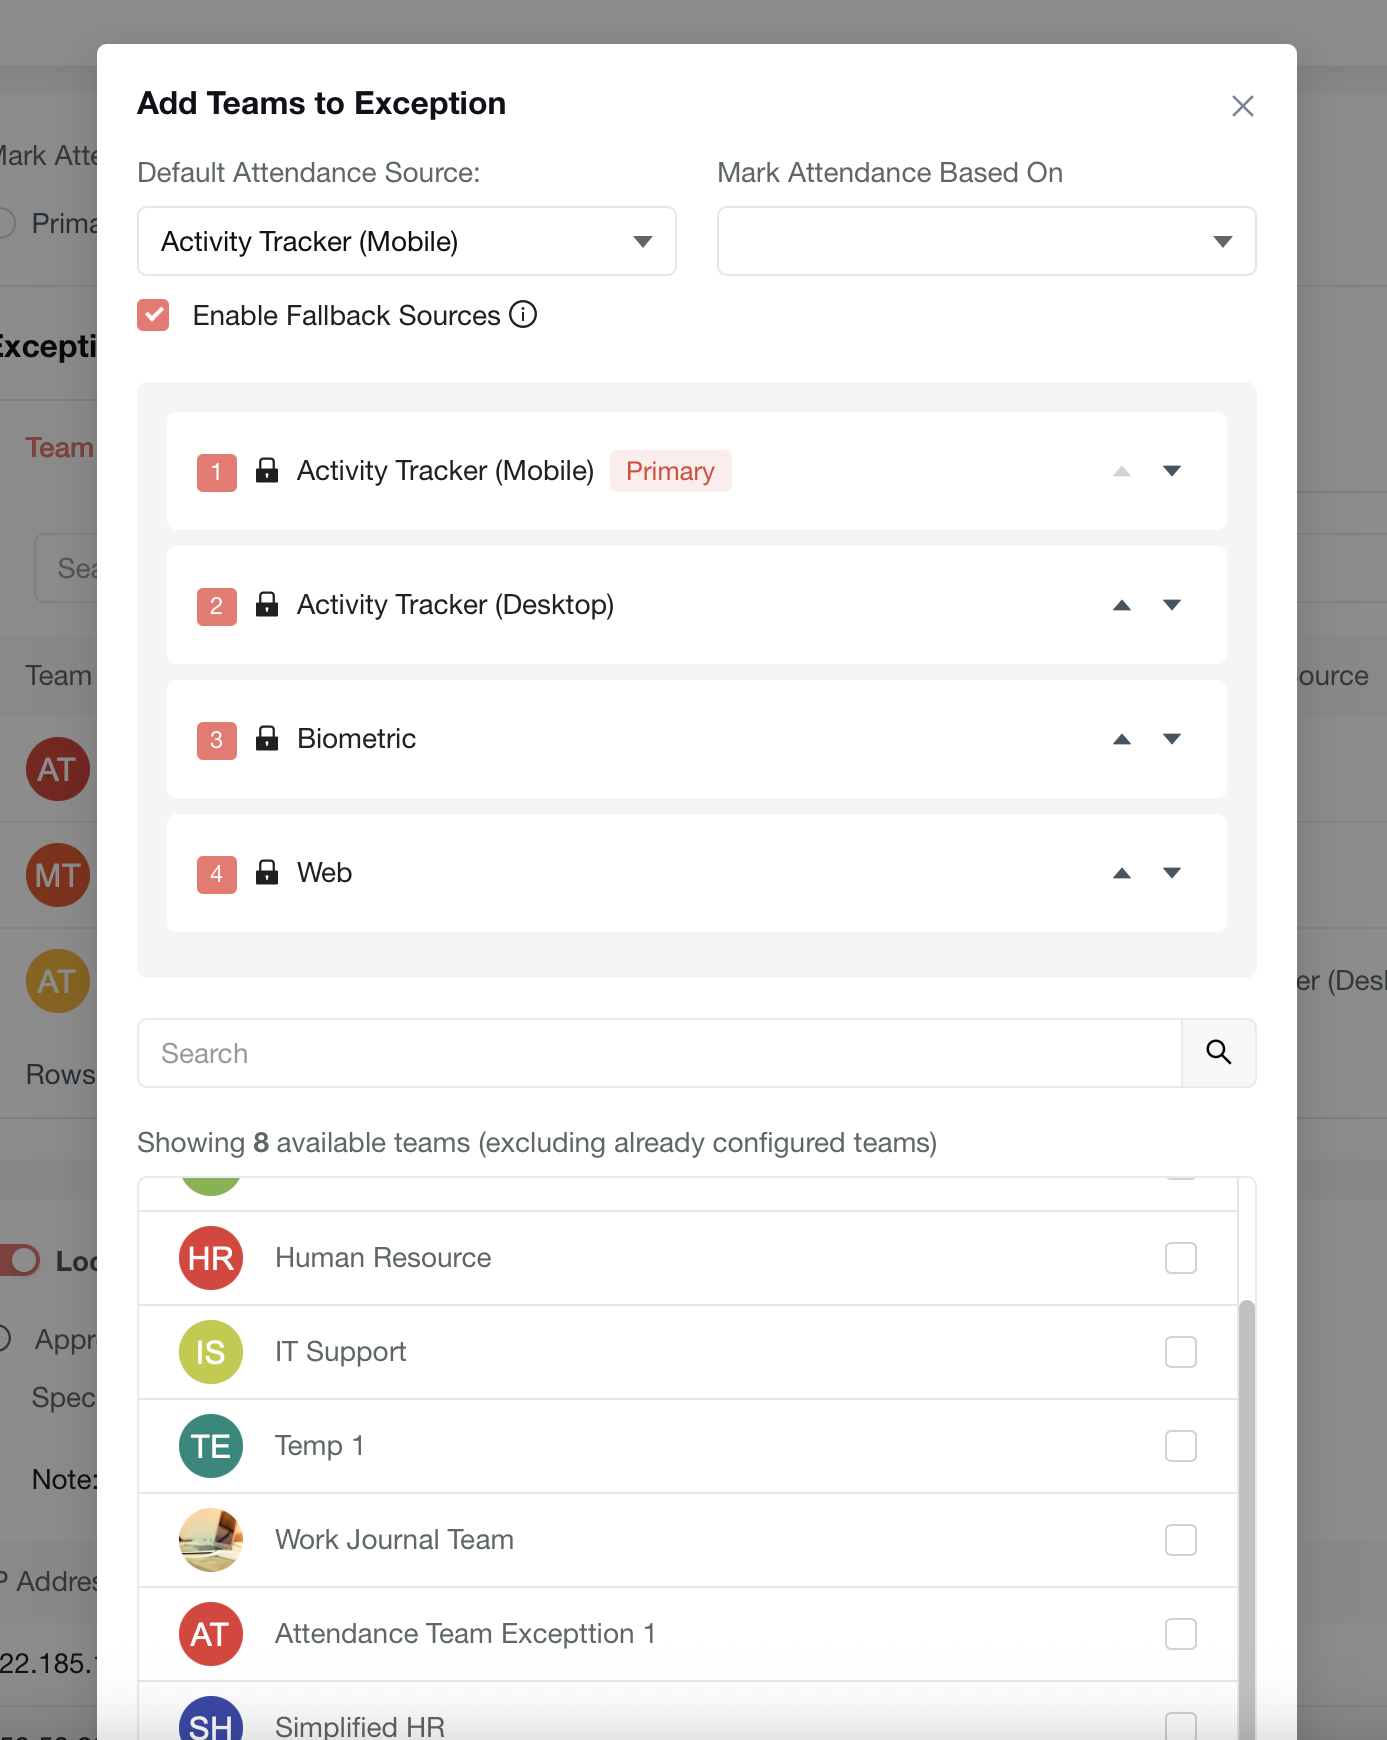
This modal allows admins to add one or more teams to the exception list with customized attendance tracking rules.
Configuration Options
-
Default Attendance Source – Choose the primary method for tracking team attendance (e.g., Desktop, Mobile, Biometric, Web).
-
Mark Attendance Based On – Primary Shift Only (based only on the employee's main shift) or All Shifts (combines all assigned shifts for attendance).
-
Enable Fallback Sources – When checked, additional sources are used in sequence if the default source is unavailable.
-
Fallback Priority Order – Sources are listed with a drag-and-drop order (e.g., Desktop → Mobile → Biometric → Web). The first one is tagged as Primary.
Team Selection Area
-
Search Field – Search available teams by name.
-
Team List – Displays all teams that can be added (already configured teams are excluded).
-
Checkboxes – Select one or multiple teams to apply the configuration.
Edit Team Attendance Configuration
When editing a team configuration:
-
Default Attendance Source – Defines the main method of capturing attendance (e.g., Desktop, Mobile, Biometric, Web).
-
Mark Attendance Based On – Primary Shift Only (uses only the employee's assigned primary shift) or All Shifts (combines attendance from all assigned shifts).
-
Enable Fallback Sources – When enabled, the system checks backup sources in the defined priority order if the default source fails.
-
Priority Order – Admins can arrange sources in sequence (e.g., Desktop → Mobile → Biometric → Web). The top source is marked as Primary.
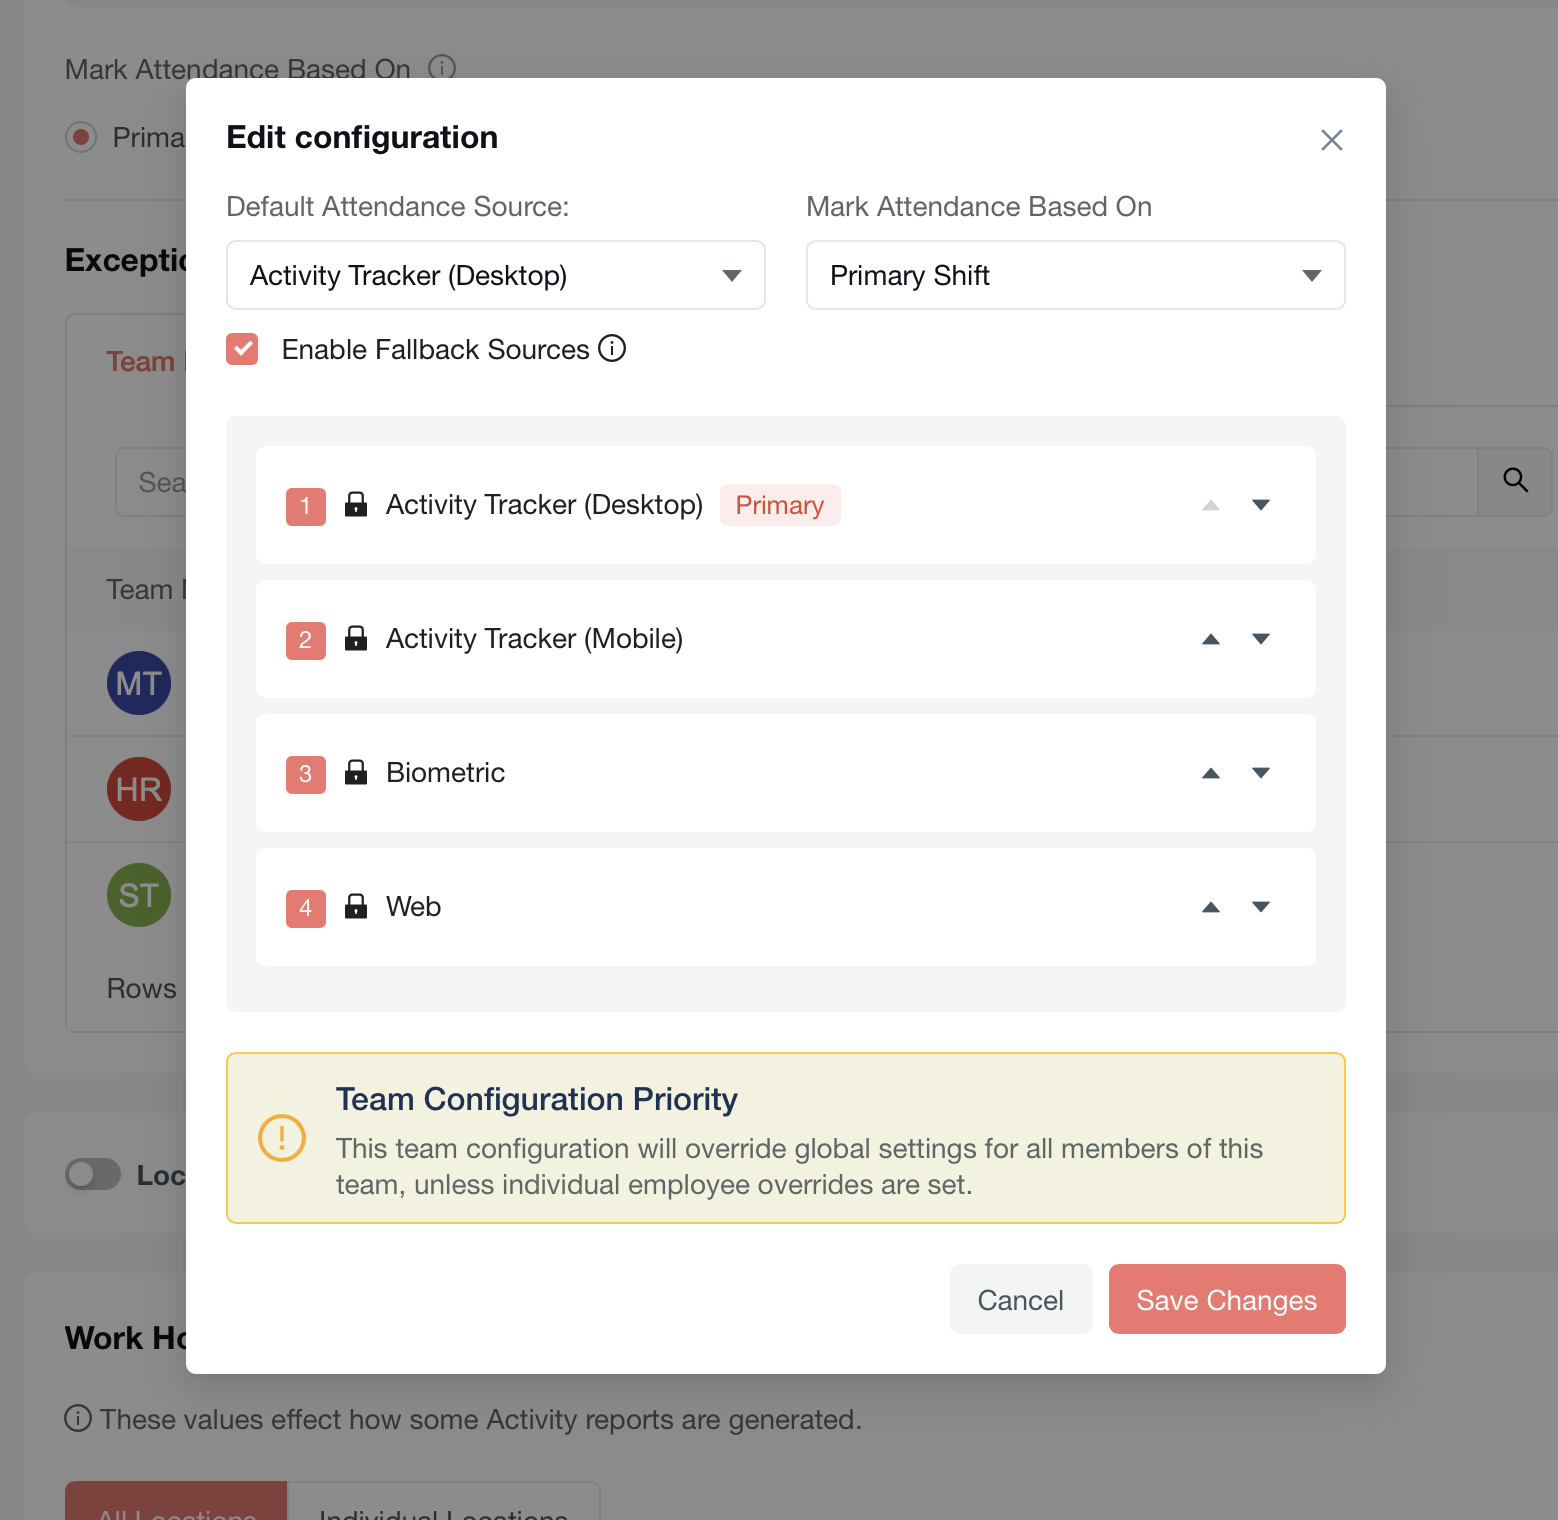
Important: Team Configuration Priority: Team-level settings override global attendance configurations for all members unless individual employee overrides are applied.
Delete Team Attendance Exception
From the Actions column of the Team Exception table, admins can select Delete to remove a team's attendance configuration.
Configure Location Tracking
The Location Tracking module helps determine whether users are working from the office or remotely by validating their connected IP address against the configured list.
How it Works
-
If a user connects from a configured IP address, their status is marked as Office.
-
If a user connects from an unconfigured (non-listed) IP address, their status is marked as Remote.
This location information is reflected in:
-
Activity Report
-
Timesheet
-
In Status
Enable/Disable Tracking – The toggle switch at the top allows admins to turn Location Tracking on or off.
Add Location Tracking IP
Admins can configure static IP addresses and map them to:
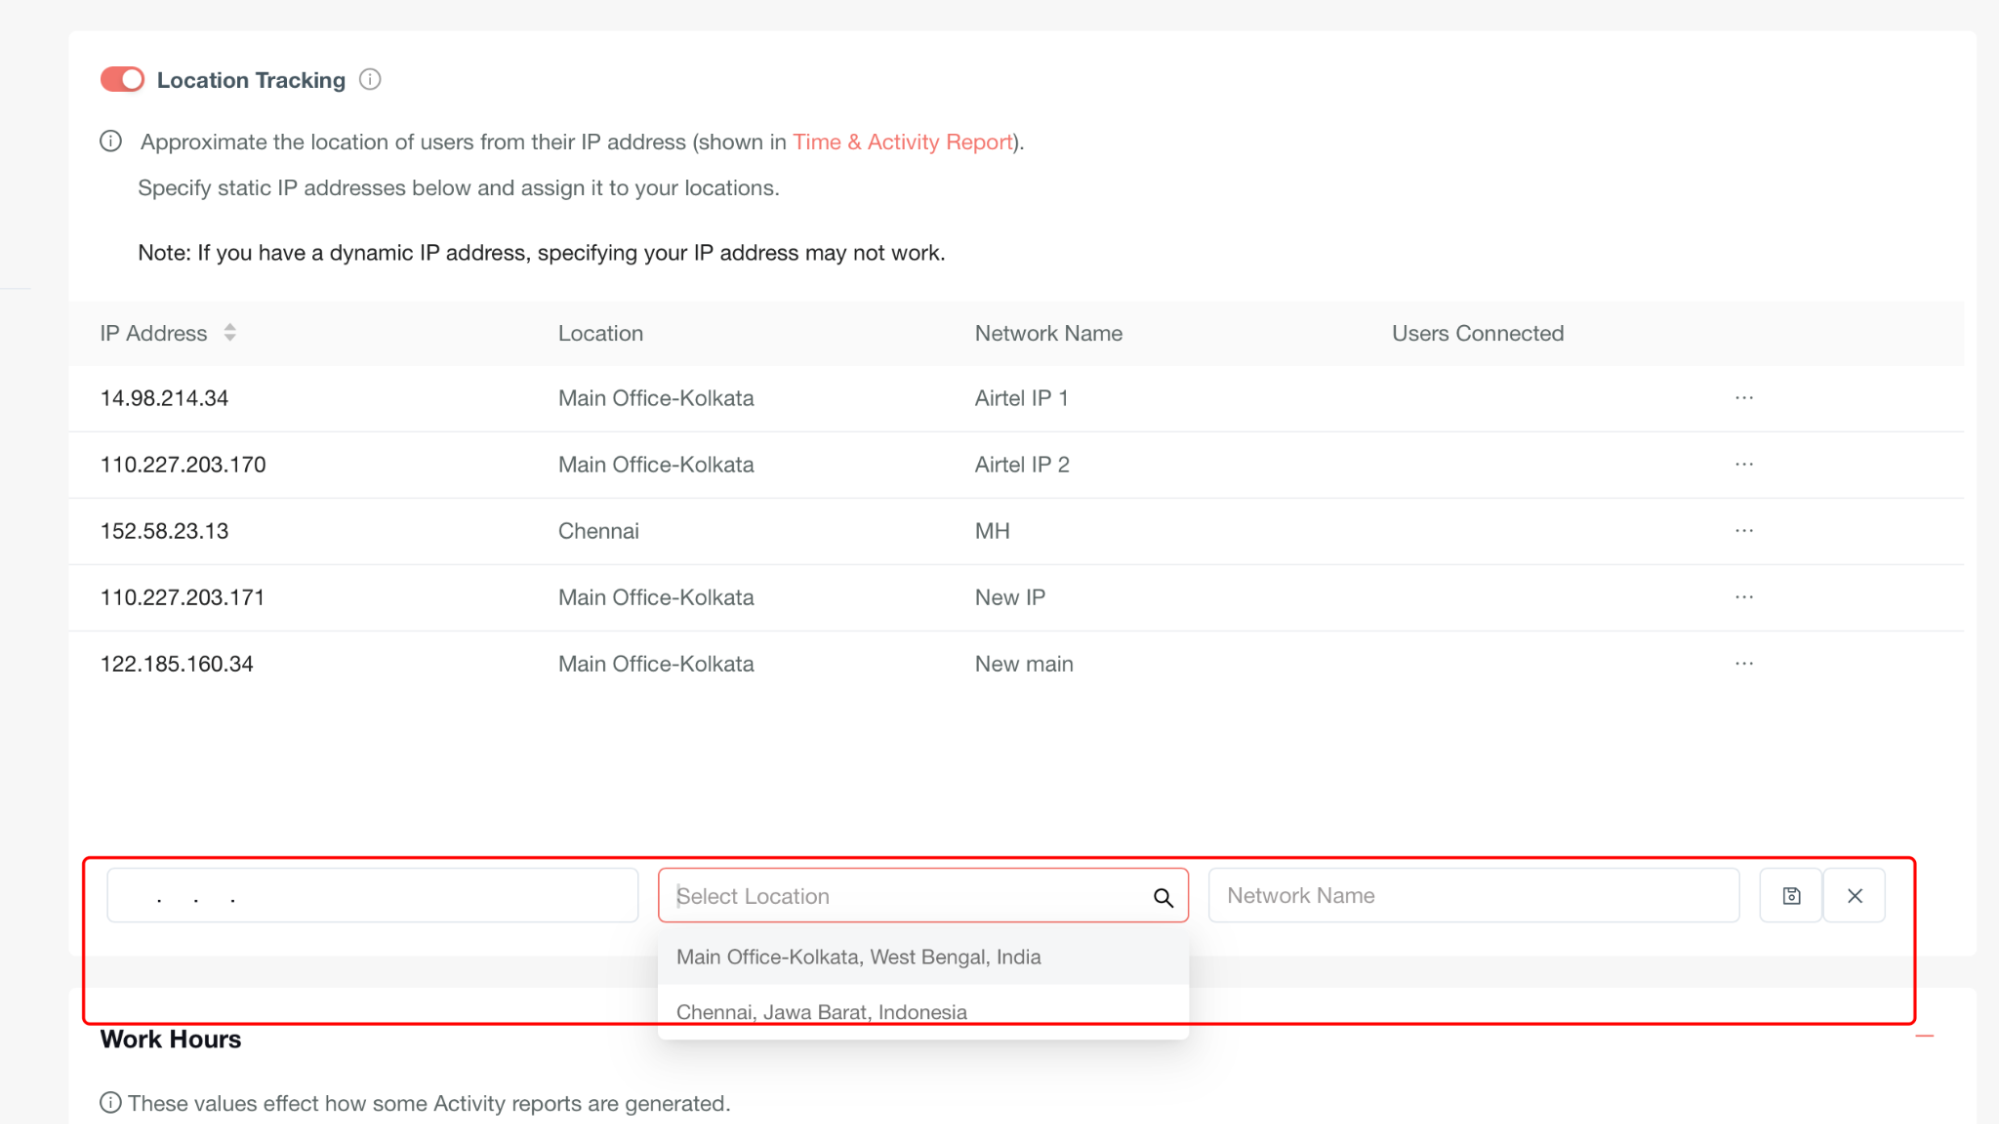
Important: If users connect via dynamic IPs, tracking may not be reliable.
IP Address Table Details
-
IP Address – The exact static IP being tracked.
-
Location – Office/branch/area label assigned by admin.
-
Network Name – Helps identify the network associated with the IP.
-
Users Connected – Displays how many users are currently connected from this IP.
Configure Work Hours
The Work Hours settings allow administrators to configure standard working time definitions and grace periods that affect how activity reports are generated within the system.
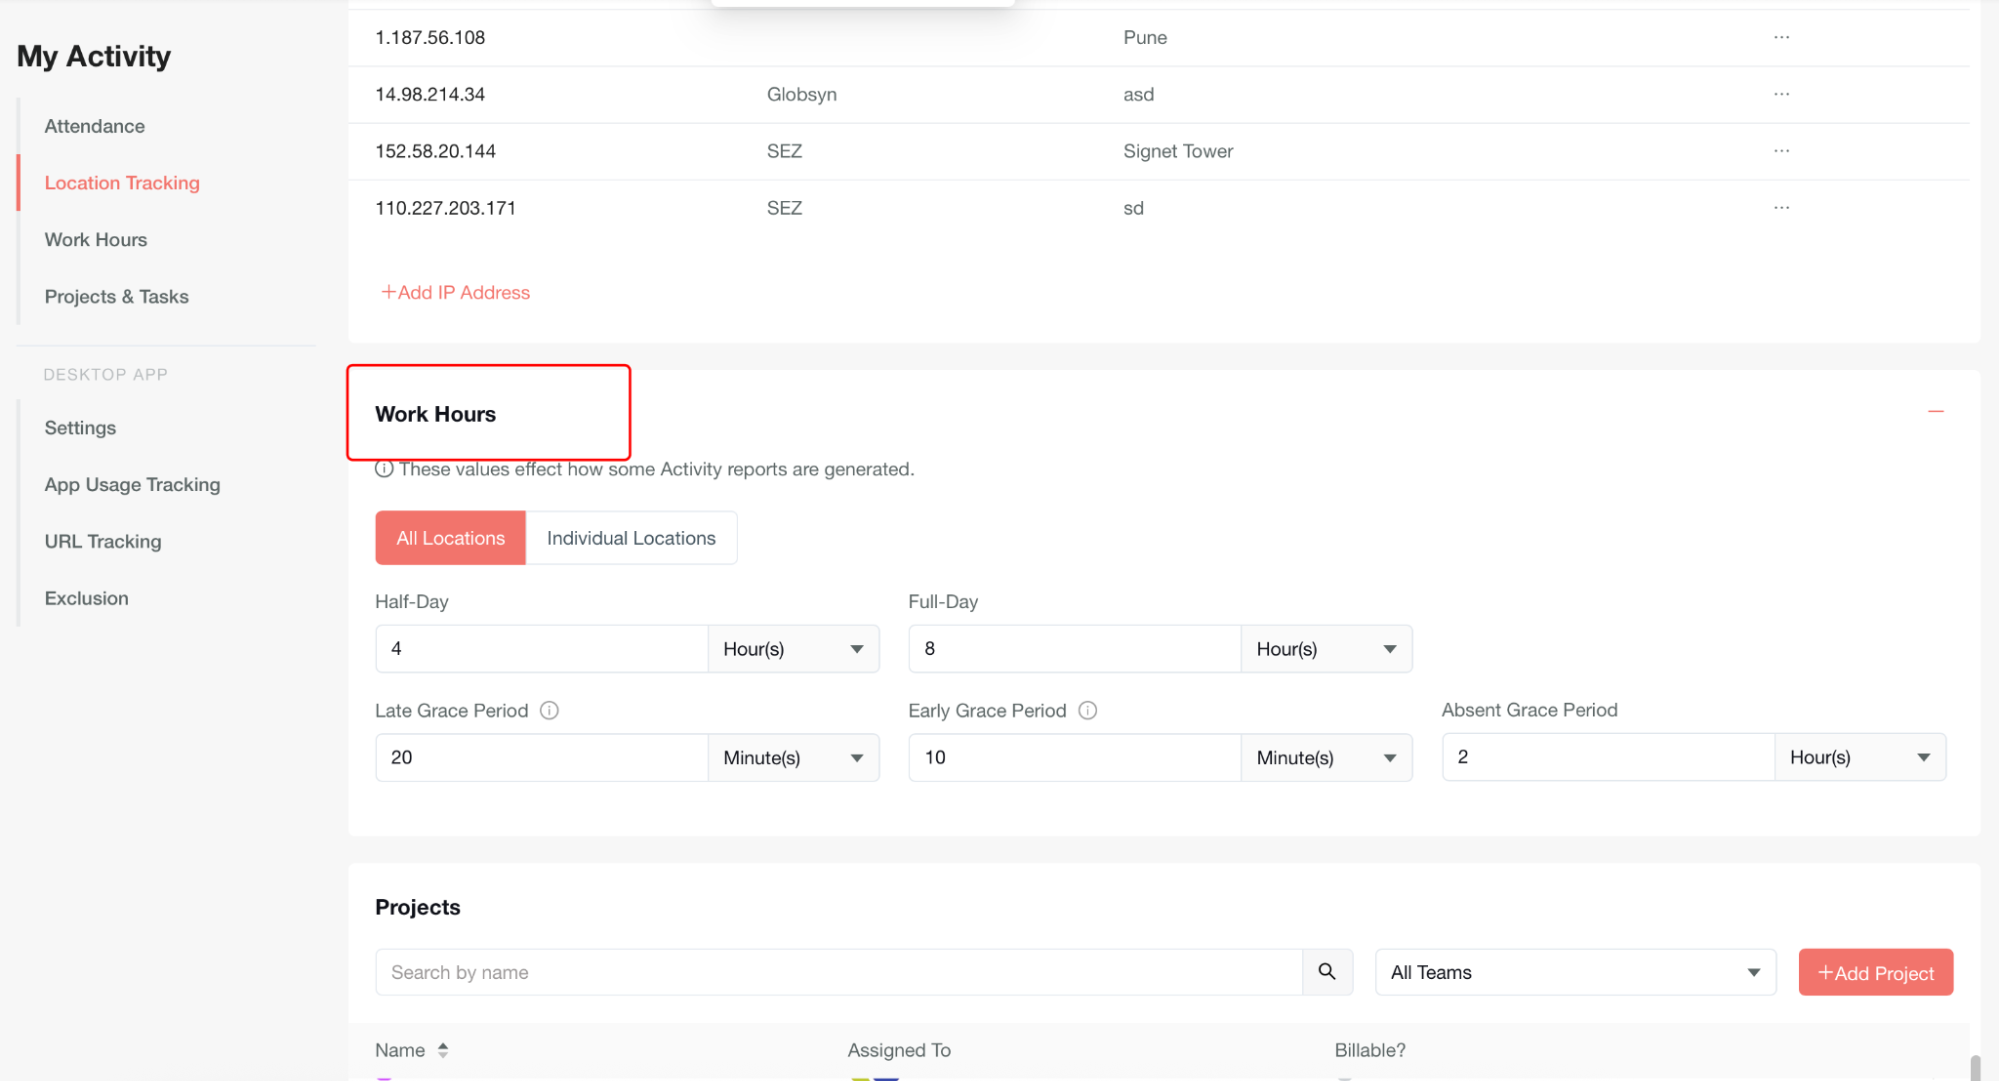
Choose Location Scope
- All Locations (default): Apply the same work hour settings across all company locations.
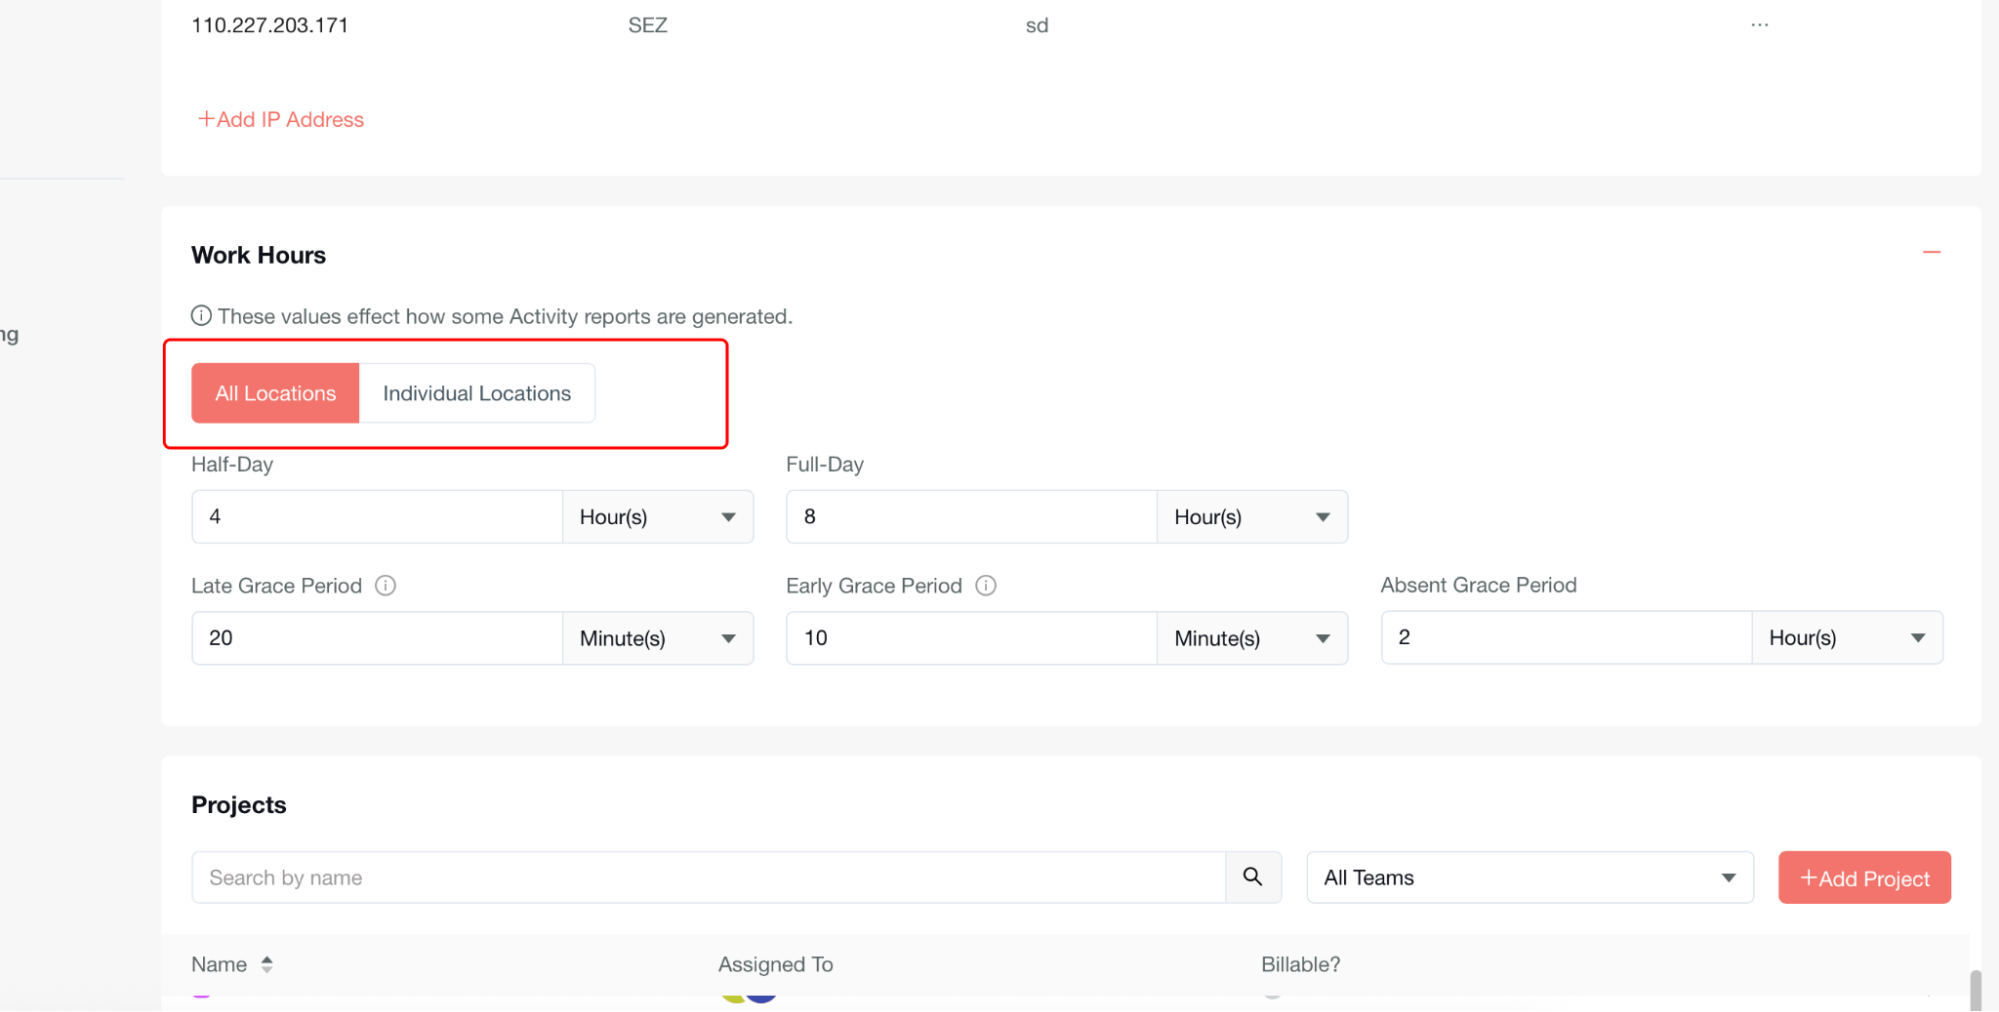
- Individual Locations: Set specific work hour configurations for different locations.
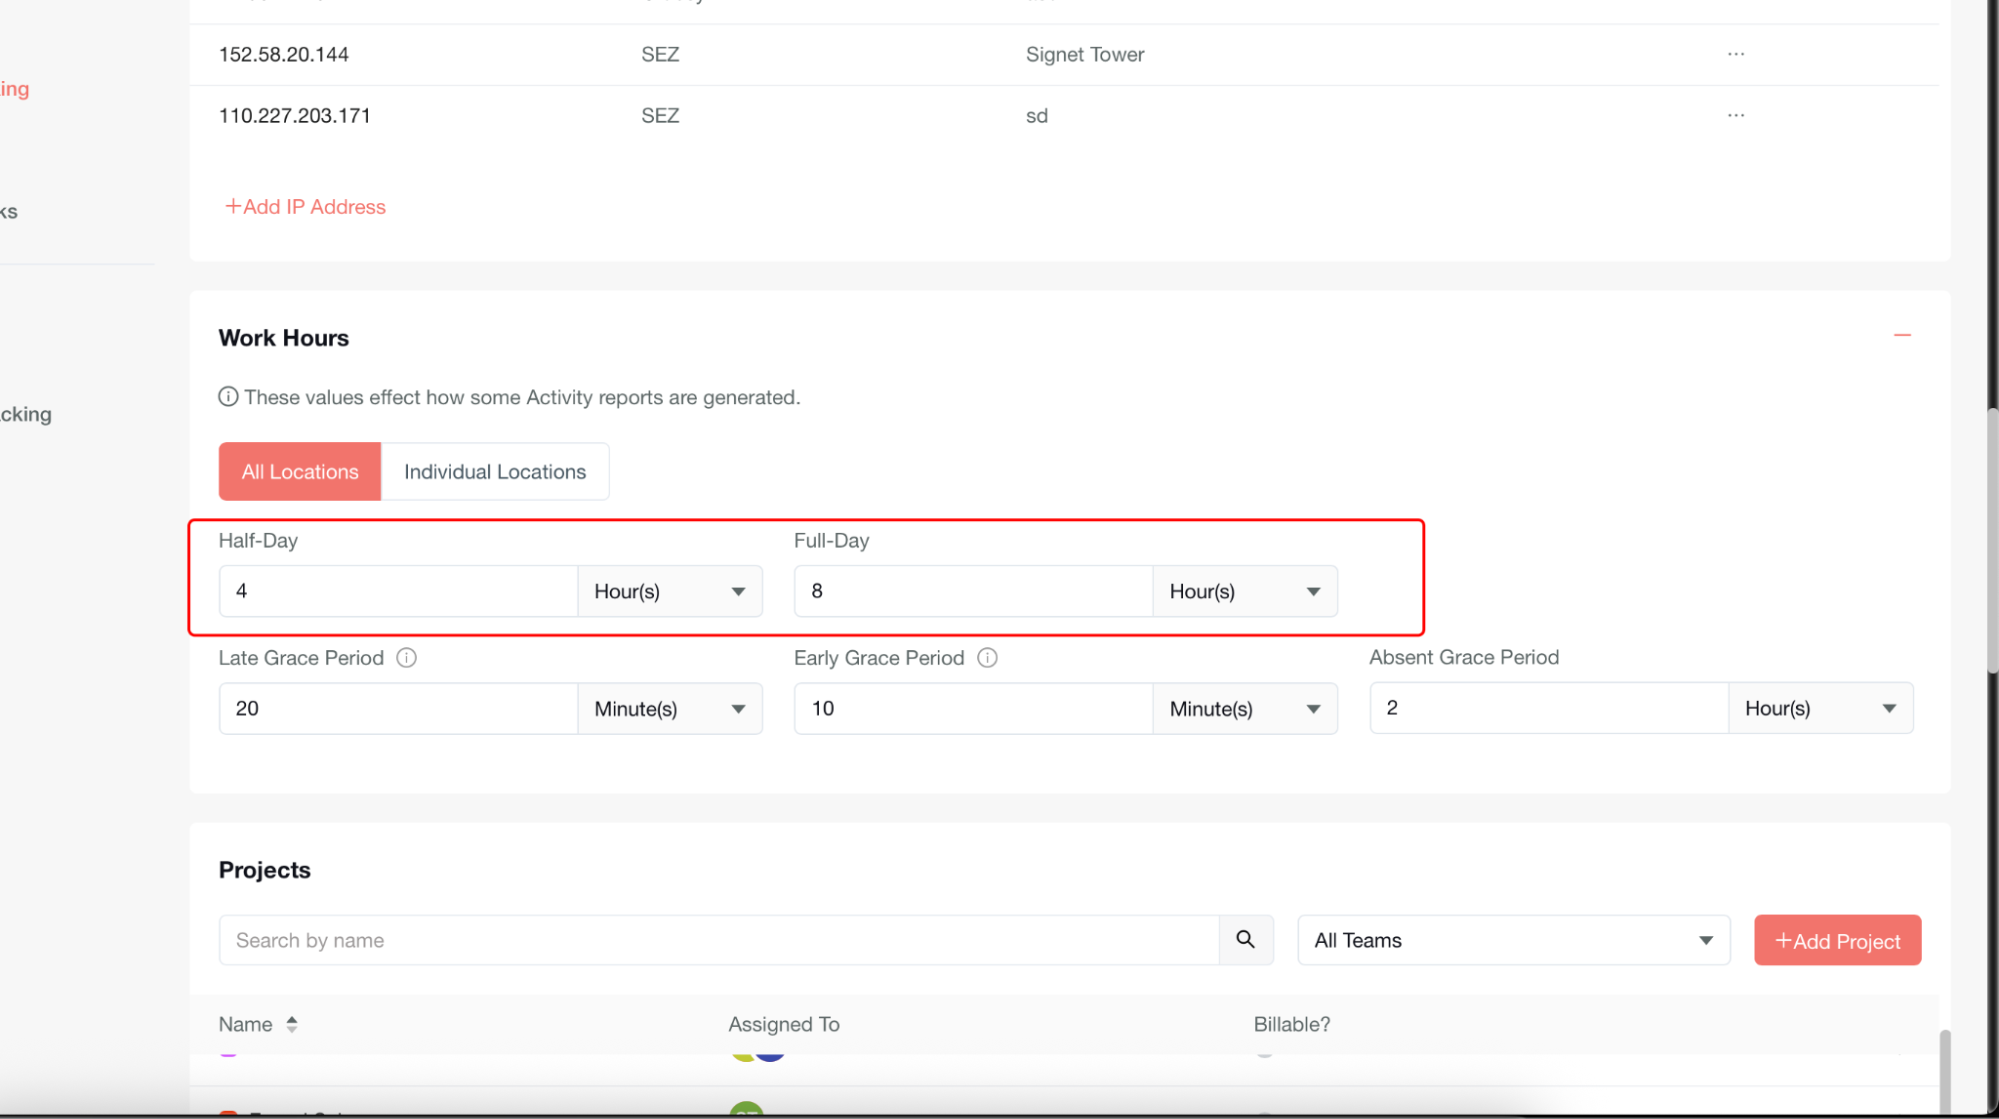
Half-Day Setting
-
Enter the number of hours that constitute a half-day.
-
Use the dropdown menu to select the time unit.
Full-Day Setting
-
Enter the number of hours for a standard full work day.
-
Use the dropdown menu to select the time unit.
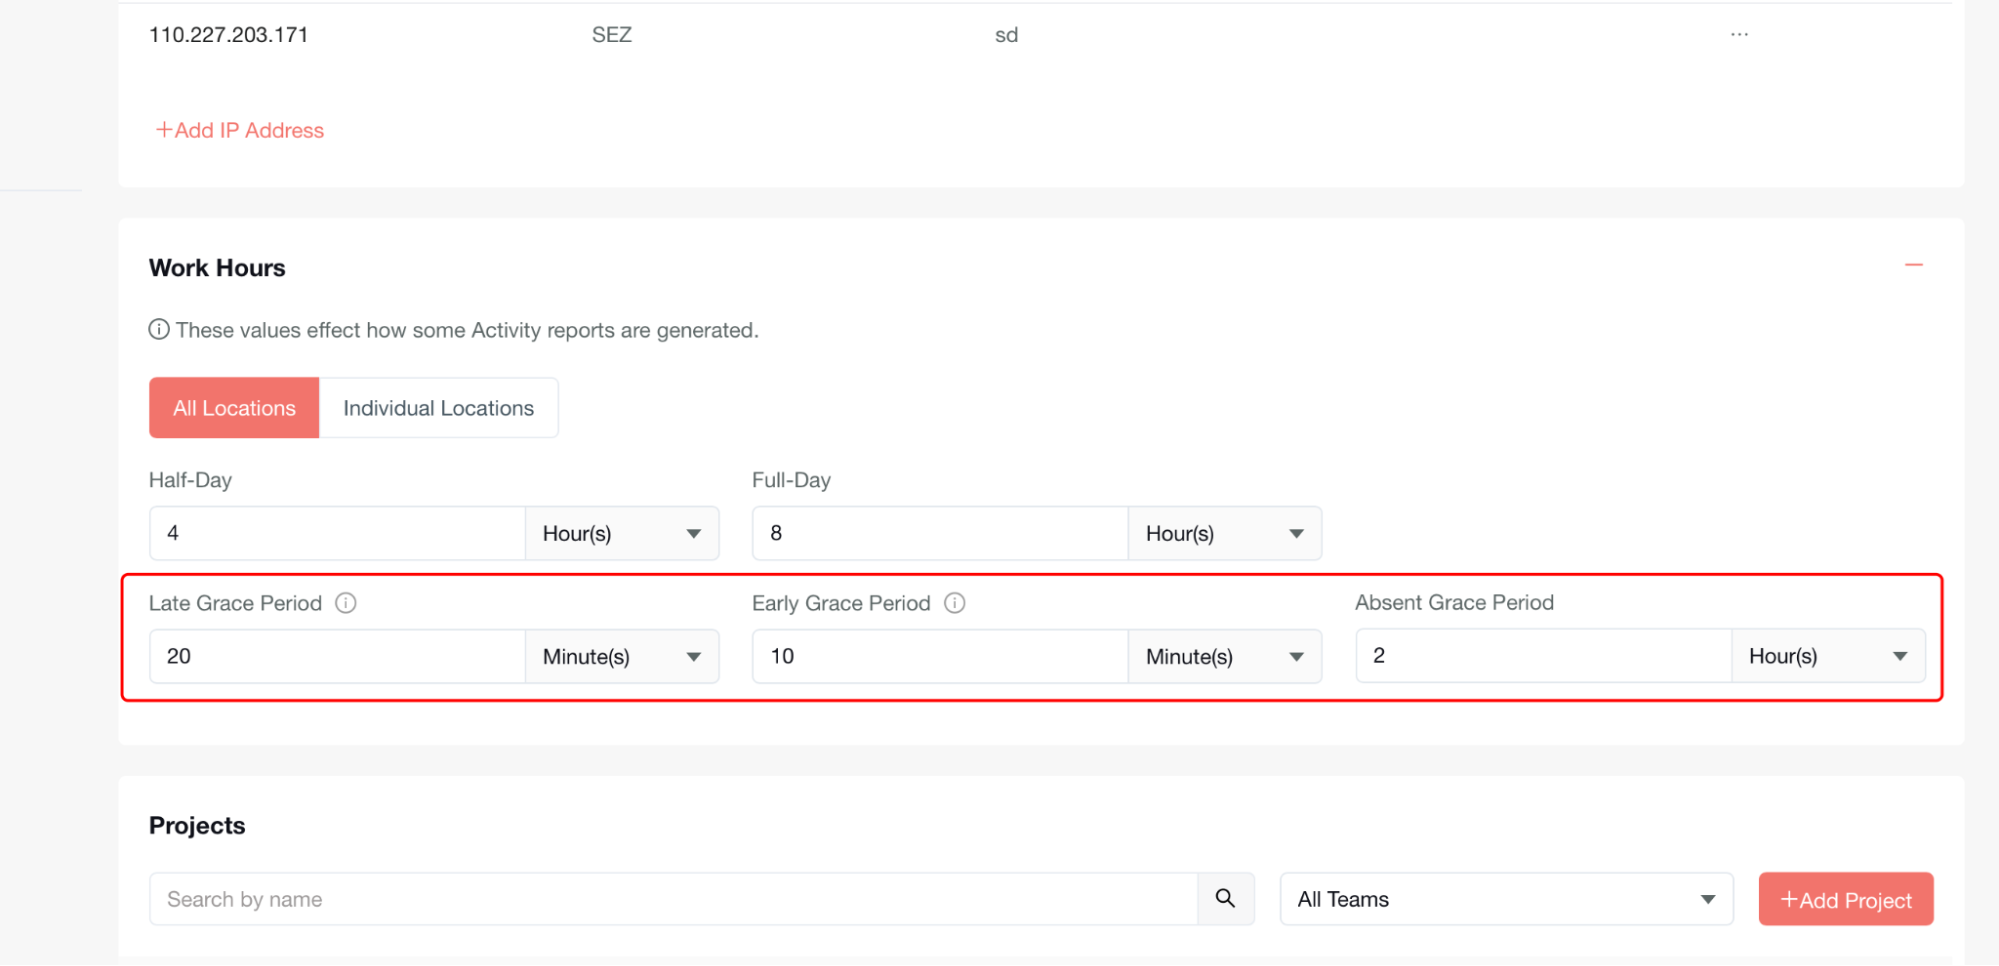
Configure Late Grace Period
-
Enter the buffer time allowed for late check-in.
-
The member will show as late if check-in occurs after the late grace period in the attendance report.
-
Select the time unit from the dropdown menu.
Configure Early Grace Period
-
Set the buffer time for early check-out.
-
The member's status will show as early if check-out occurs before the early grace period in the attendance report.
-
Select the time unit from the dropdown menu.
Configure Absent Grace Period
-
Configure the time threshold before marking someone absent.
-
The member will show as absent after the completion of the absent grace period.
-
Select the appropriate time unit from the dropdown.
Impact on Reporting: Work hours configuration directly influences employee attendance calculations, time tracking accuracy, activity report generation, and payroll-related time computations.
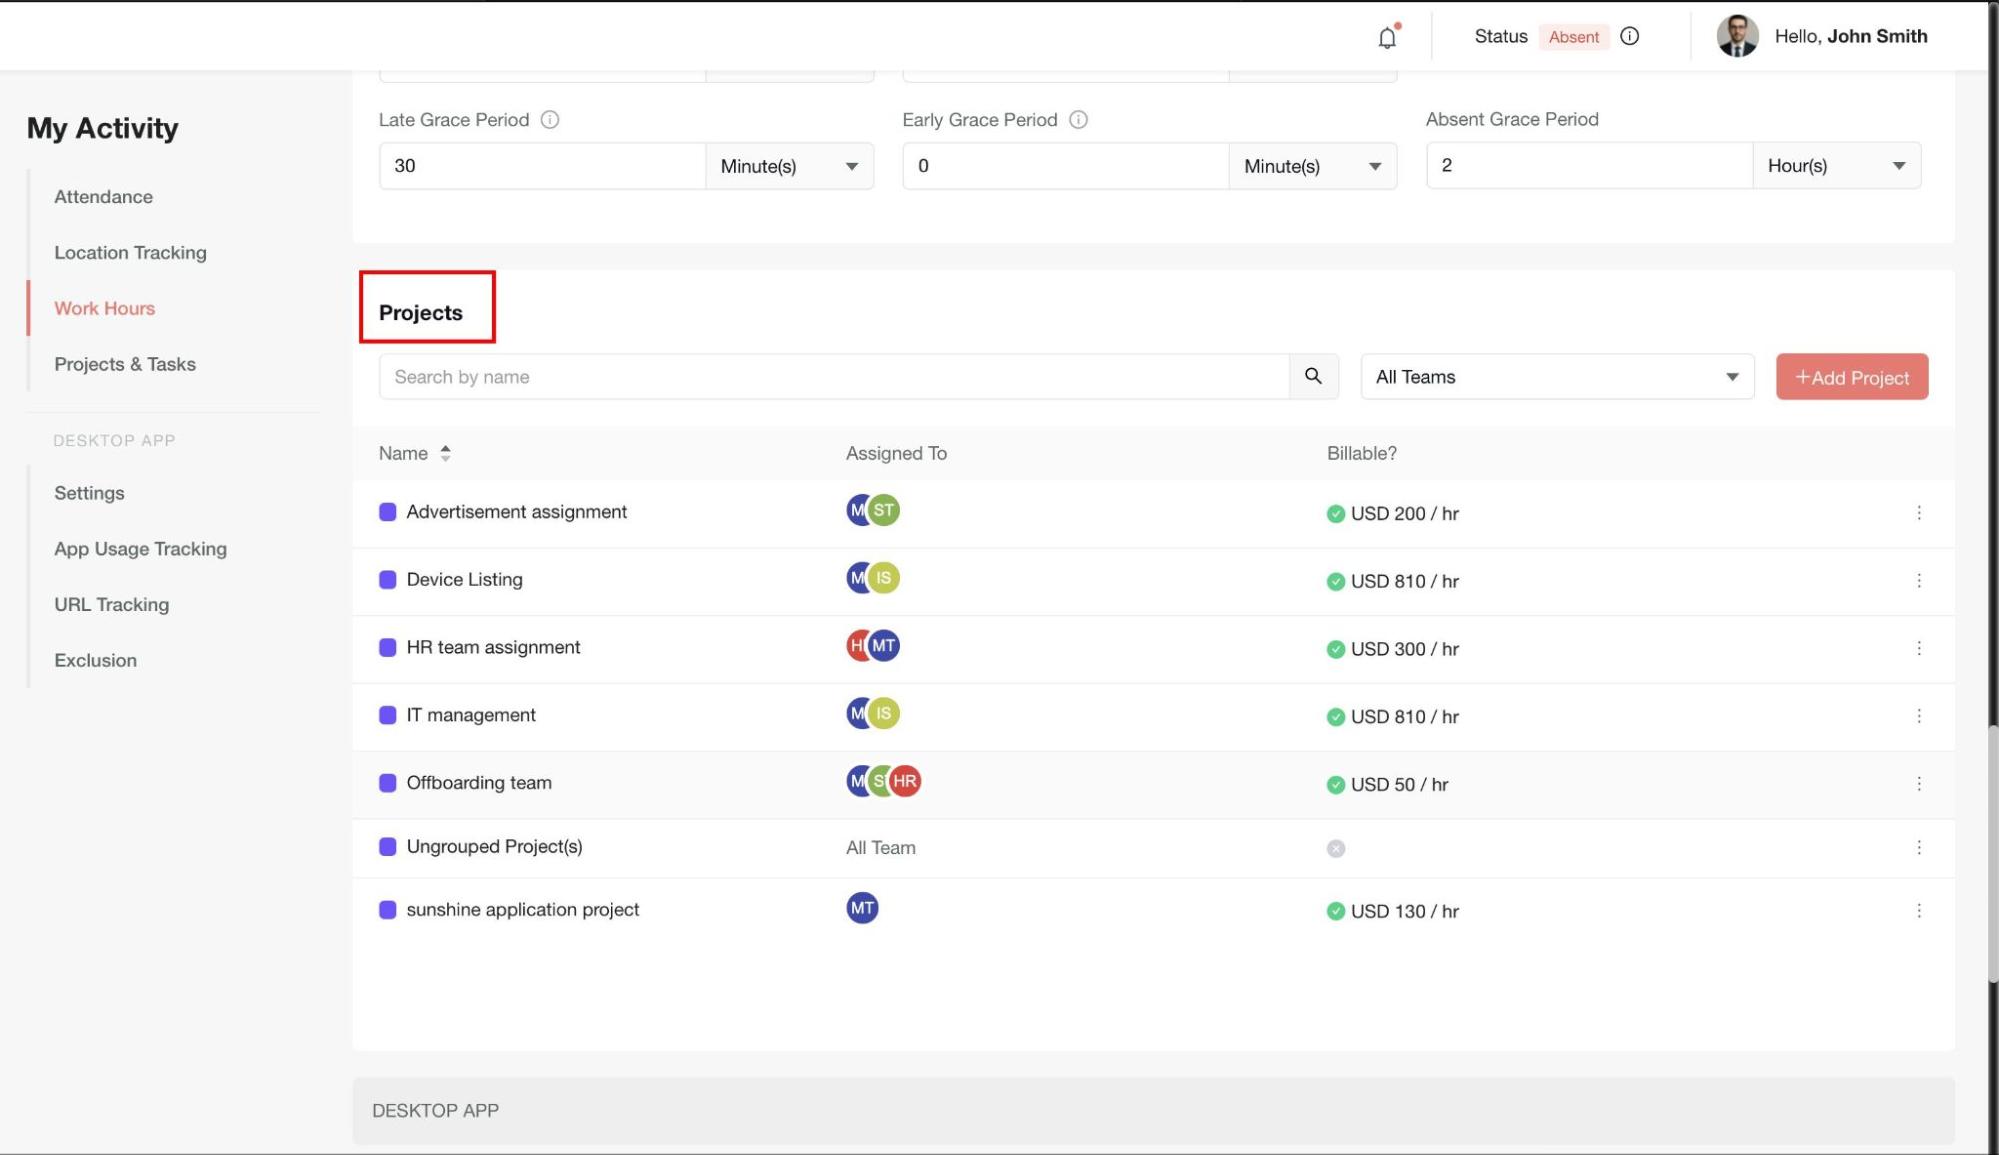
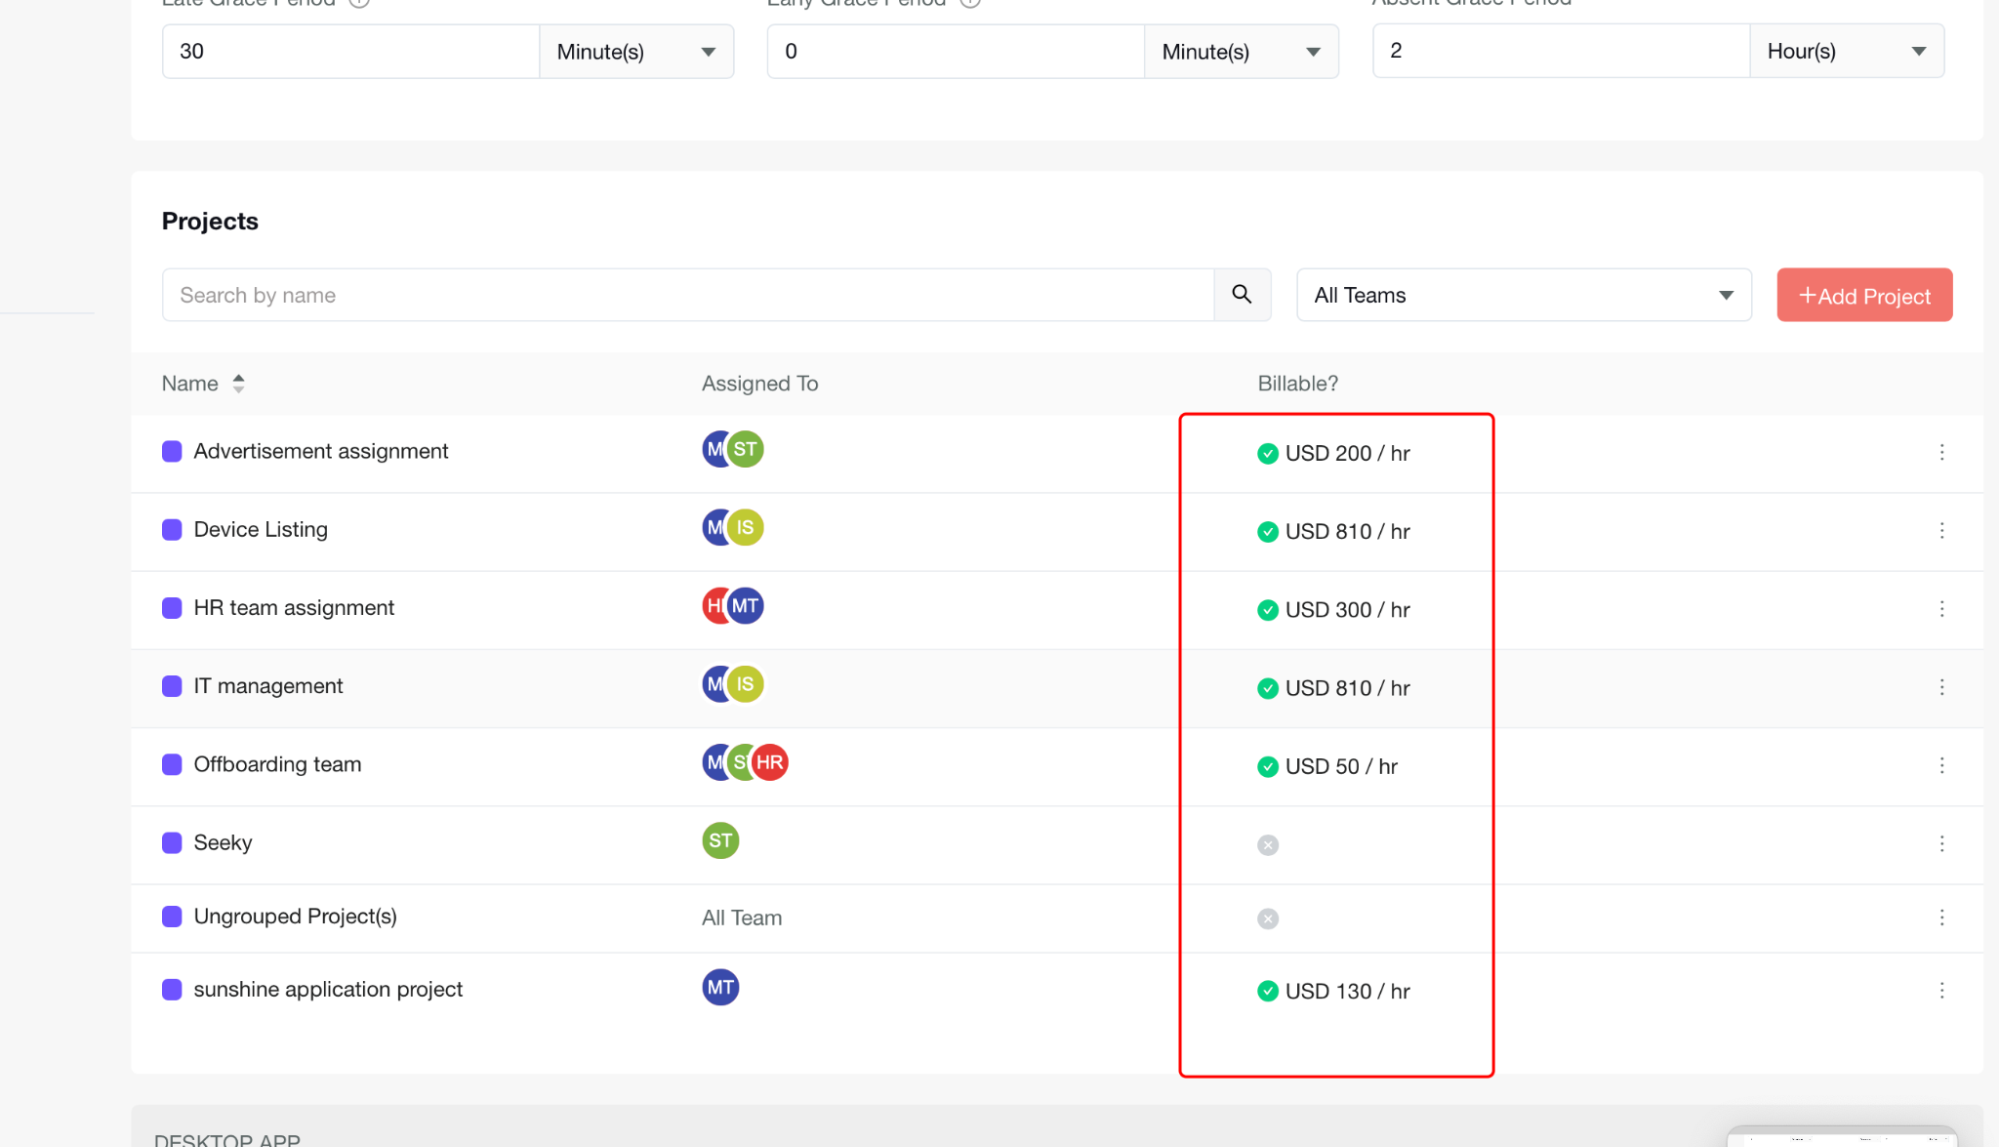
Manage Projects
The Projects module setting provides a centralized interface for managing all organizational projects, including project creation, assignment, billing configuration, and team management.
Project Search and Filtering
- Search for Specific Projects: Enter the project name or keywords, then click the search icon or press Enter to filter results. The project list updates to show matching results.
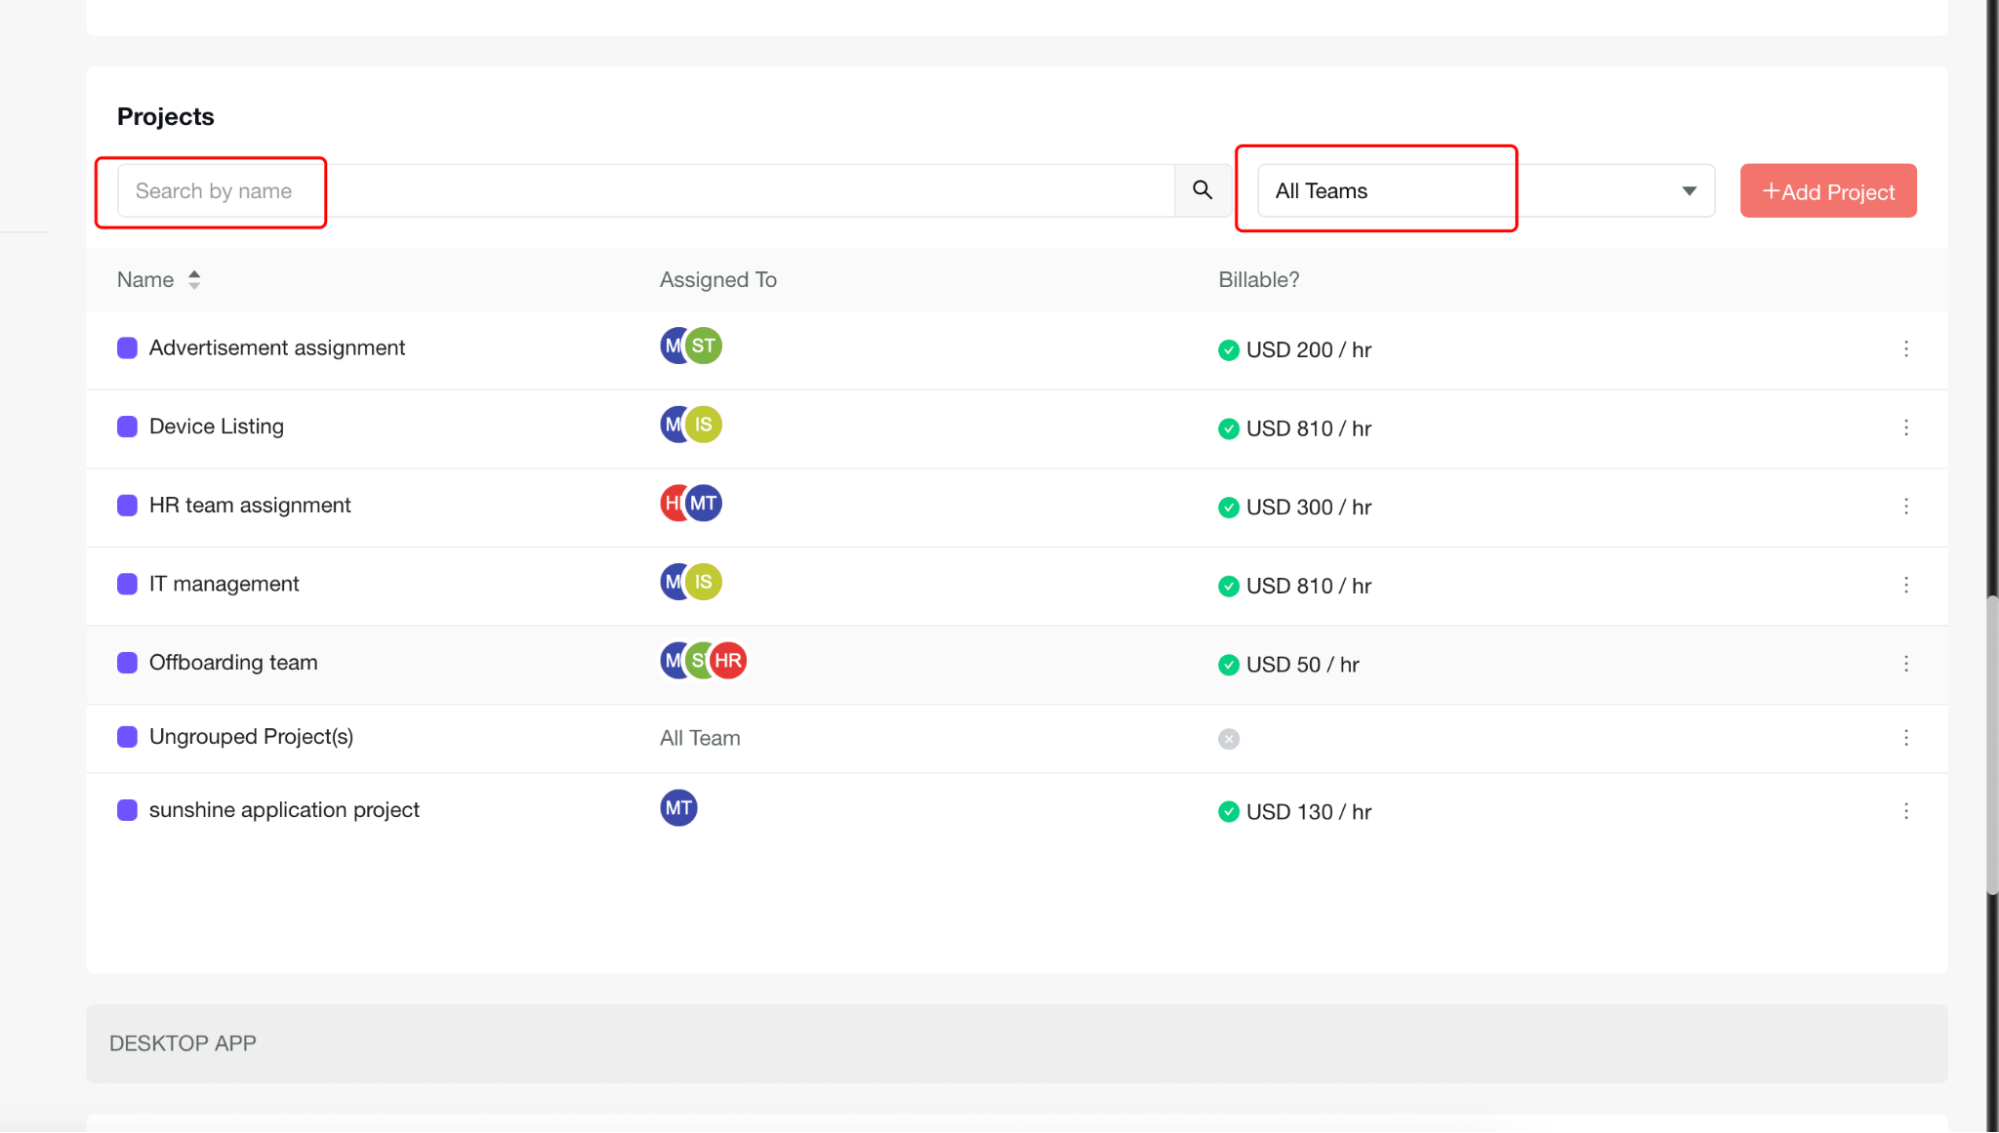
- Filter by Team Assignment: Click the dropdown to expand team options and select a specific team to view only projects assigned to that team. The project list automatically updates.
Project List Overview
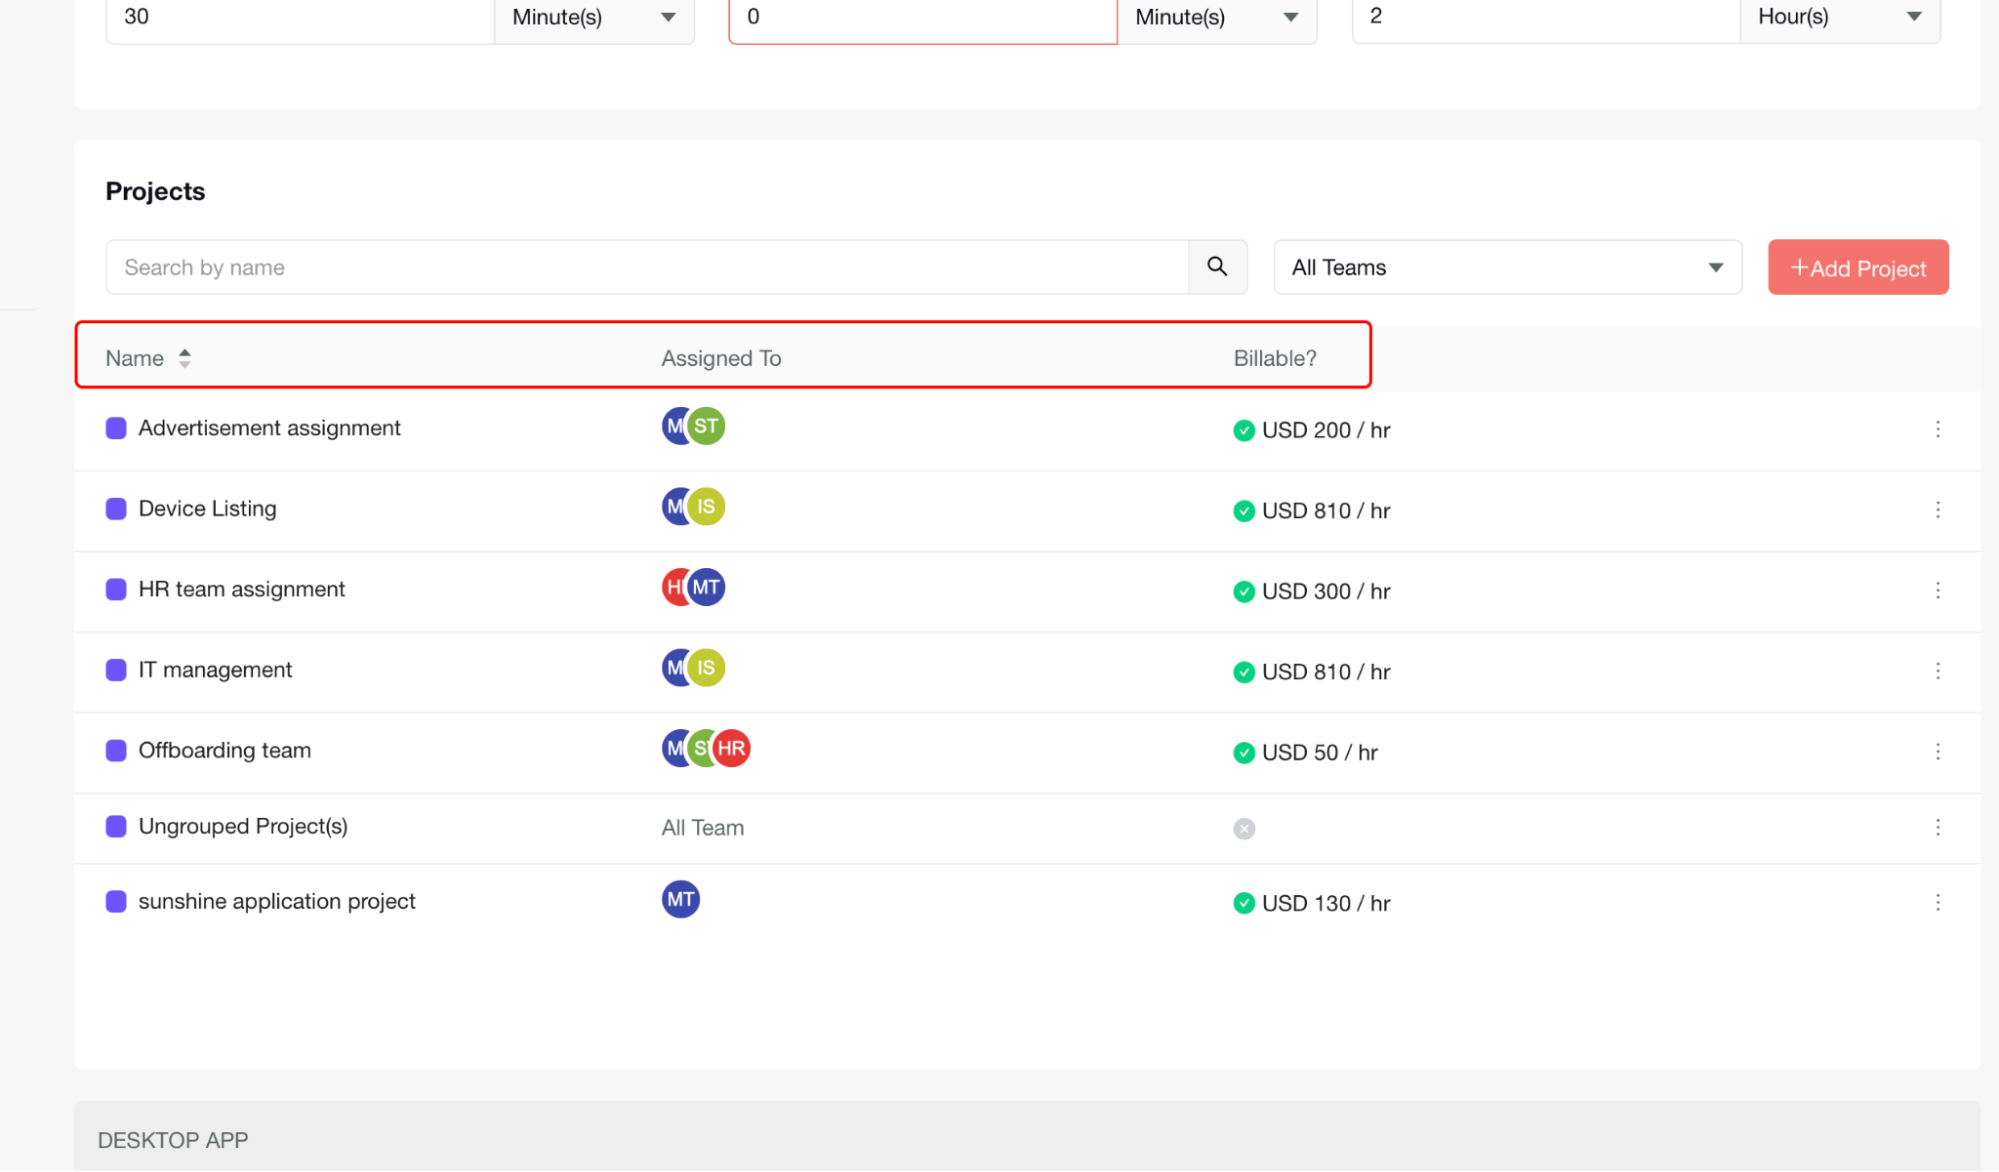
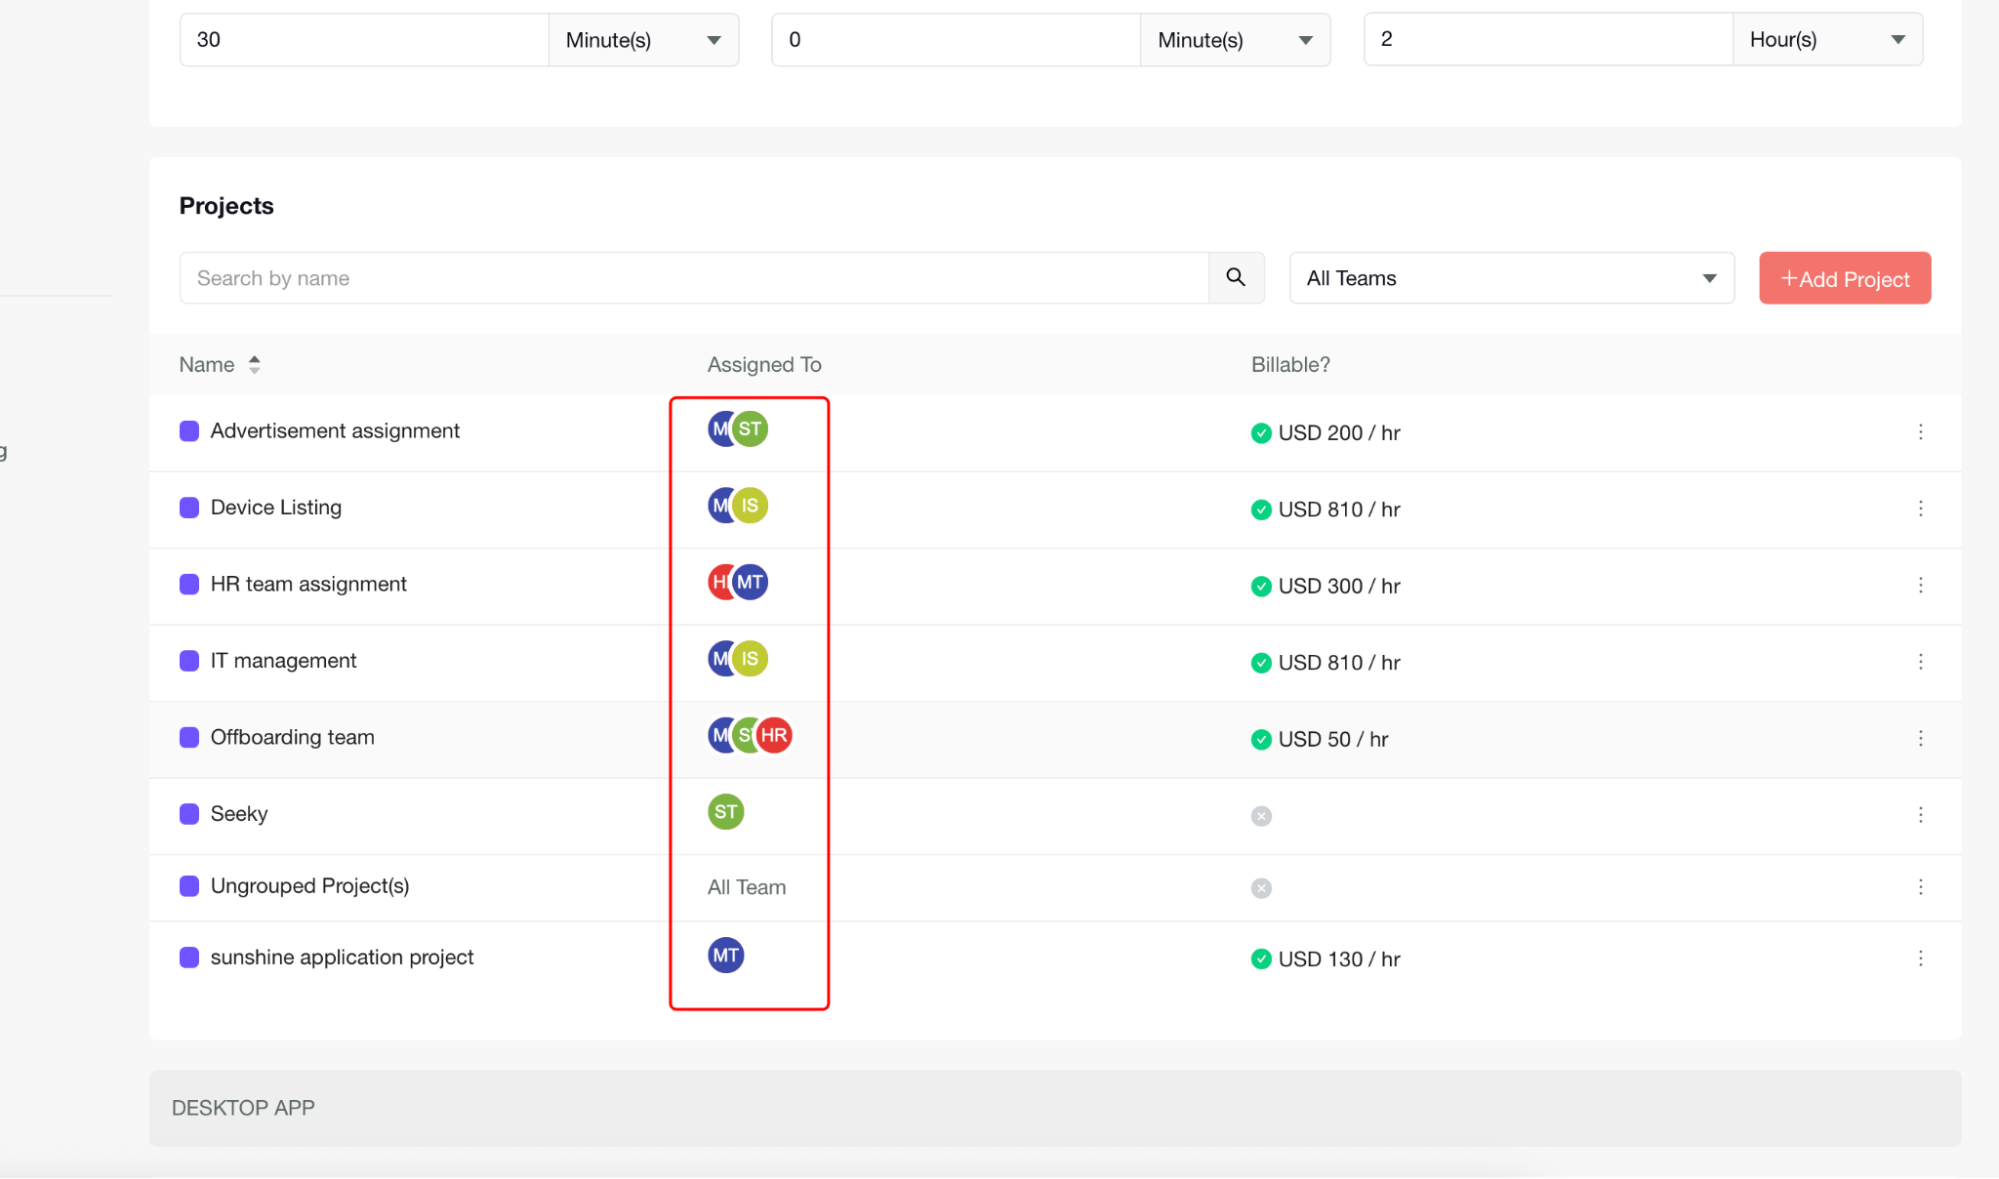
The projects table displays the following key information for each project:
-
Project Name Column – Each project shows a colored indicator for quick visual identification; project names are displayed clearly, and colors help differentiate between projects.
-
Assigned To Column – Shows user avatars or initials of team members assigned to each project. Multiple team members may be displayed for collaborative projects. "All Team" indicates the project is accessible to the entire organization.
-
Billable Status Column – Displays whether a project is billable or non-billable. Billable projects show hourly rates; non-billable projects show a different status indicator. Green indicators typically represent active billable status.
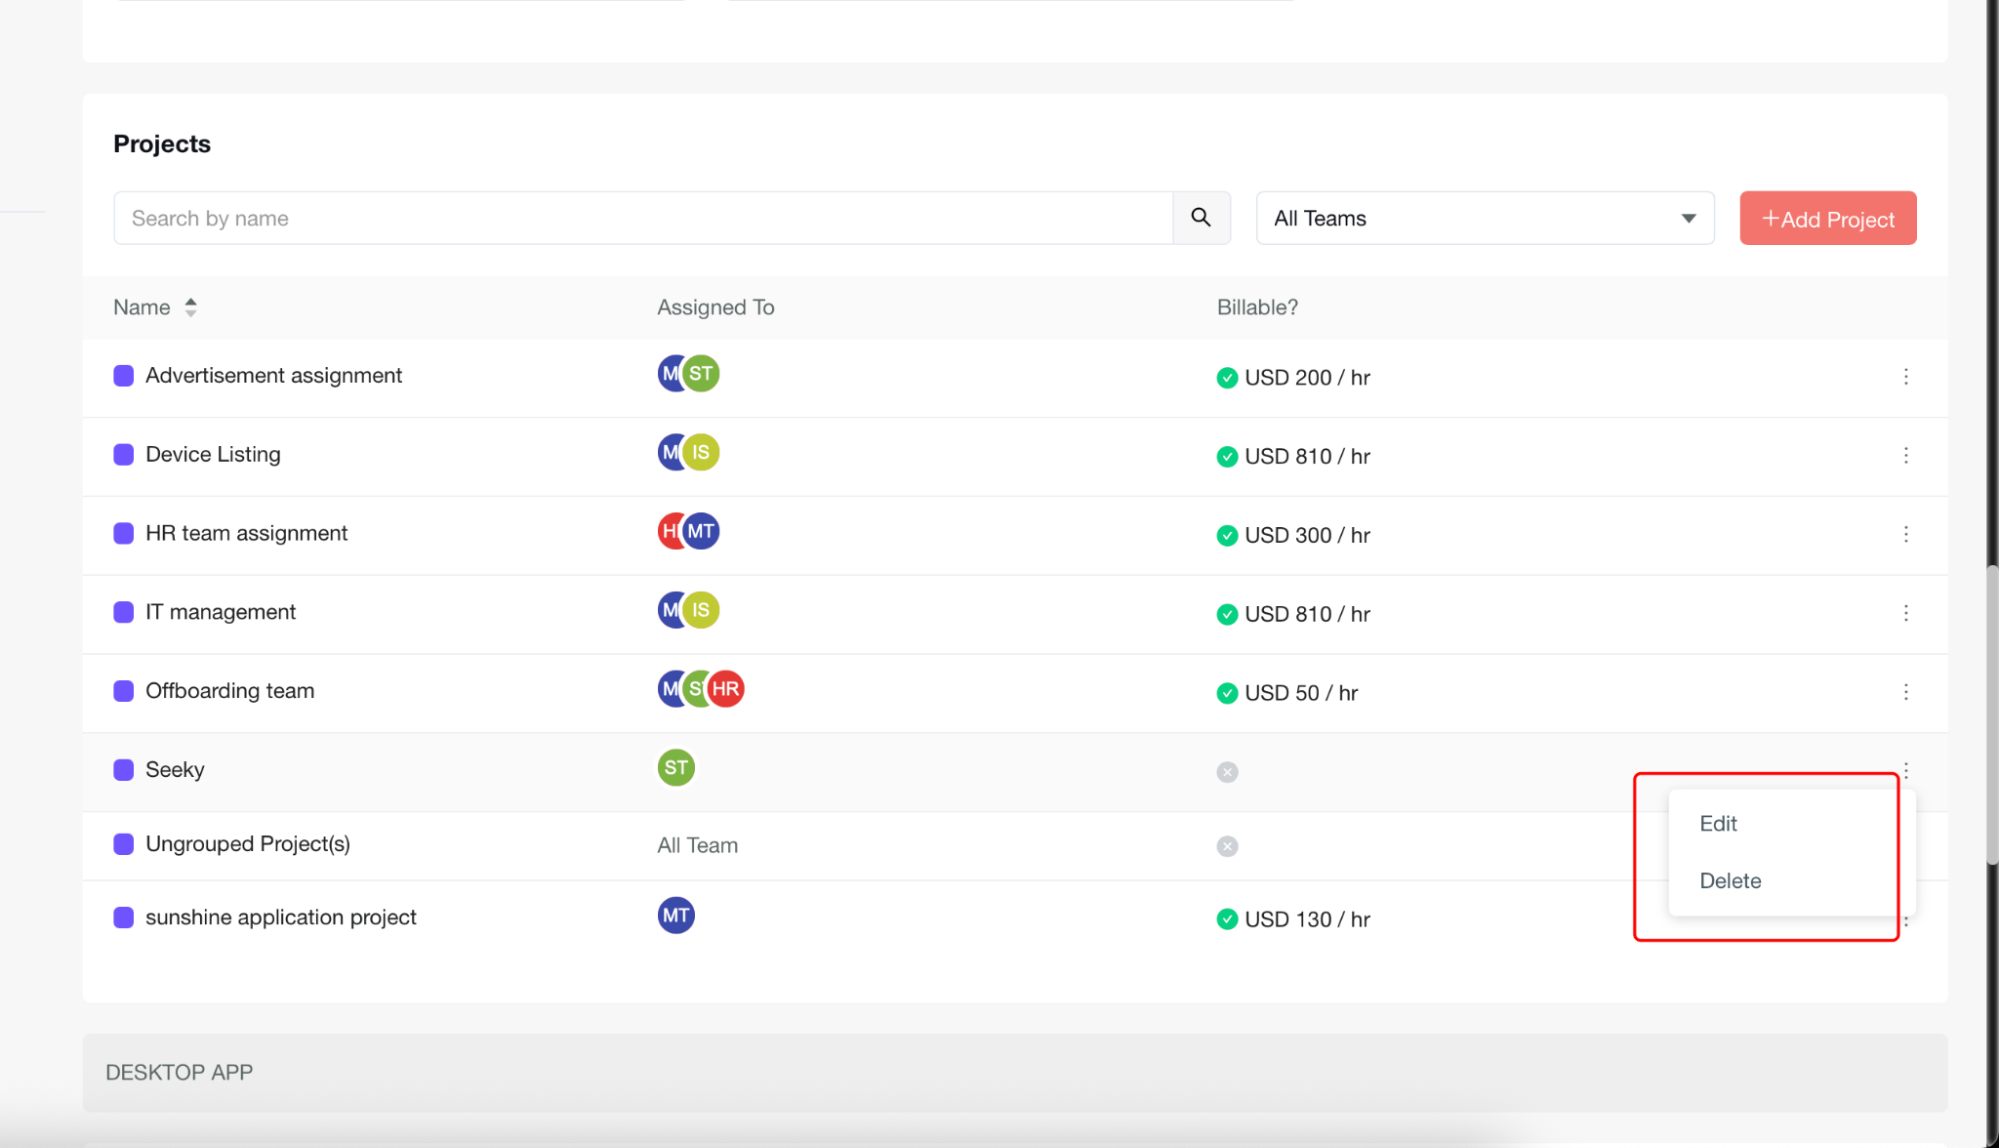
Access Project Options
-
Look for the three-dot menu icon at the end of each project row.
-
Click the menu to reveal available actions for that project.
Available options include:
-
Edit: Modify project details, assignments, or billing information.
-
Delete: Remove the project from the system (use with caution).
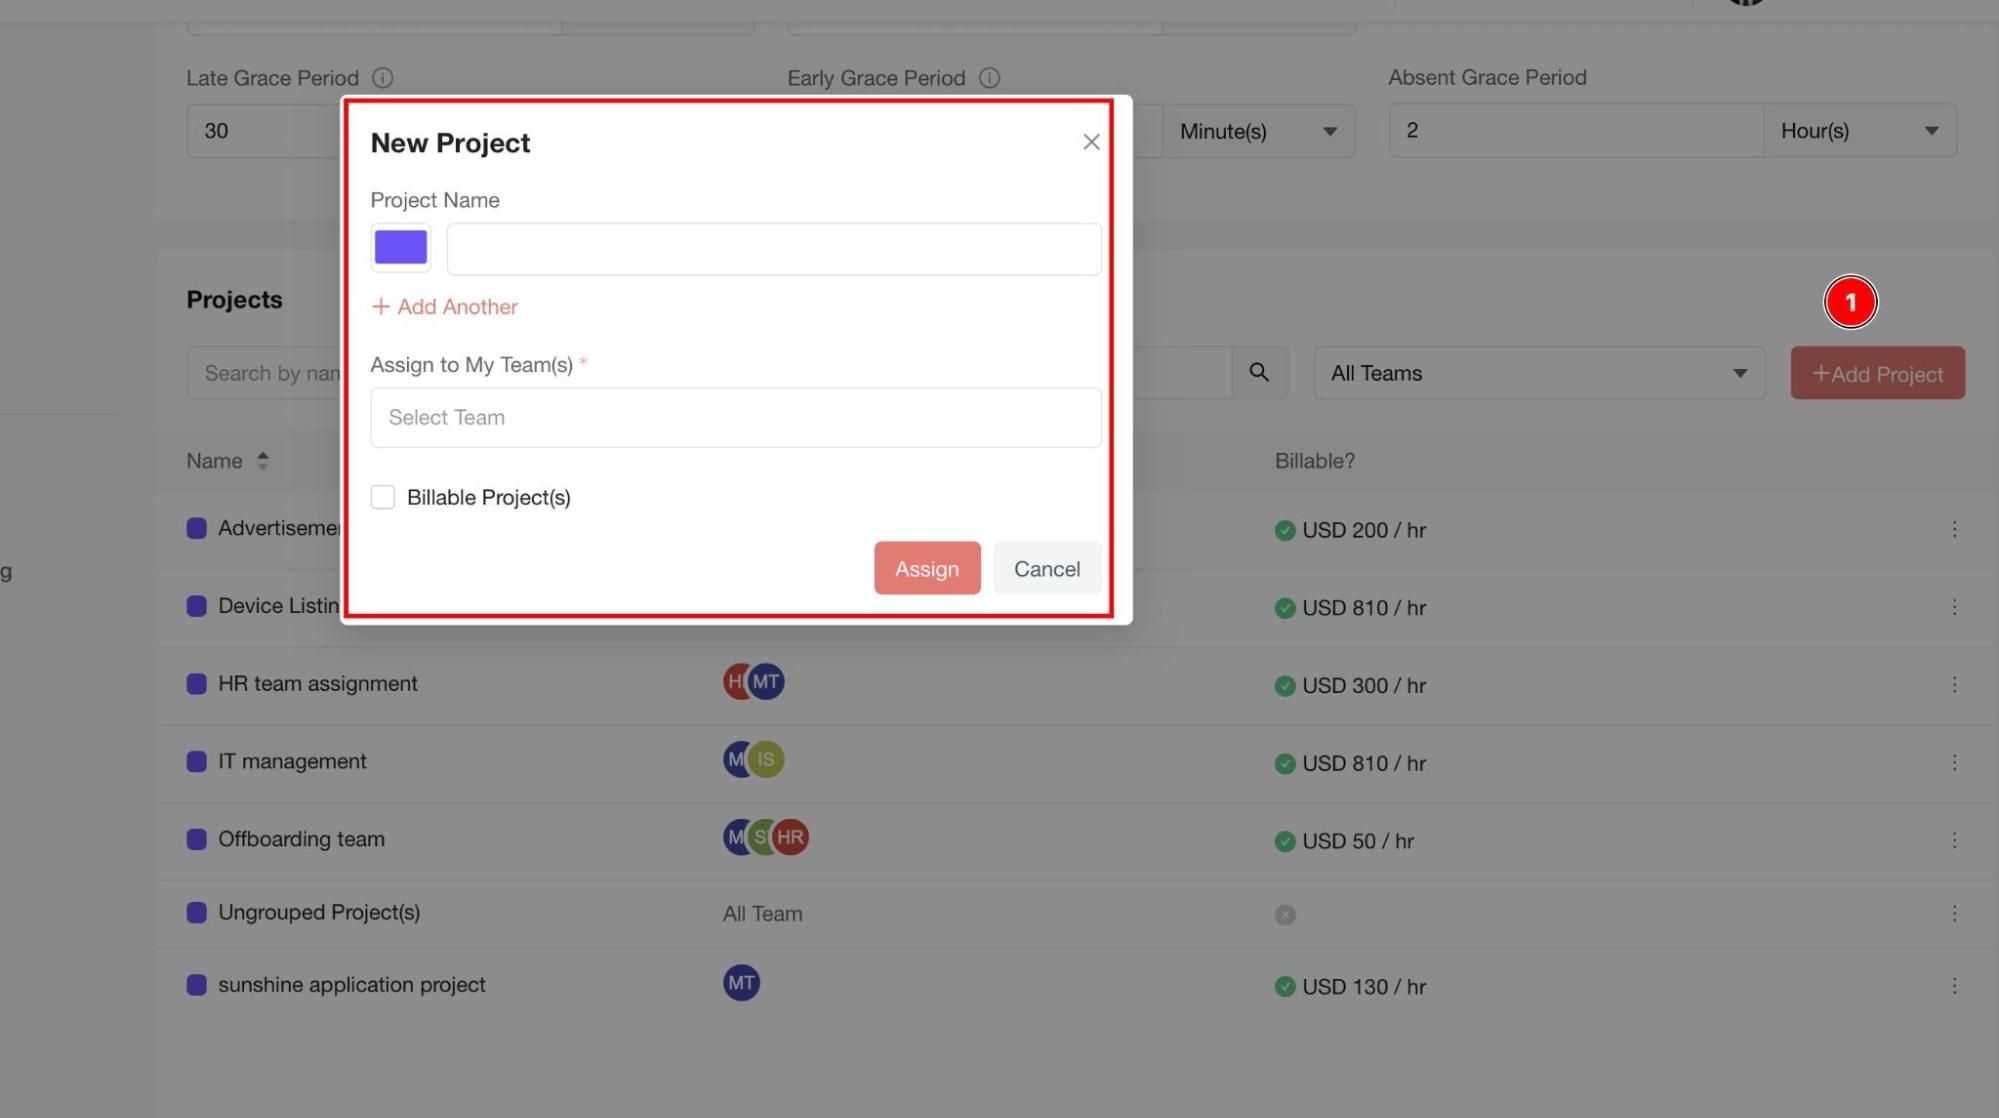
Create Project
-
Click the Add Project button to open the new project creation form.
-
Complete the required project details in the form that appears.
-
Save your new project to add it to the projects list.
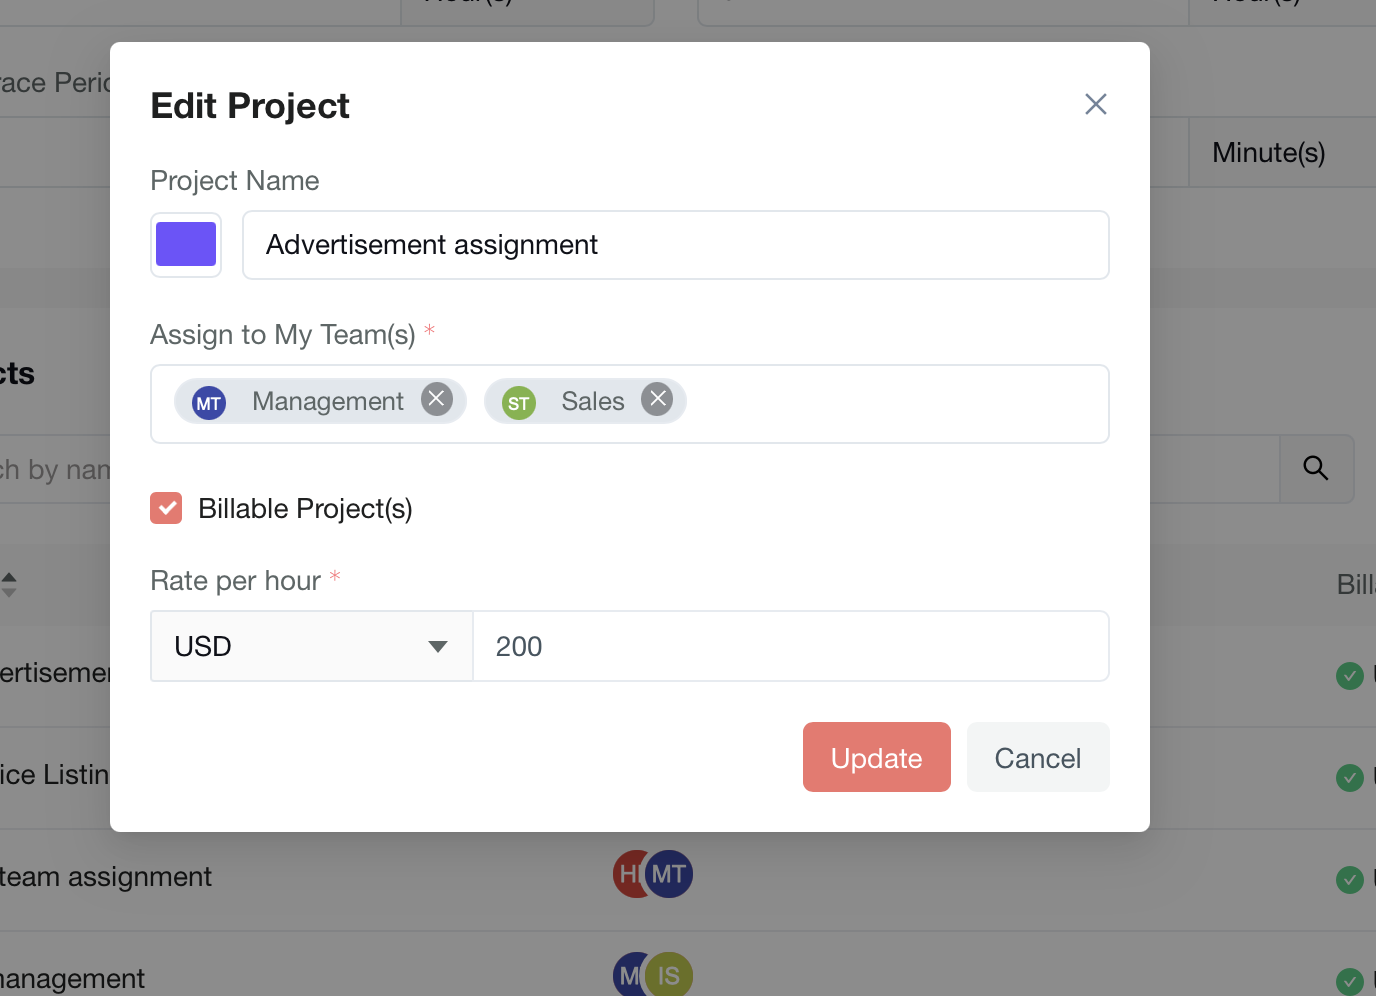
Edit Project
-
Click the three-dot menu for the desired project.
-
Select "Edit" from the dropdown menu.
-
Update project information as needed in the edit form.
-
Save changes to apply updates to the project.
Delete Project
-
Access the three-dot menu for the project you want to remove.
-
Select "Delete" from the available options.
-
Confirm the deletion when prompted.
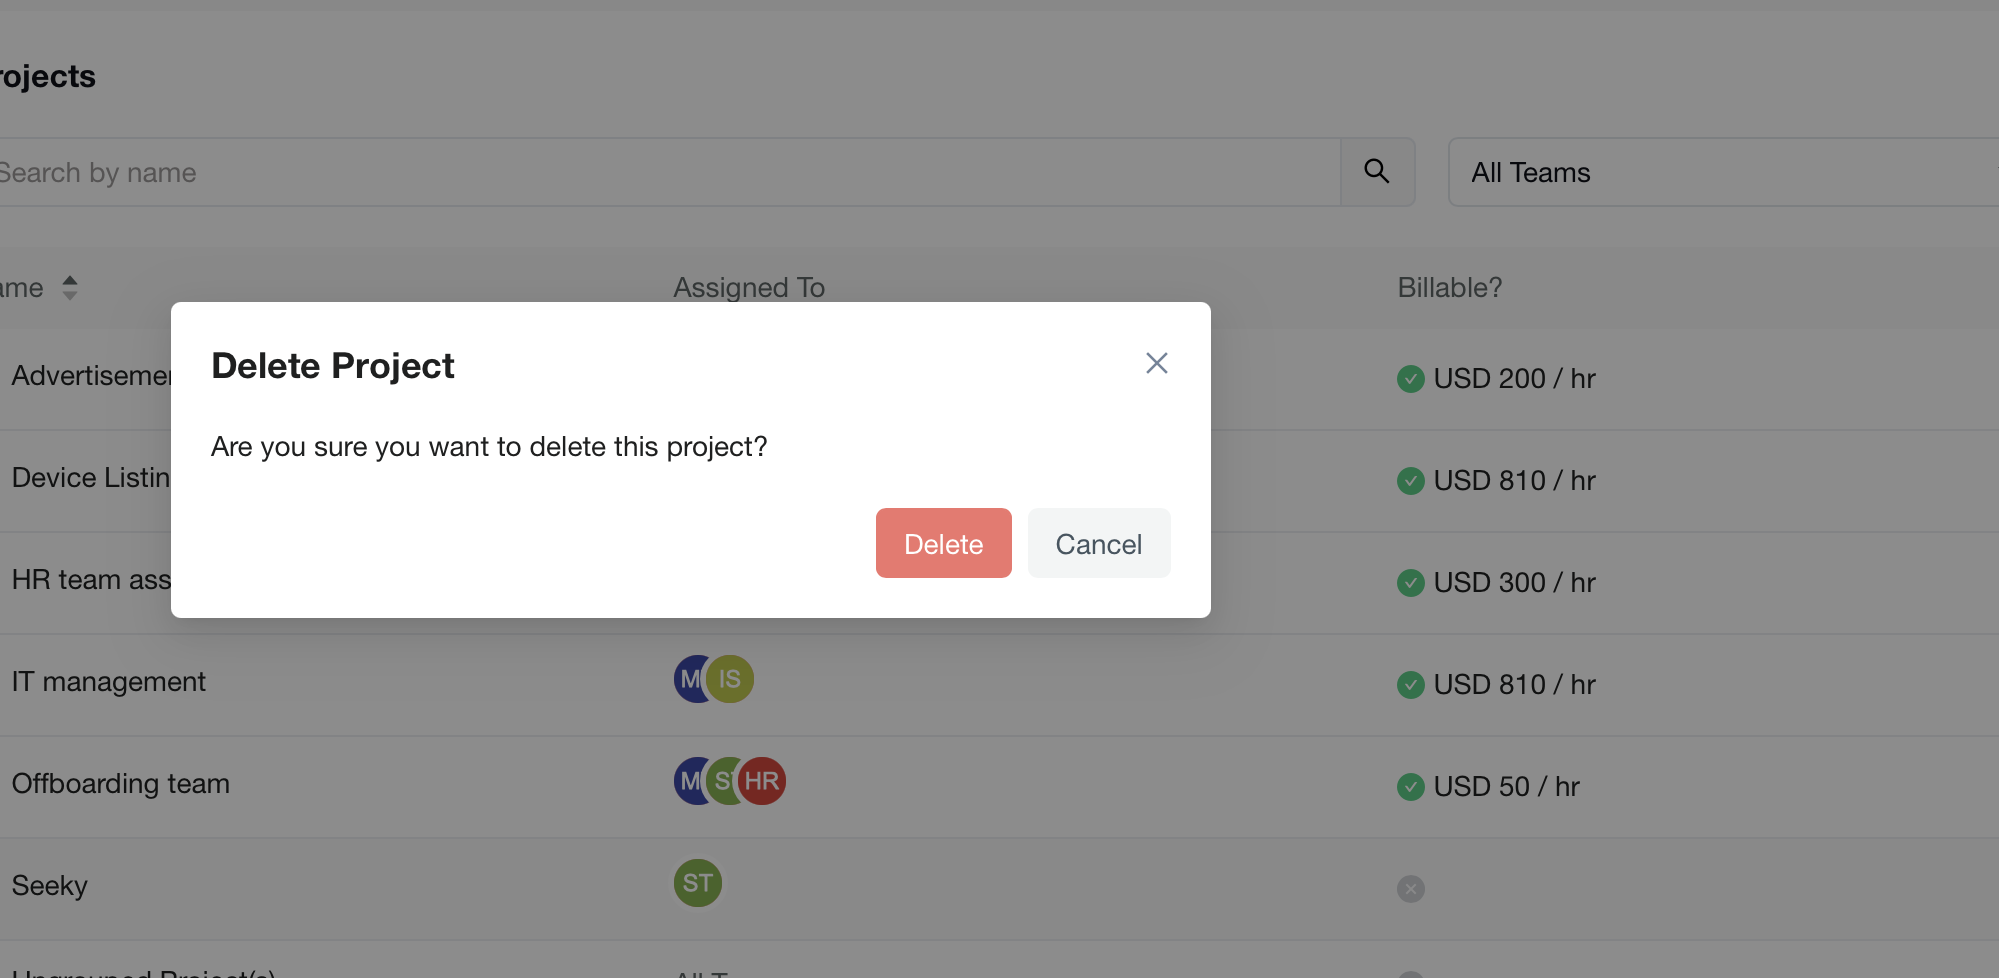
Important: This action may be permanent, so ensure you want to remove the project.
Configure Project Assignment
-
Team Assignment: Projects are assigned by team, showing team initials.
-
Organization-wide Assignment: Projects marked "All Team" are accessible to all organization members.
-
Multiple Team Assignment: Some projects may show multiple team identifiers for cross-team collaboration.
Configure Project Billing
Configure Desktop App
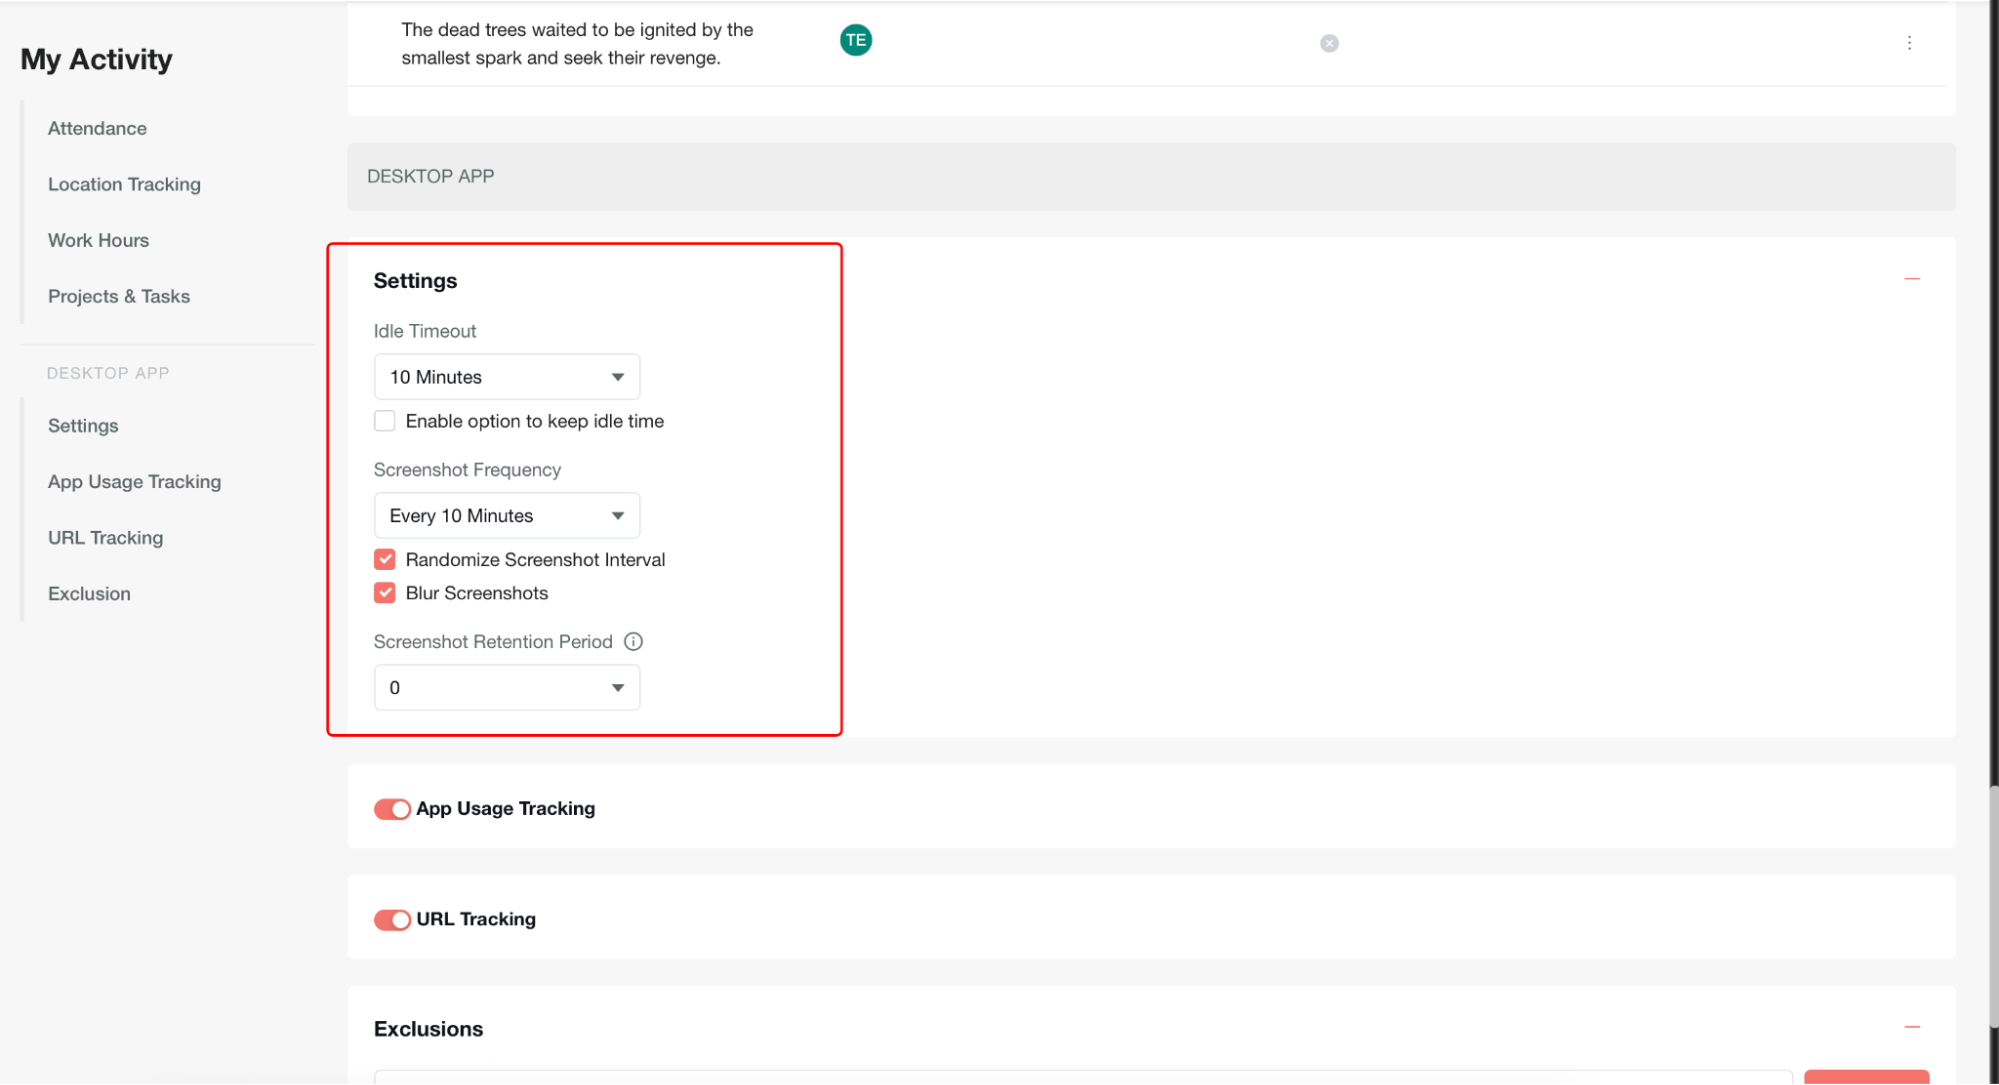
In the Settings section, admins can configure how the Desktop App behaves in terms of idle time handling and screenshot capturing.
Configure Idle Timeout
Purpose: Defines how the system handles inactivity when a user is tracking time.
-
When the configured idle timeout (e.g., 20 minutes) is reached and the user has been inactive, an Idle Popup appears in the Desktop App.
-
If the Enable option to keep idle time checkbox is checked, the idle popup includes a Keep Idle Time option, allowing users to record that idle time as part of their tracked time.
-
If Never is selected for idle timeout, the idle popup will never appear, regardless of user inactivity.
Configure Screenshot Frequency
Purpose: Controls how often the Desktop App captures screenshots.
-
If set to a specific interval (e.g., 10 minutes), the Desktop App captures a screenshot automatically after that interval.
-
If set to Never, no screenshots are captured by the Desktop App.
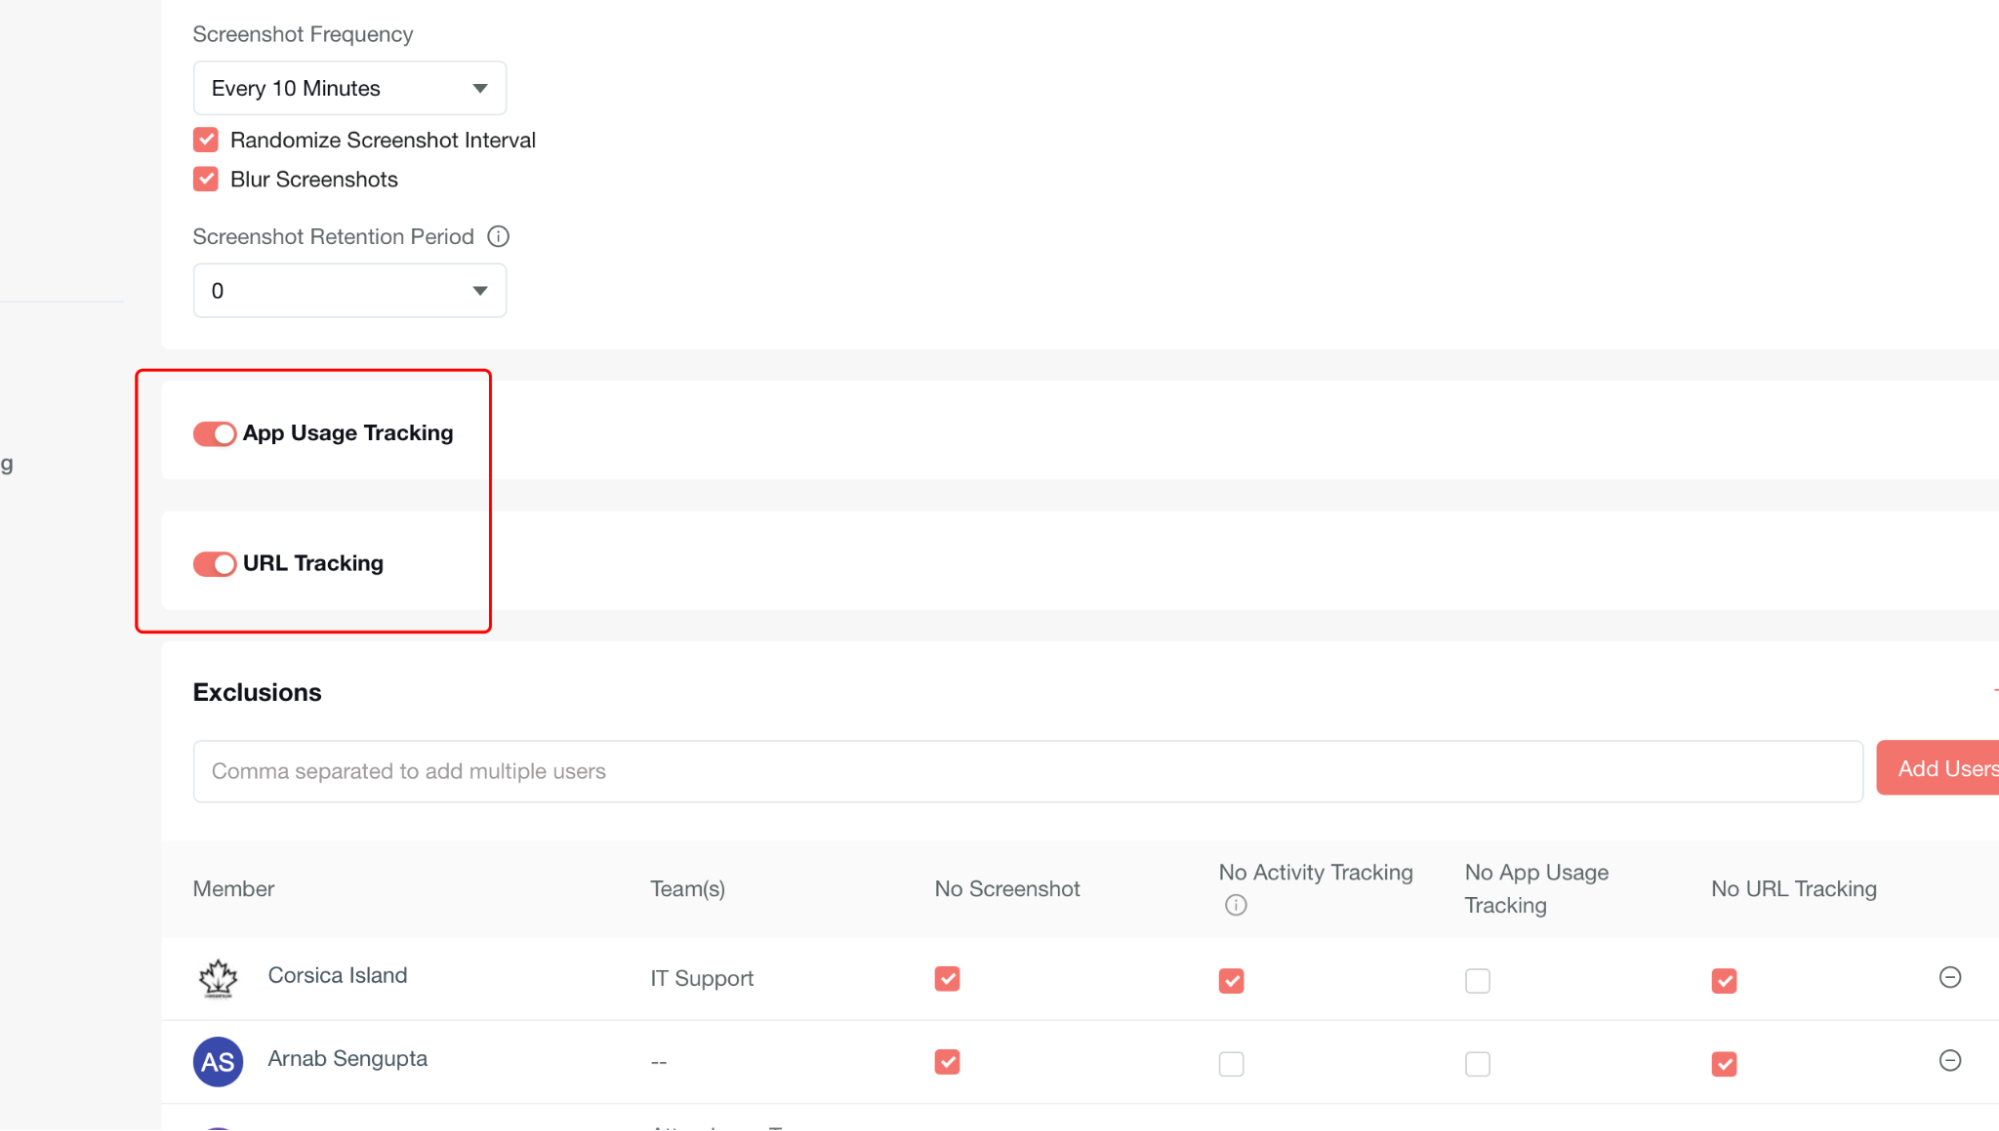
Configure App Usage Tracking
Purpose: Captures the applications used by the user while tracking time in the desktop app.
-
When enabled, the desktop app records all active applications used by the user. The tracked details are reflected under My Activity → Apps tab.
-
When disabled, application usage is not tracked or displayed.
Configure URL Tracking
Purpose: Captures the websites visited by the user during tracked time in the desktop app.
-
When enabled, the desktop app records all visited URLs. The tracked details are reflected under My Activity → URLs tab.
-
When disabled, website usage is not tracked or displayed.
Manage Activity Tracking Exclusions
Admins can exclude specific users from certain monitoring features. This allows flexibility for members who should not be tracked in particular areas.
Add Users: Multiple users can be added at once (comma-separated).
Options available per user:
-
No Screenshot → Screenshots will not be captured for the user.
-
No Activity Tracking → The user's mouse/keyboard activity will not be tracked.
-
No App Usage Tracking → The user's application usage will not be tracked.
-
No URL Tracking → The user's website usage will not be tracked.
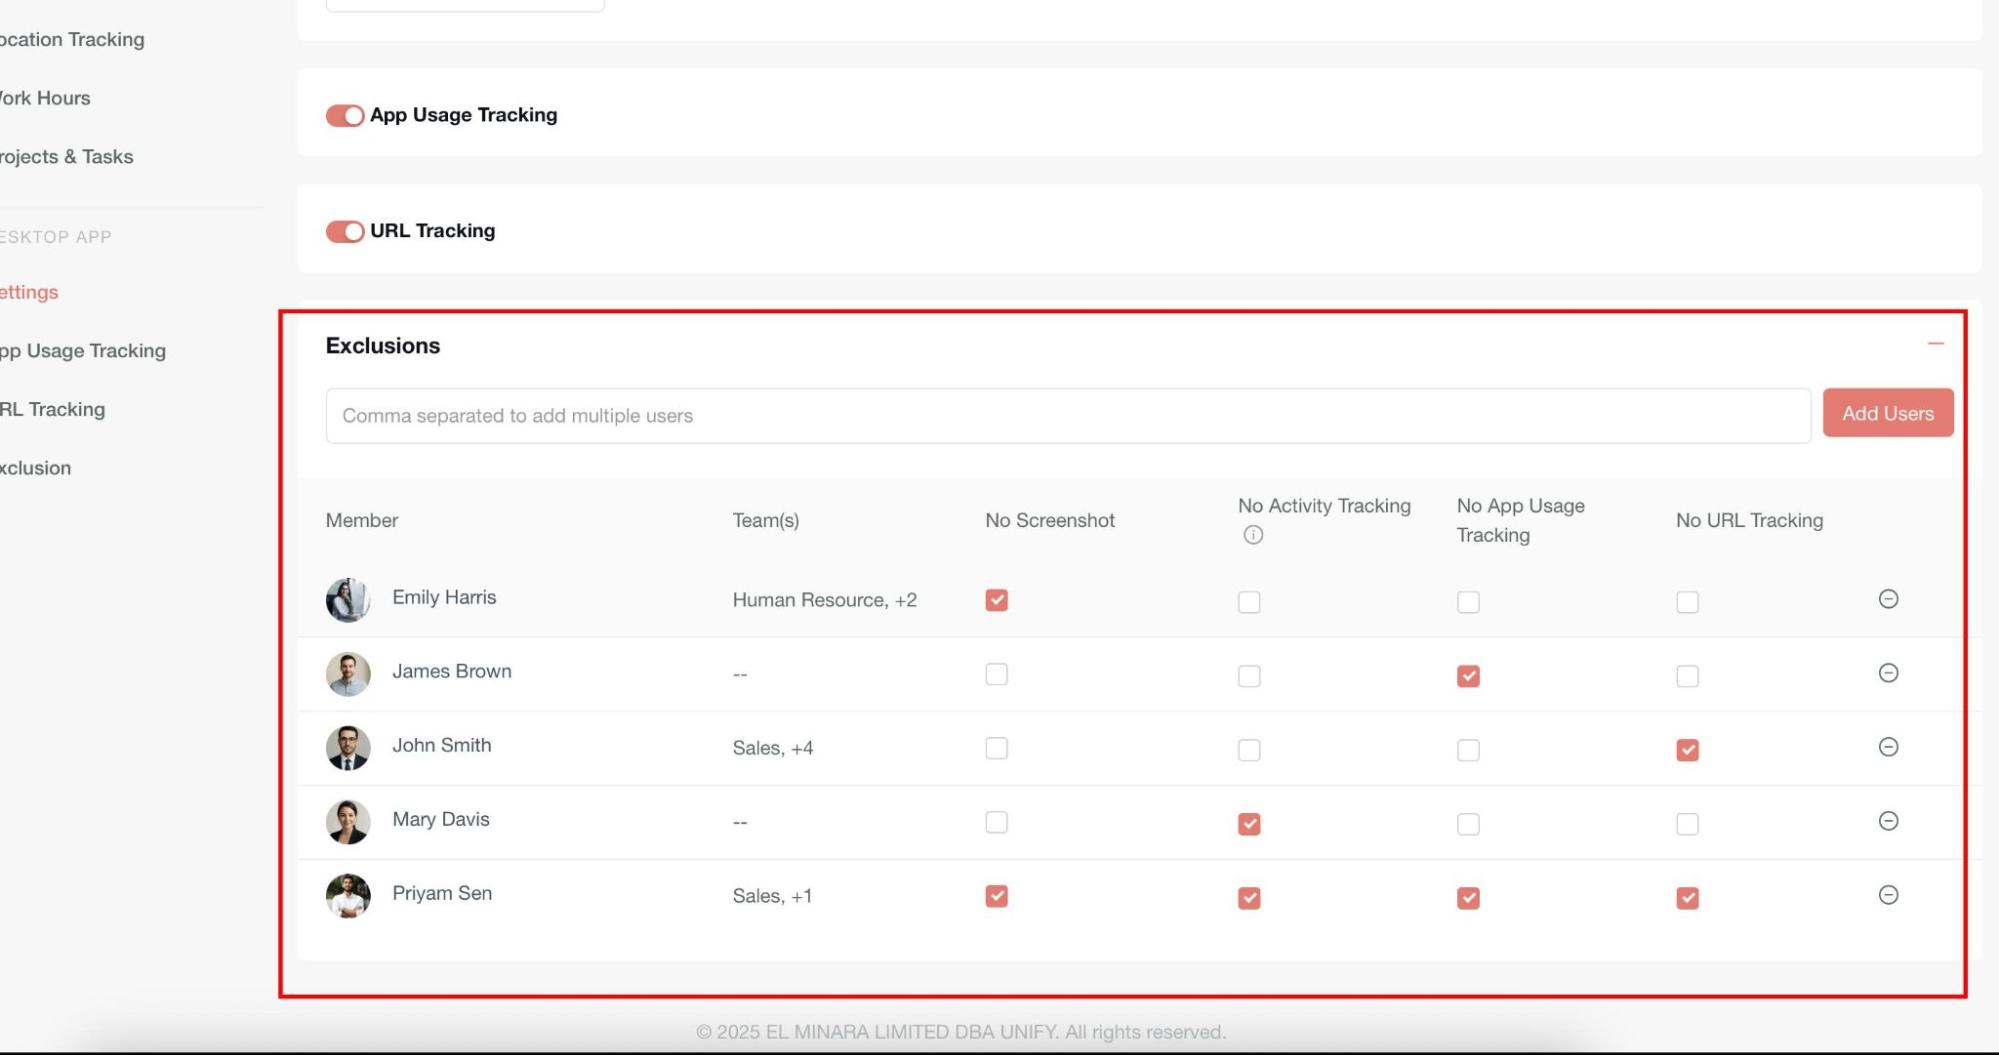
Important: Once excluded, the respective data will not appear in reports such as My Activity, Timesheets, or Admin Reports.