Admin → Request
Overview
Request or opening a ticket is possible from this interface, where any member in the organization can raise a request.
Request Prerequisites
-
To raise a request, at least default teams or categories must be configured.
-
Proper Roles and permissions should be available to access and raise requests.
-
The request feature must be enabled by the administrator for usage.
Access Request
Request can be accessed in two ways:
Method 1: Side Menu Access
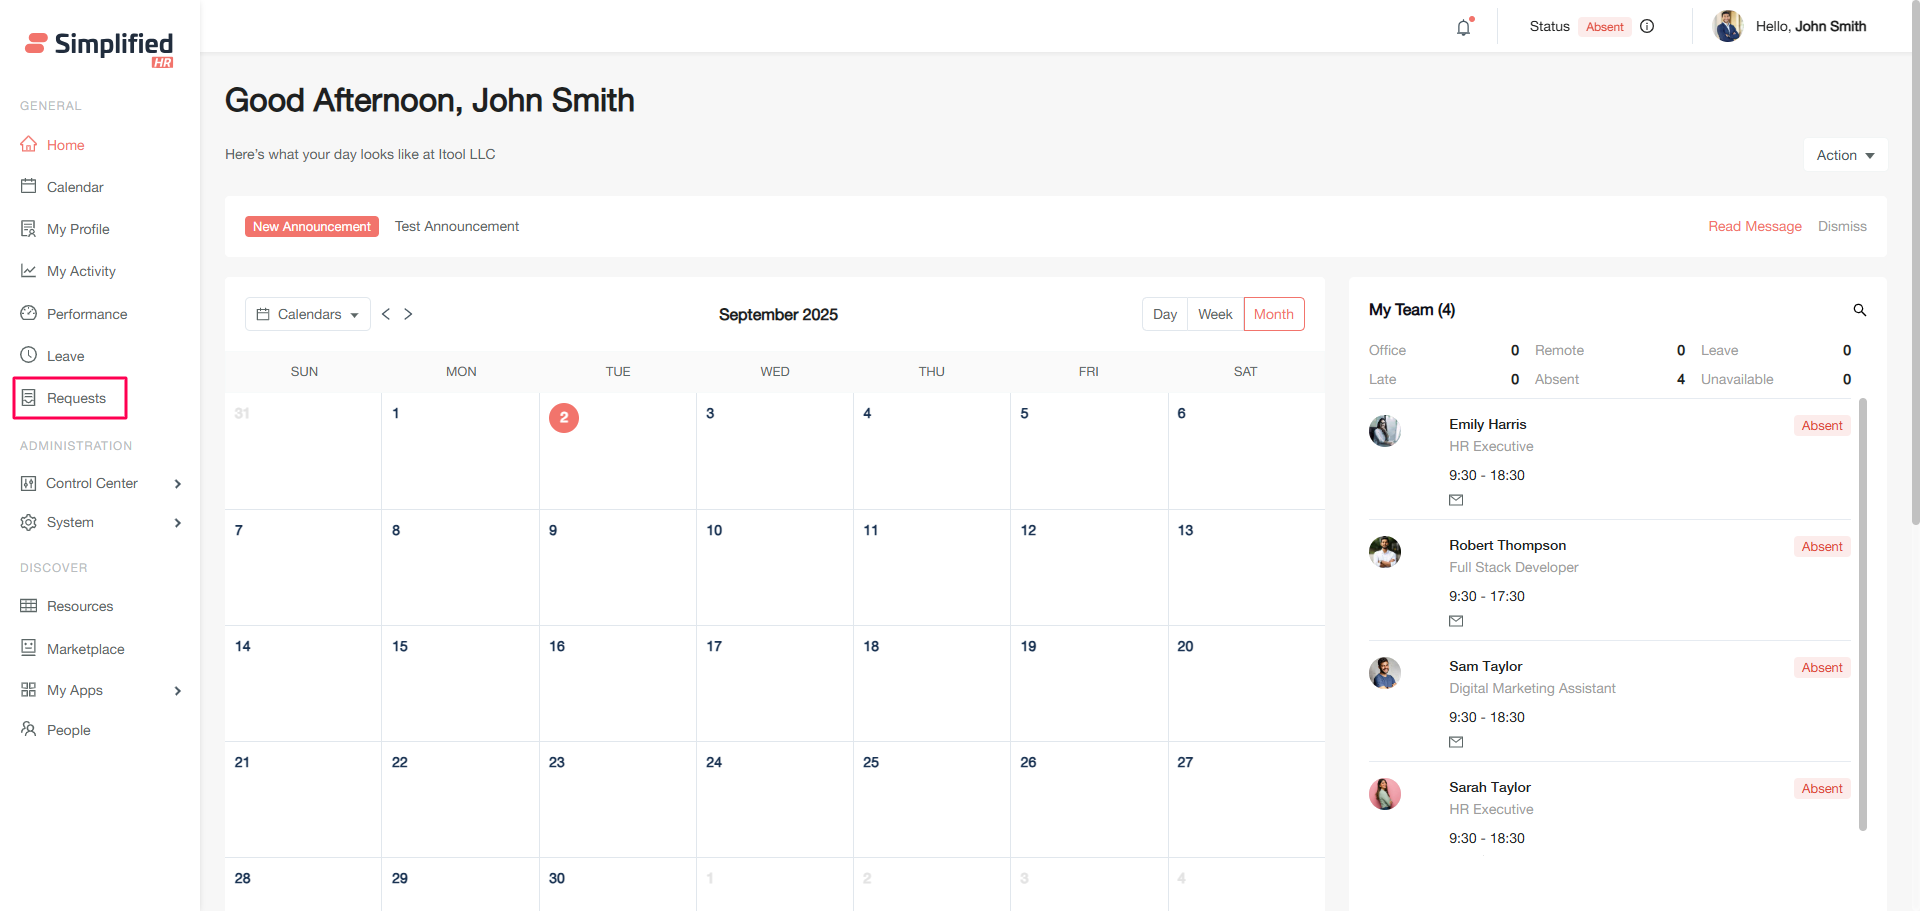
The request menu is available as a side menu bar. Clicking it redirects to the Request homepage.
Method 2: User Details Access
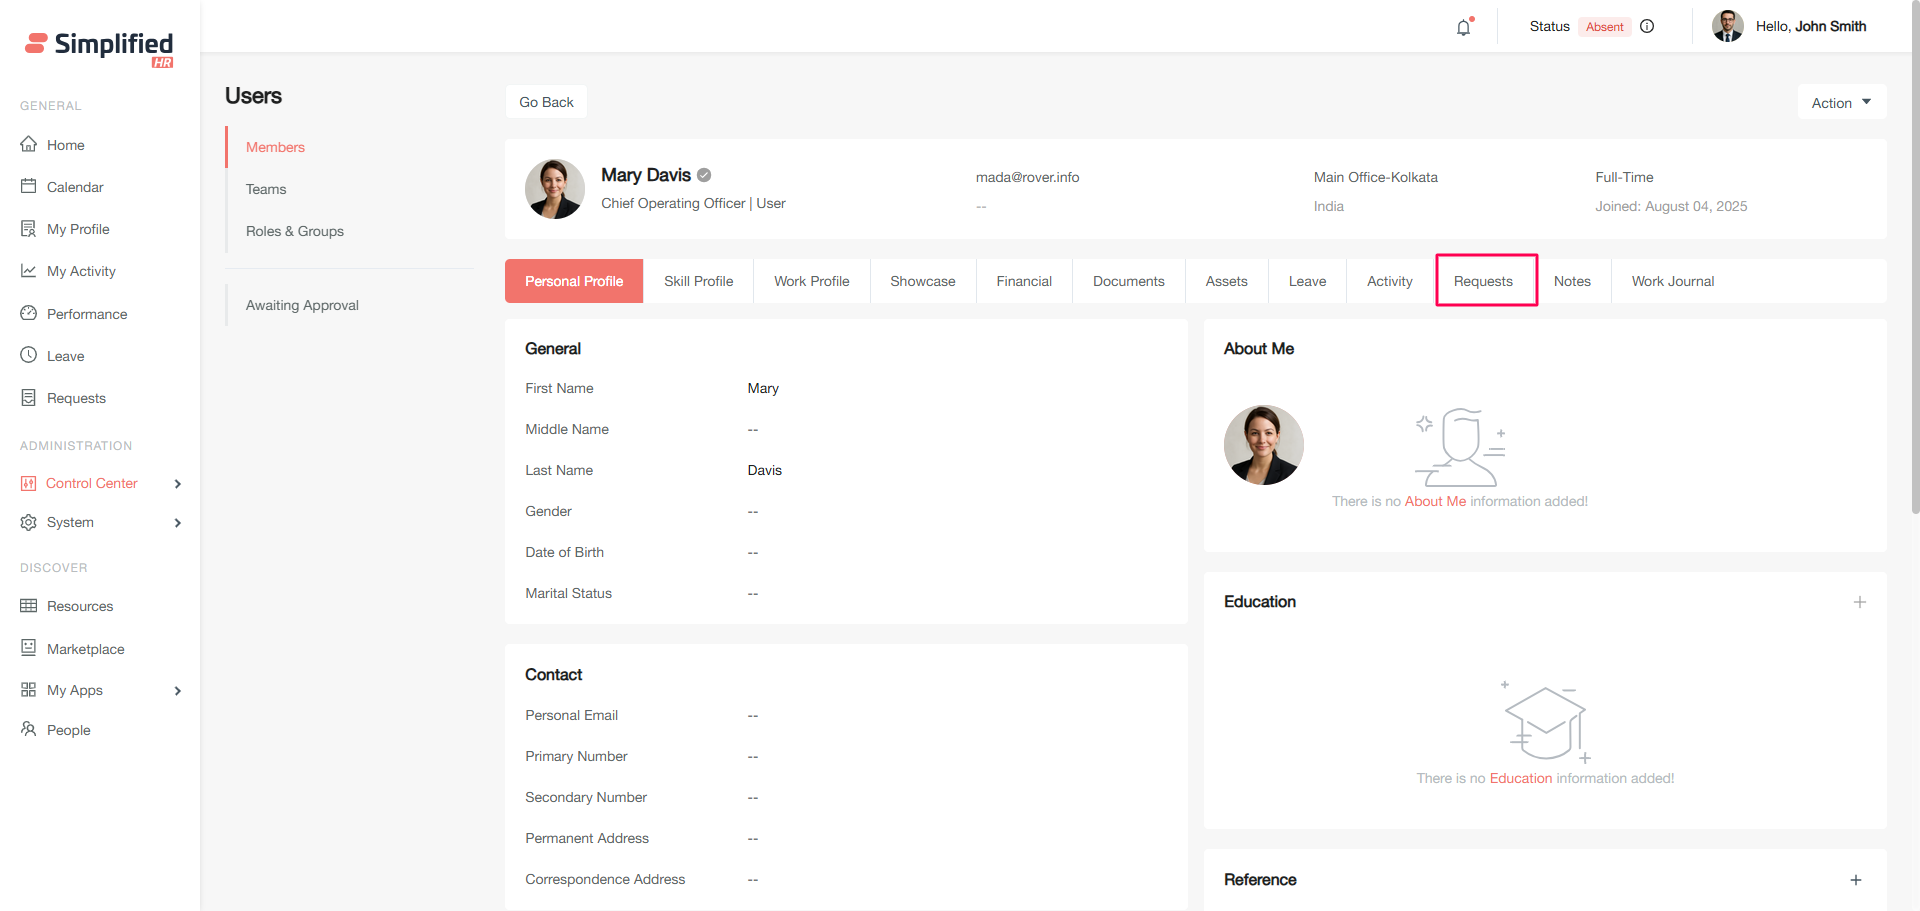
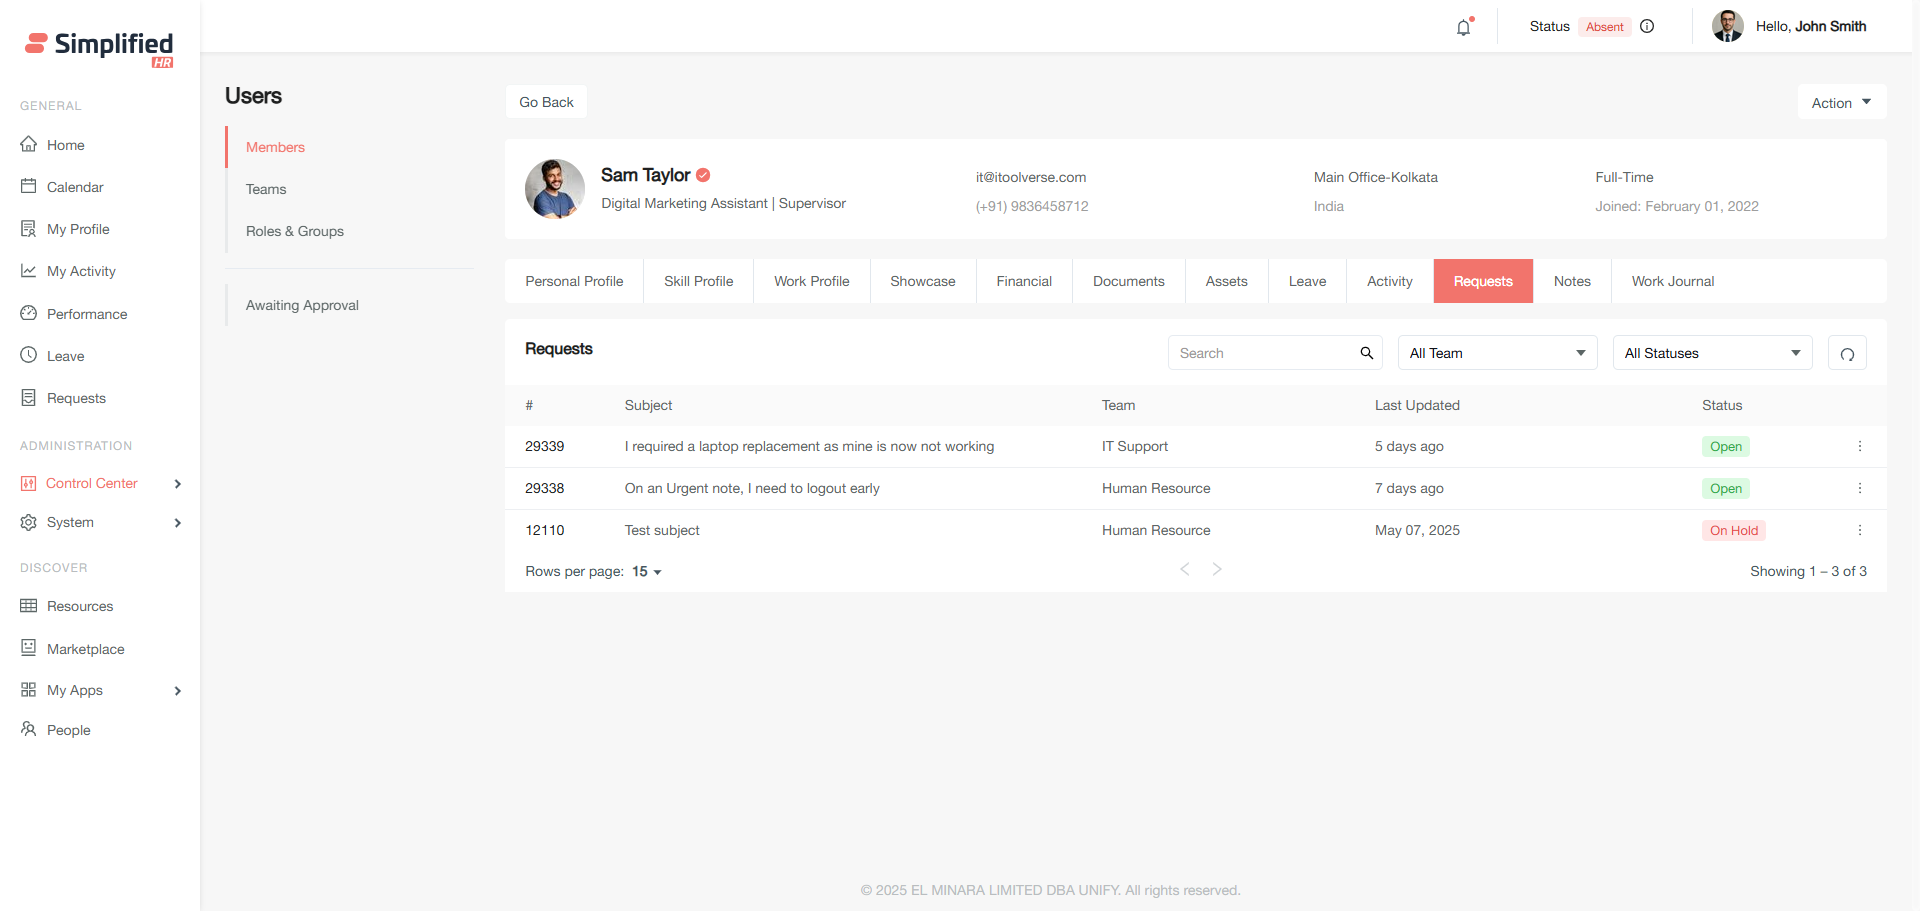
Requests can also be monitored and managed from user details by Owner, Admin, or similar role members, using the flow: Control Center > Users > View Profile > Request Tab.
Monitor Requests from User Details
Owner, Admin, or similar role members can monitor and manage a specific user's requests directly from that user's profile, via the Request Tab.
Understand Request Tabs
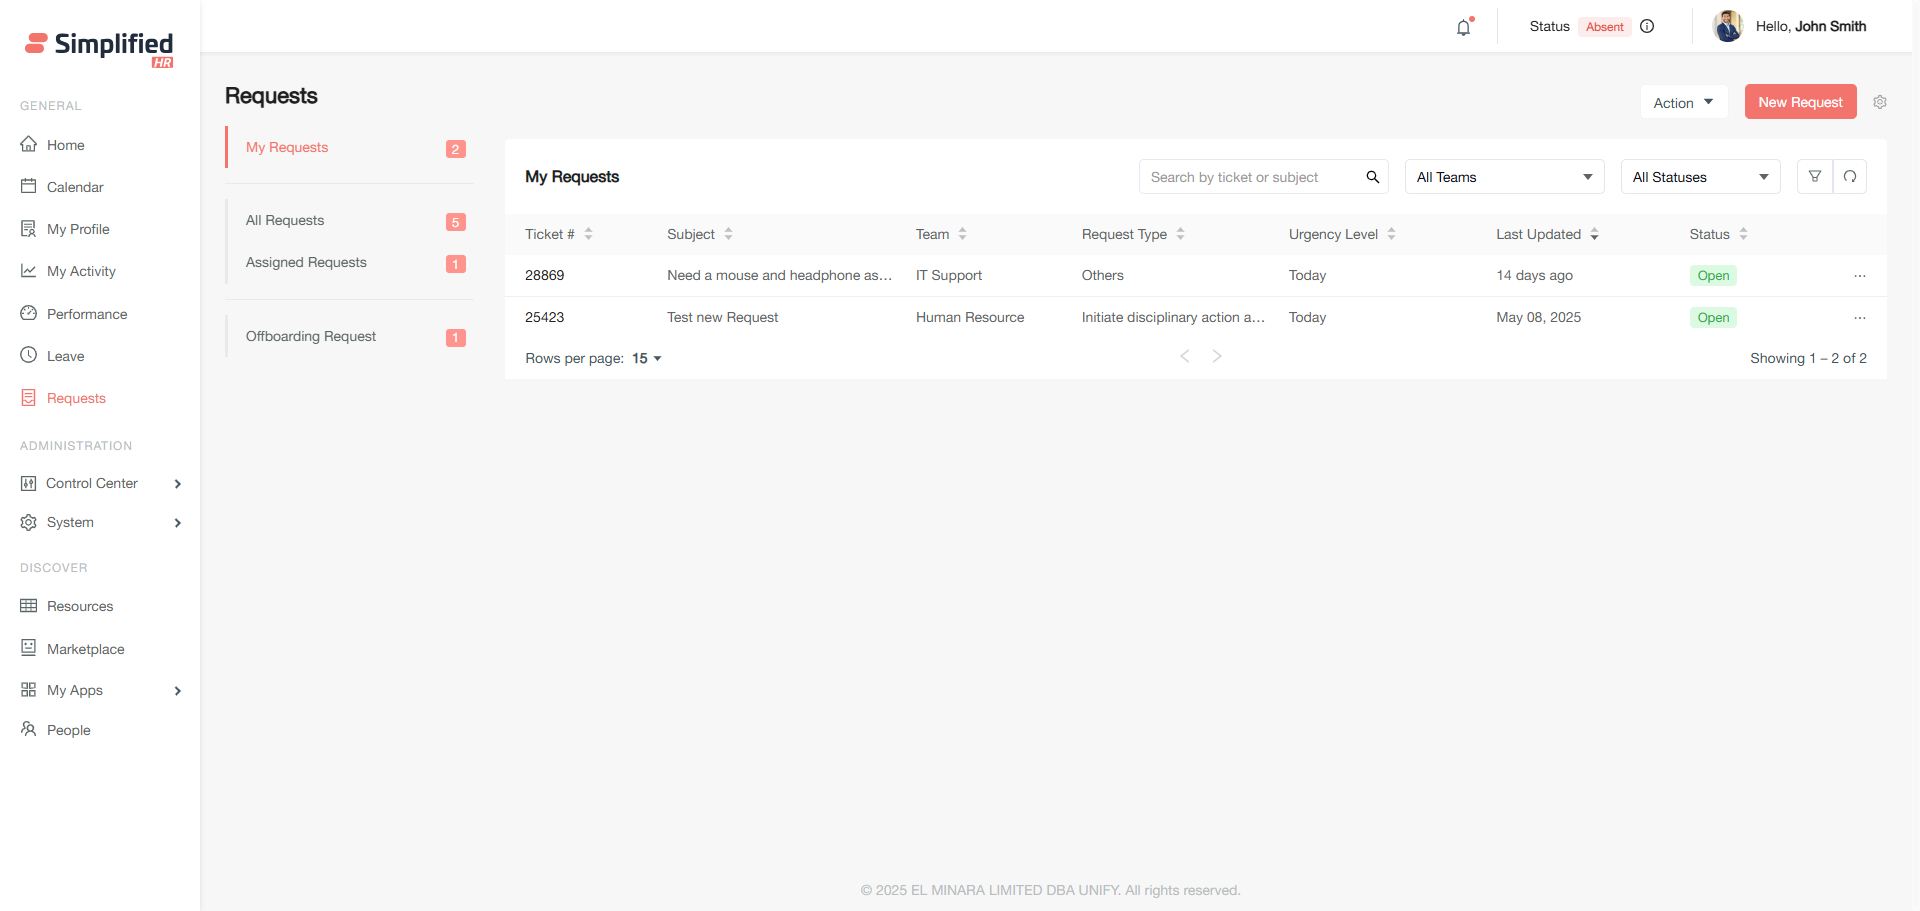
The request feature has four tabs where requests are organized and shown. Each request displays in tabular form with: Ticket ID, Subject, Team, Request Type, Urgency level, Last updated date, and Request status.
-
My Request: Lists all requests raised by the currently logged-in member.
-
All Requests: Lists all requests raised in the organization.
-
Assigned Request: Lists all requests assigned to the currently logged-in member.
-
Offboarding Request: Appears conditionally, dependent on the Simplified Offboarding feature.
View My Requests
My Request lists all requests raised by the currently logged-in member, with search and filtering available.
View All Requests
All Requests lists all requests raised in the organization.
Important: The owner, administrator, or any similar role member can see requests of any team or department.
View Assigned Requests
Assigned Request lists all requests assigned to the currently logged-in member, with the same filtering available as All Requests.
View Offboarding Requests
Important: The Offboarding Request tab appears conditionally and is dependent on the Simplified Offboarding feature being present. It is not universally available.
Understand Request Visibility
-
The owner, administrator, or any similar role member can see requests of any team or department.
-
Non-admin members can see requests of their associated teams if requests are raised to any one of their associated teams.
-
Non-admin members can also see a request in All Requests if any requester or responder adds them in Share With or Followed By.
Understand Request Roles
-
Requester: The member who raises a request.
-
Assignee: A responsible member who takes action on the raised request once it is assigned.
-
Request Team Member: A member of the team a request is raised to; can access and manage requests raised to that team.
-
Owner: The organization owner; holds the broadest permissions, including reopening closed requests.
-
Administrator/similar role: Can see requests of any team or department and take administrative actions.
-
Share With member: A member added to a request who is not part of the request's team; can add comments/notes and receive notifications.
-
Followed By member: A member added to view a request only; cannot take any action on it.
Search Requests
All request sections have the option to search requests by Ticket ID or Subject.
Filter Requests by Team
All request sections have a common filter by team.
Filter Requests by Status
All request sections have a common filter by request status.
Filter Requests by Request Type
Request Type: Requests can be filtered using request types or reasons depending on the selected team. Request types are predefined reasons configured according to the team or department.
Filter Requests by Date Range
Date Range: Requests can be filtered by selecting a date range. A selected date range filters and shows requests created and updated within that range.
Filter Requests by Request Age
Request age: Requests can be filtered by defined ages. A selected age filters and shows requests which exactly match that age.
Important: Example: "3 days" will show those requests which were created exactly 3 days ago.
Filter Requests by Assignee
Assignee: Requests can be filtered using Assignee — the responsible member who will take actions on the raised request once assigned.
Filter Requests by Requester
Requester: The member who raises a request is considered a Requester, and requests can be filtered by this field.
Filter Requests by Tags
Tags: Tags are optional keywords added to a request and can be used as a filter.
Filter Requests by Urgency
Urgency level: Requests are raised with an urgency level which determines priority or severity of resolving requests, and can be used as a filter.
Reset Request Filters
A reset option is available in all request tabs, which clears search and applied filters.
Important: Search keyword and applied filters will not clear on page refresh and relogin, until members reset manually. This keeps usage history until manually cleared.
My Request allows two additional filters: date range and Request Age. All Requests allows multiple additional filters: Request Type, Date Range, Request age, Assignee, Requester, Tags, and Urgency level. Assigned Request allows the same multiple filters as available in All Requests.
Create New Request
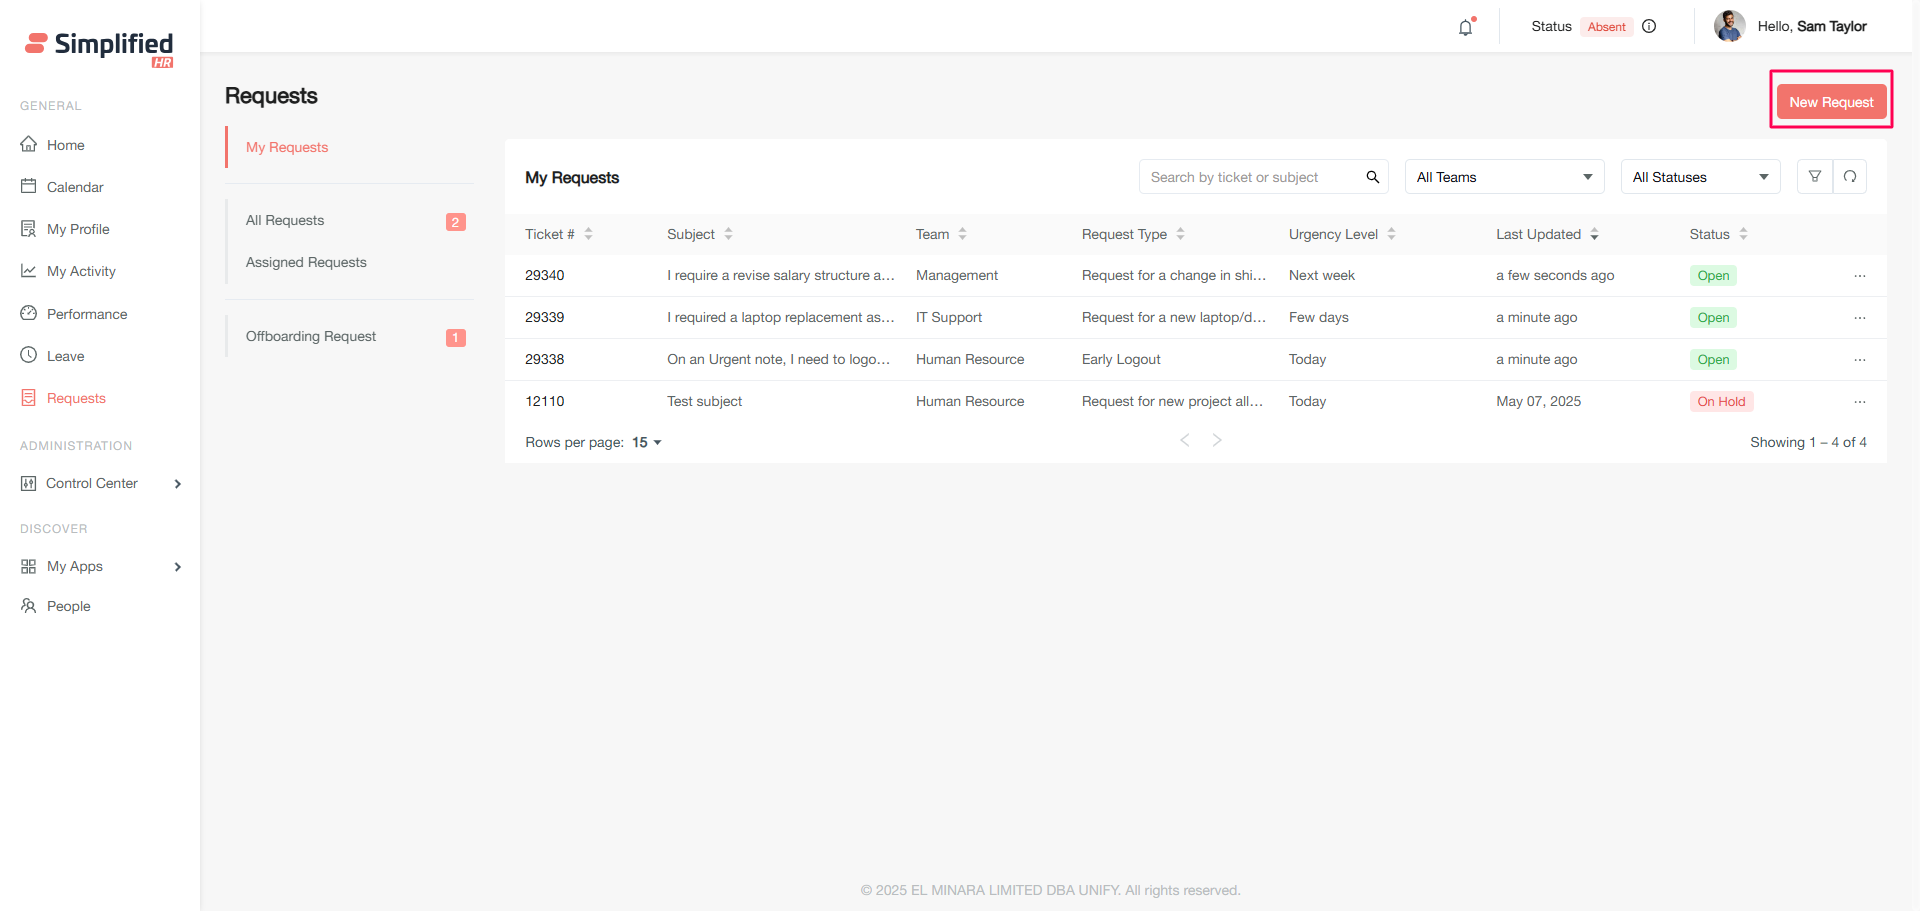
Requests can be created or raised from the New Request button on the Request Homepage.
-
Click New Request.
-
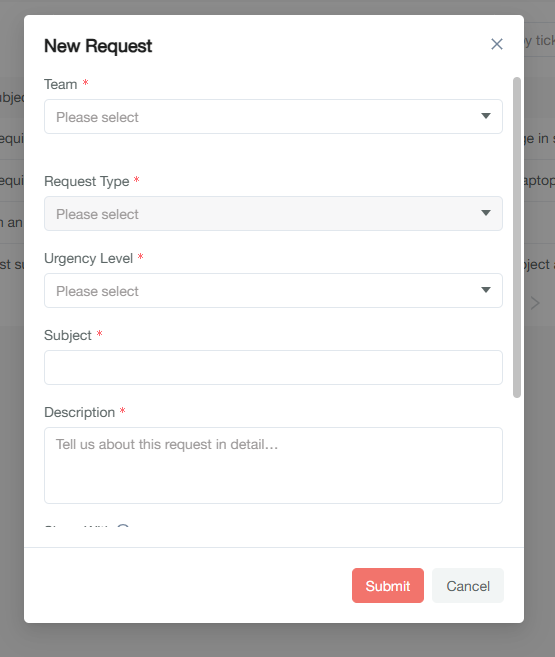
A modal opens requiring input.
-
Select a relevant team from the dropdown (mandatory).
-
Select a Request Type depending on the team/category selection (mandatory).
-
Select an Urgency level (mandatory).
-
Add a Request subject line or title (mandatory).
-
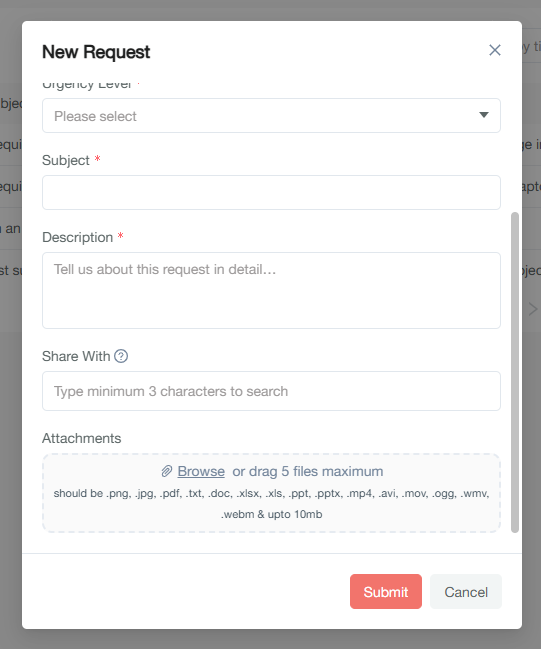
Add a Request description with detailed content (mandatory).
-
Optionally, select relevant members under Share With.
-
Optionally, add file attachments as proof of request verification.
-
Click Submit.
A toast message confirms that the request has been raised.
Select Request Team
Select a relevant team from the dropdown where the request will be raised. It's mandatory. Example: for an HR-related issue, select Human Resource.
Select Request Type
Request types need to be selected depending on the team/category selection, to make the request more specific. Request types are predefined reasons configured according to the team or department. It's mandatory.
Set Request Urgency
Urgency level determines the priority or severity of resolving the request. It's mandatory.
Enter Request Subject
A request subject line or title must be added; it's mandatory.
Enter Request Description
The description box allows you to describe the reason in detailed and elaborated content. It's mandatory.
Add Share With Members
The Share With field lets you select any relevant member to the request, if needed. It's optional.
Important: Members showing in Share With are members active in the organization but not members of the current selected request team.
Add Request Attachments
File attachments can be added as proof of request verification. It's optional.
Submit Request
Click Submit. A toast message will confirm that the request has been raised.
View Request Details
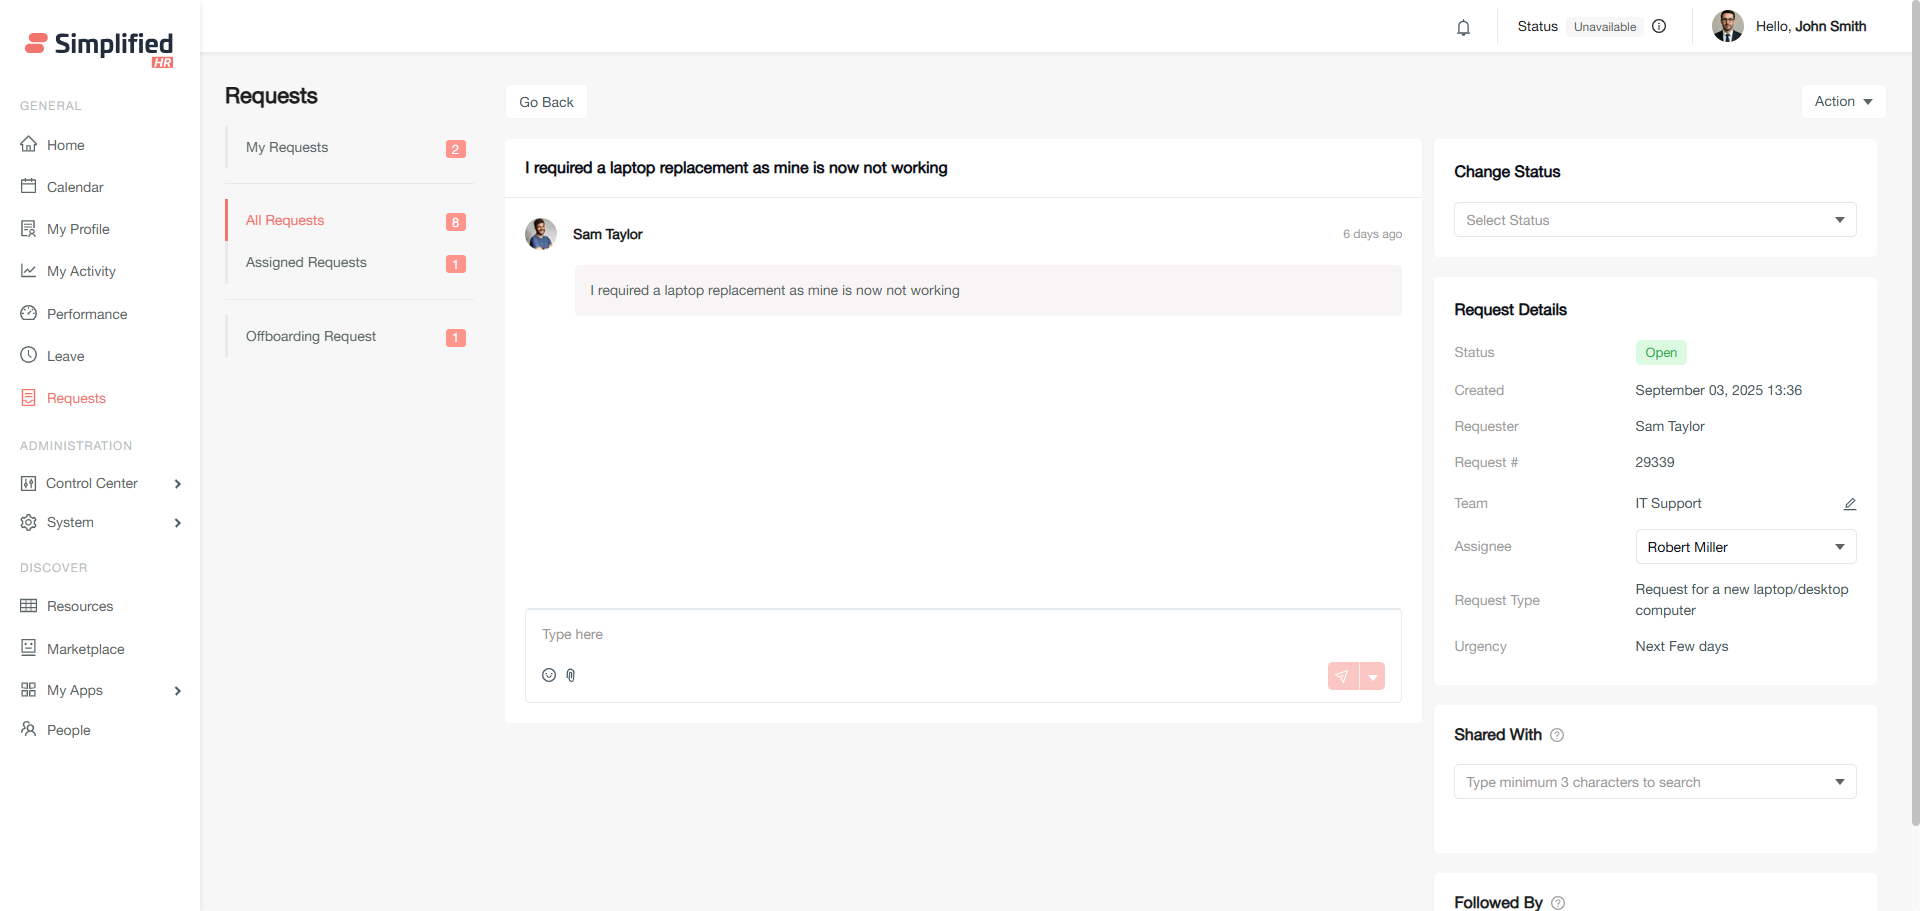
To update or modify a request, click View Request, or click the required request directly. All updates and actions of the request can be made from this UI.
Update Request
All updates and actions of the request can be made from the request detail interface, according to your permissions.
Add Comment to Request
Adding Comments, Public and private notes, and adding attachments to the Request is possible from:
-
The requester's end.
-
The owner, admin, or similar role members.
-
The assignee.
-
The team members where the request has been raised.
-
Non-admin Share With members.
Add Public Note
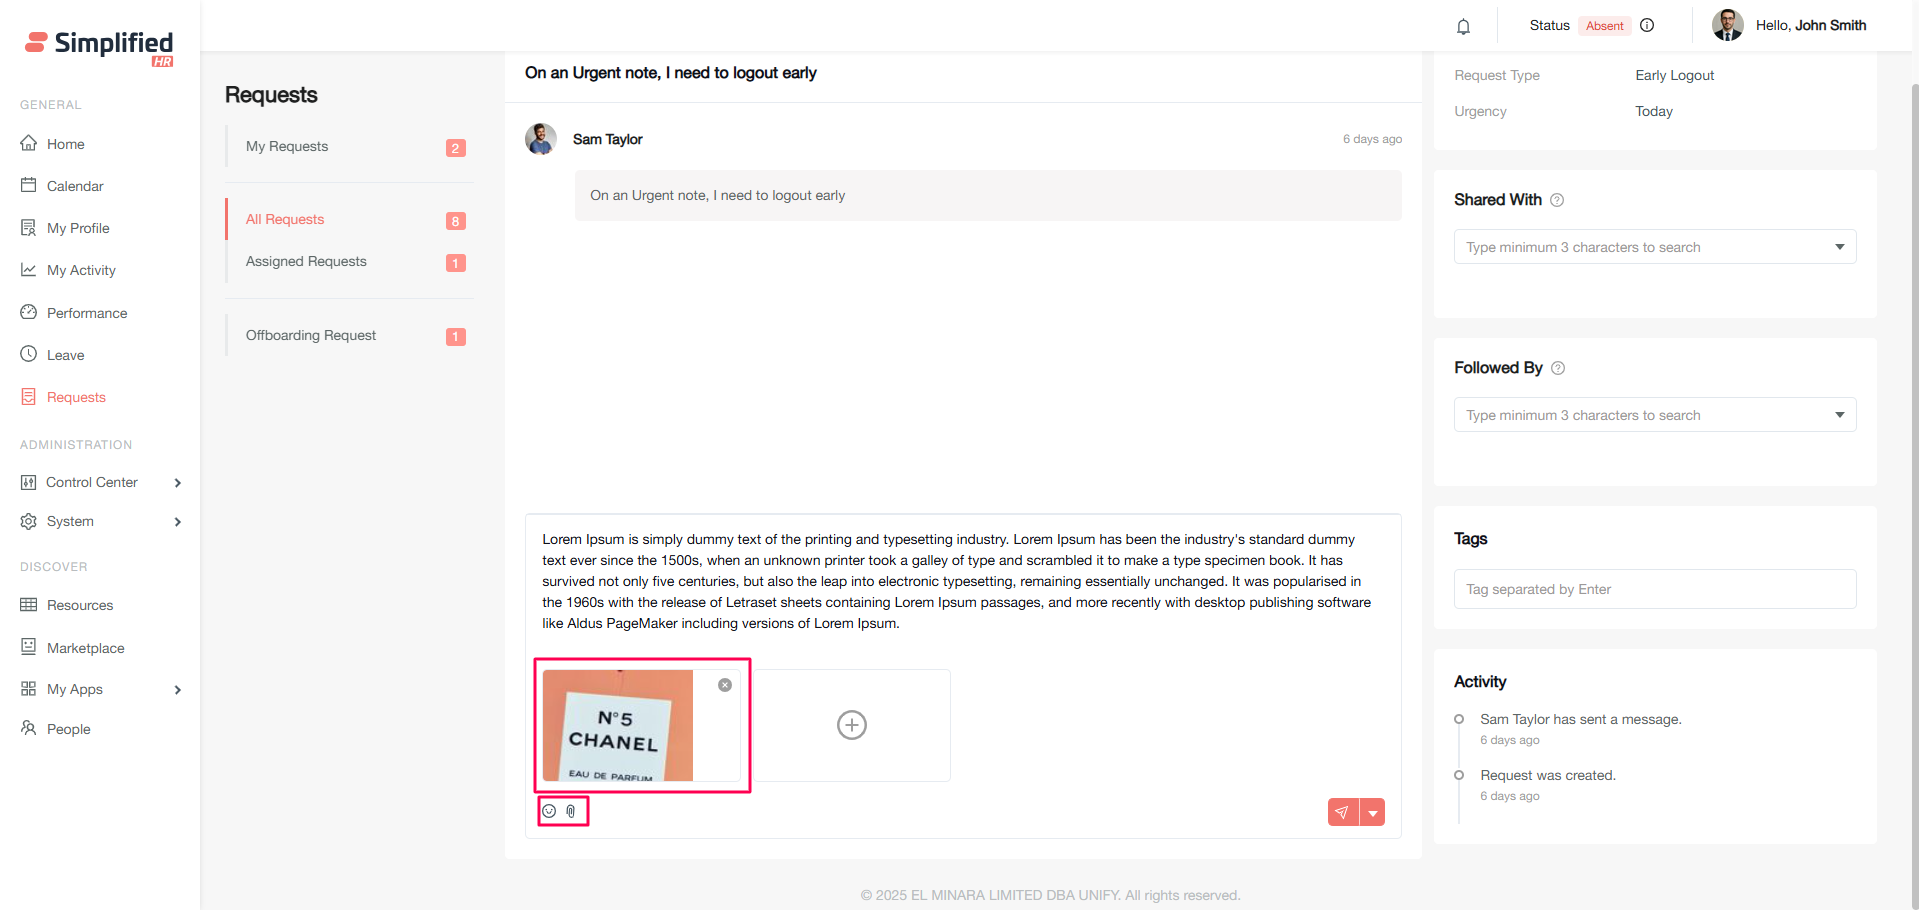
Public notes added will be visible to all the relevant members of the request.
-
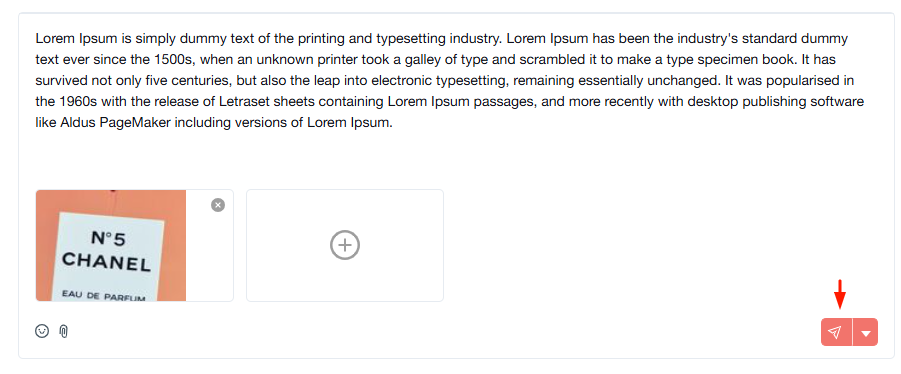
Provide the required note.
-
If required, add attachments by clicking the attachment button.
-
Click Send Note.
Important: A note will be added to the request with attachments if selected. Maximum 5 attachments are allowed with a note. Relevant members will be notified for the added note.
Add Private Note
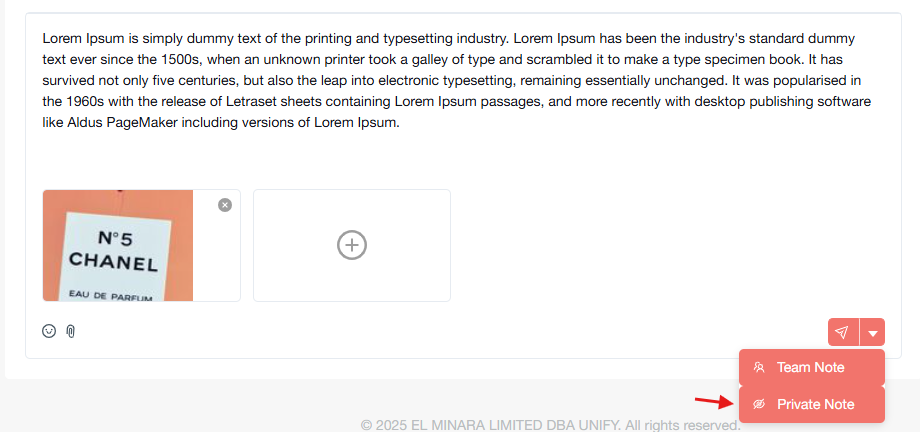
Private notes added will only be visible to members who add private notes in the request.
-
Provide the required note.
-
If required, add attachments by clicking the attachment button.
-
Click the Send Note dropdown button and select Private Note.
Important: Maximum 5 attachments are allowed with a note.
Add Team Note
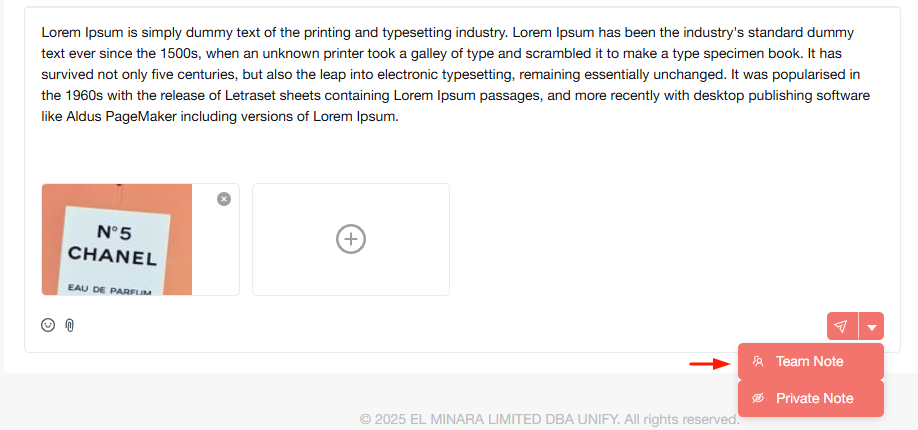
Team notes will only be added and visible to Request Team members.
-
Provide the required note.
-
If required, add attachments by clicking the attachment button.
-
Click the Send Note dropdown button and select Team Note.
Important: Relevant members will be notified for the added note. Maximum 5 attachments are allowed with a note.
Add Attachments to Comments or Notes
Attachments can be added when adding a comment or note by clicking the attachment button.
Important: Maximum 5 attachments are allowed with a note.
Understand Request Status
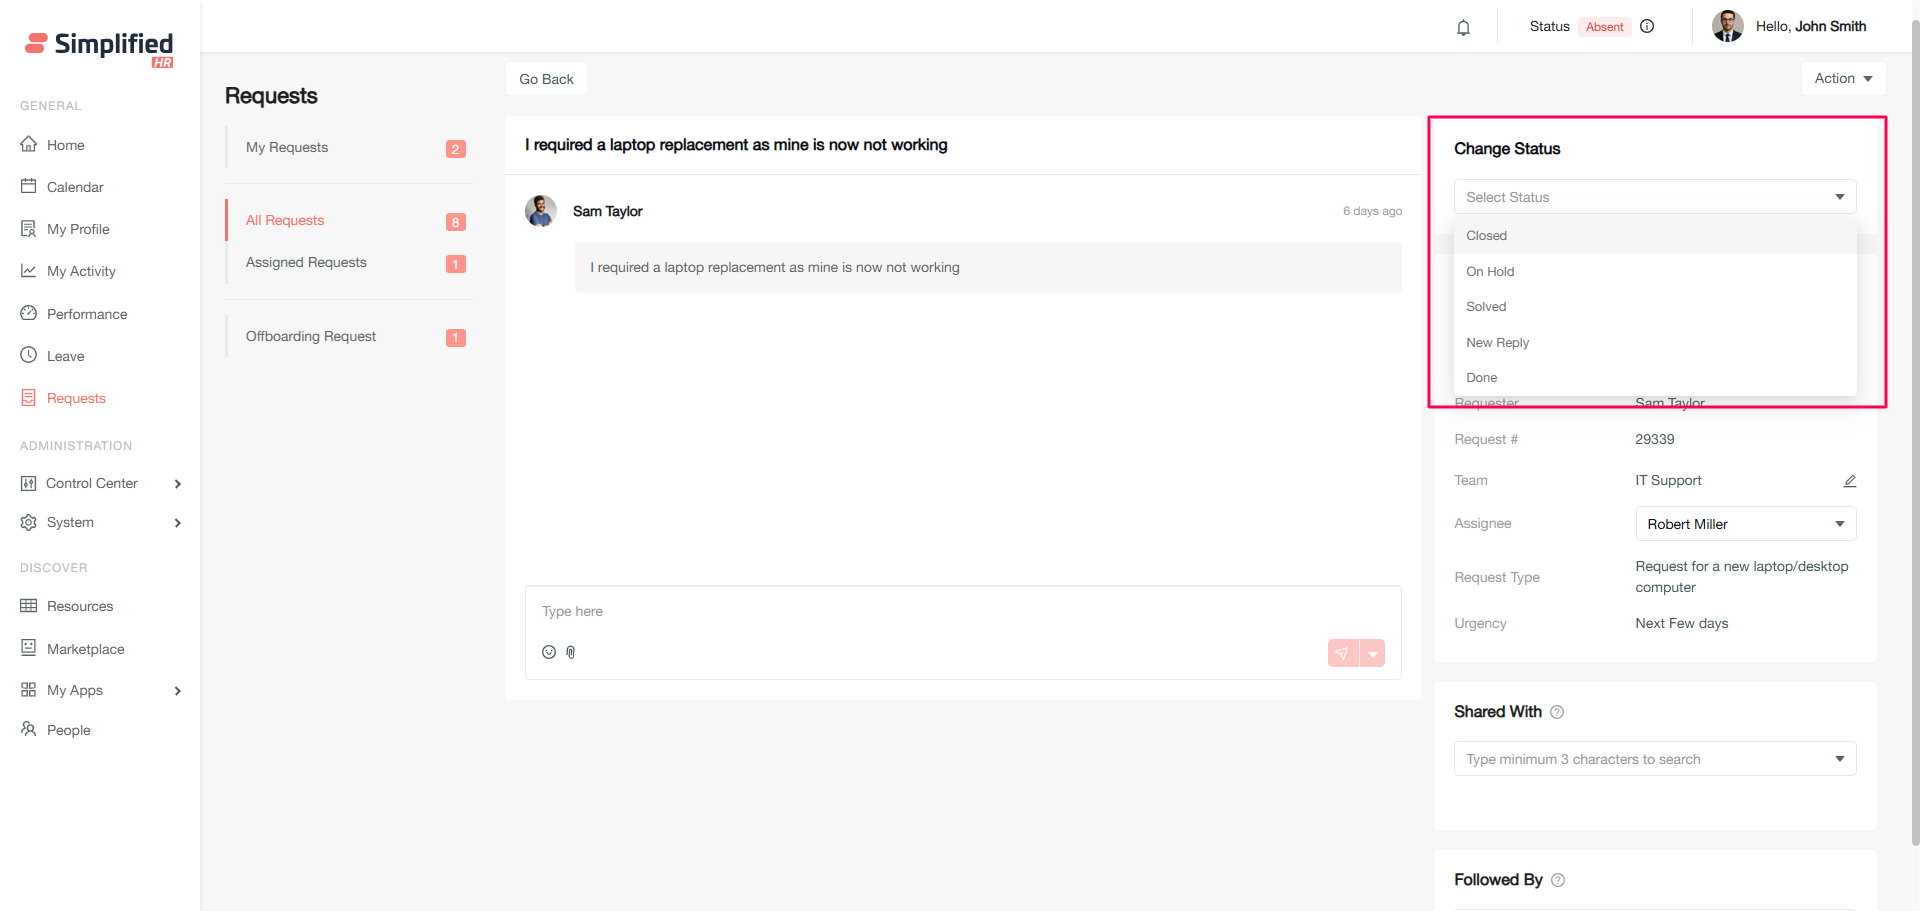
Statuses that can be selected/updated include Resolve, On Hold, Close, New Reply, and other custom statuses.
Change Request Status
-
Select the required status from the Status dropdown in the Status card.
-
The request status will be updated.
Understand Status Permissions
-
Non-admin Requesters can only open and close the request.
-
Admin Requesters can take any actions to their own request.
-
Owner, admin, or similar role member, assignee, and Request Team members can update the status such as Resolve, On Hold, Close, New Reply, and other custom statuses.
Reopen Closed Request
Important: Once a request is closed, it can only be reopened by the owner of the organization.
Change Request Team
-
In the Request details card, click the edit option beside Team.
-
Select a new team as per requirement, and also select the reason and other required details.
-
A new assignee can also be selected here as per the new selected request team.
-
Click Reassign to update the team.
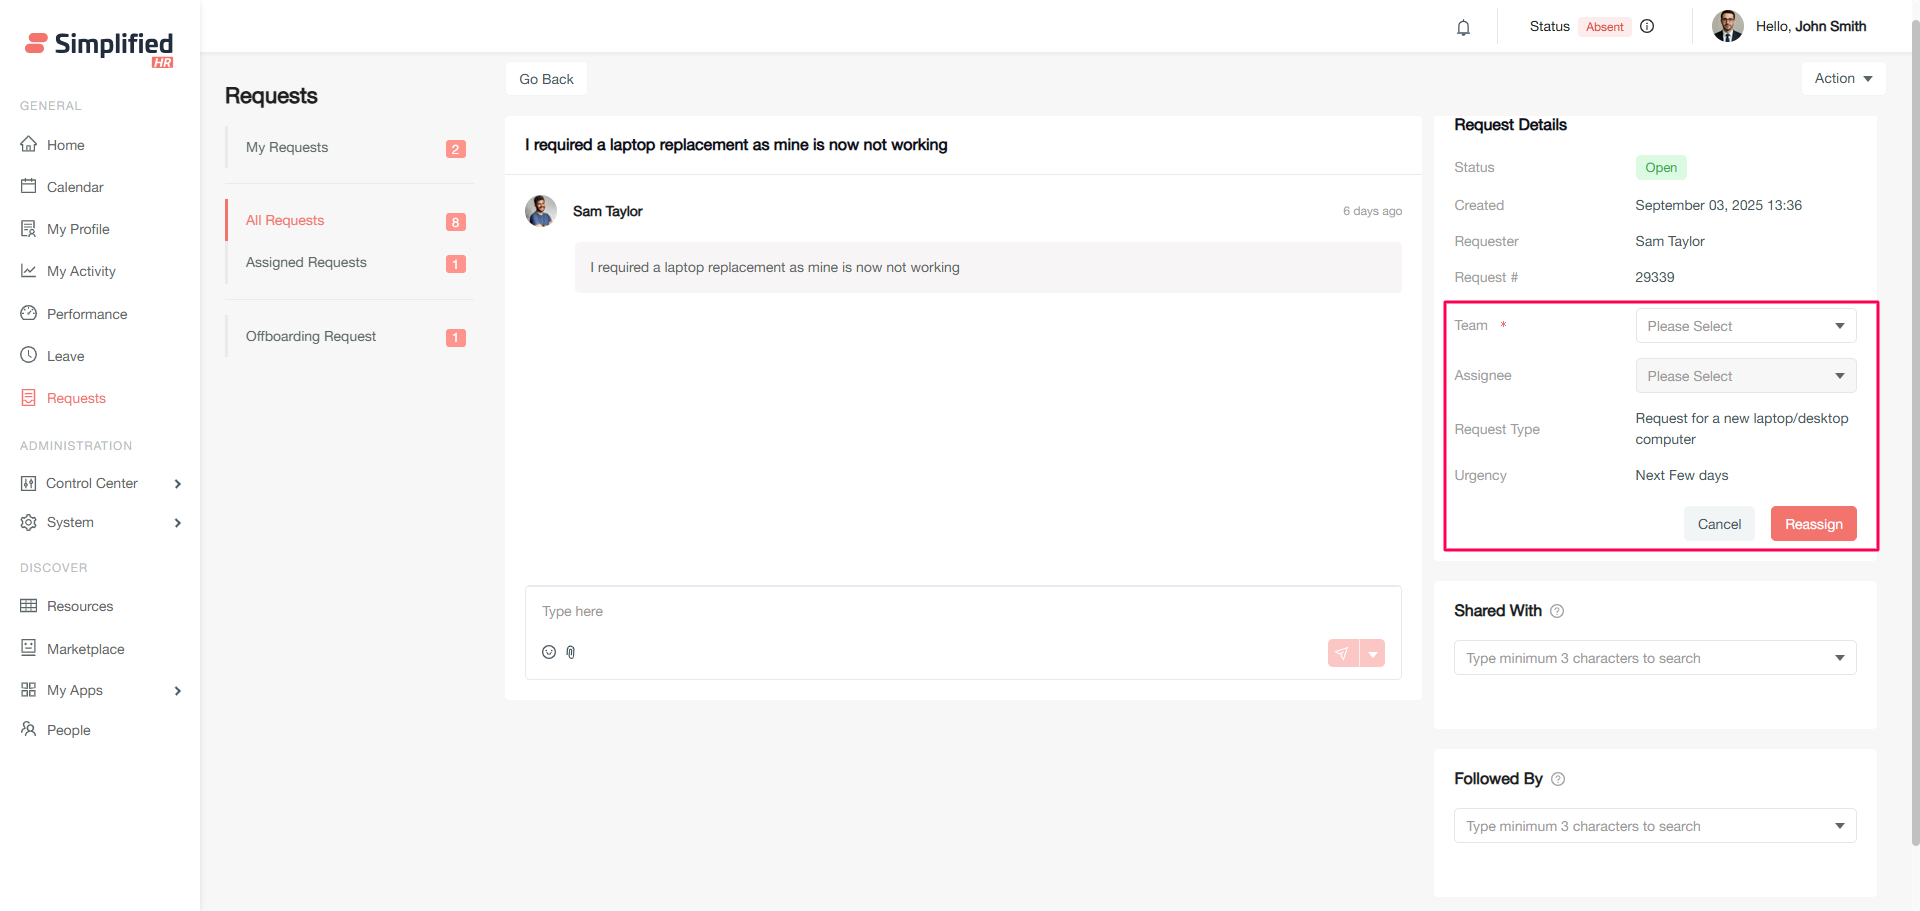
Changing the team of any request is possible by Request team members, and by Owner, Admin, or similar role members in the organization.
Select Assignee During Team Change
While changing a team, a new assignee can also be selected as per the newly selected request team.
Understand Team Change Notifications
On updating the team, the requester, the new team and its members, and the assignee (if selected) will all be notified.
Understand Previous Team Access After Reassignment
Important: As the team gets updated, the updater's previous request team members won't be able to see the request anymore in their view. However, they can still see the same request if they also belong to the new Request team, or hold owner, admin, or similar role and permission in the organization.
View Previous Team Information
Short details will be added about the previous team/request category, request type, and other information as well.
Update Share With Members
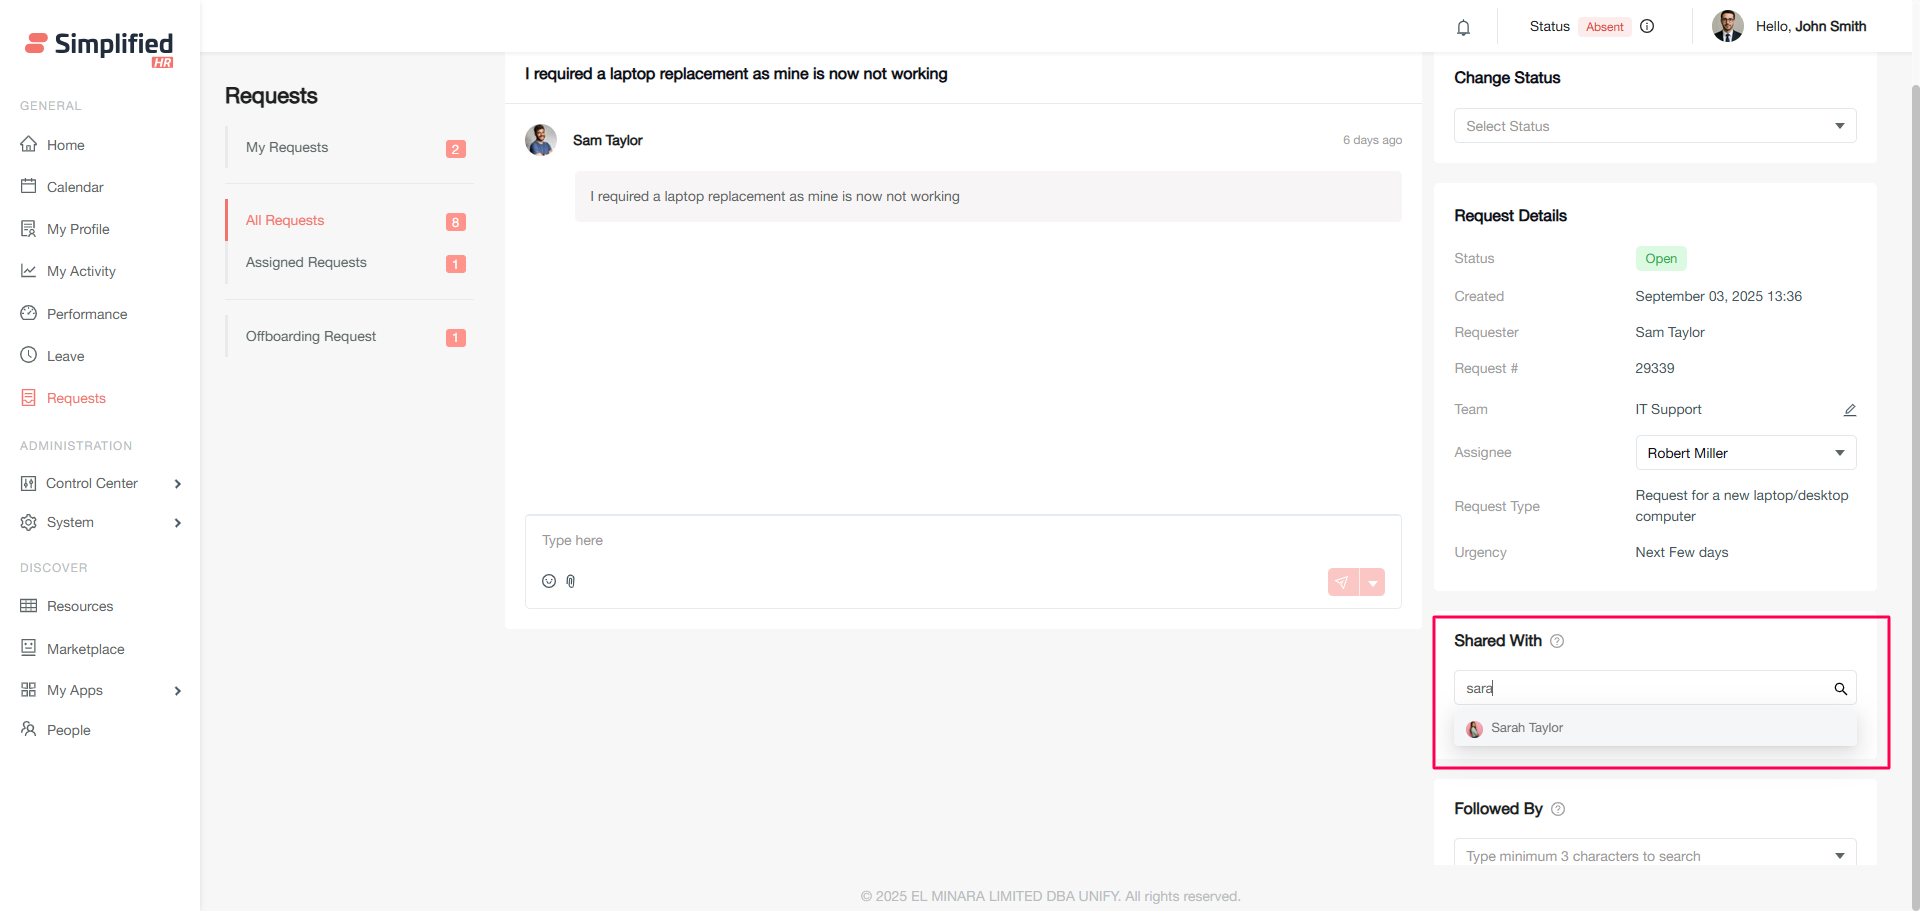
On the Share With card, search and select the required members.
-
Requested team members will not be available in Share With.
-
Updating Share With members on a request is allowed to the Requester.
-
Updating Share With members on a request is allowed to owner, admin, or similar role members.
Understand Share With Permissions
-
Share With members will get notified for the relevant requests.
-
Share With members can also add comments and notes, and change status and team, if and only if the Share With member holds admin or similar role.
Understand Share With Restrictions
Important: Added Share With members will not be available to add in Followed By.
Add Followed By Members
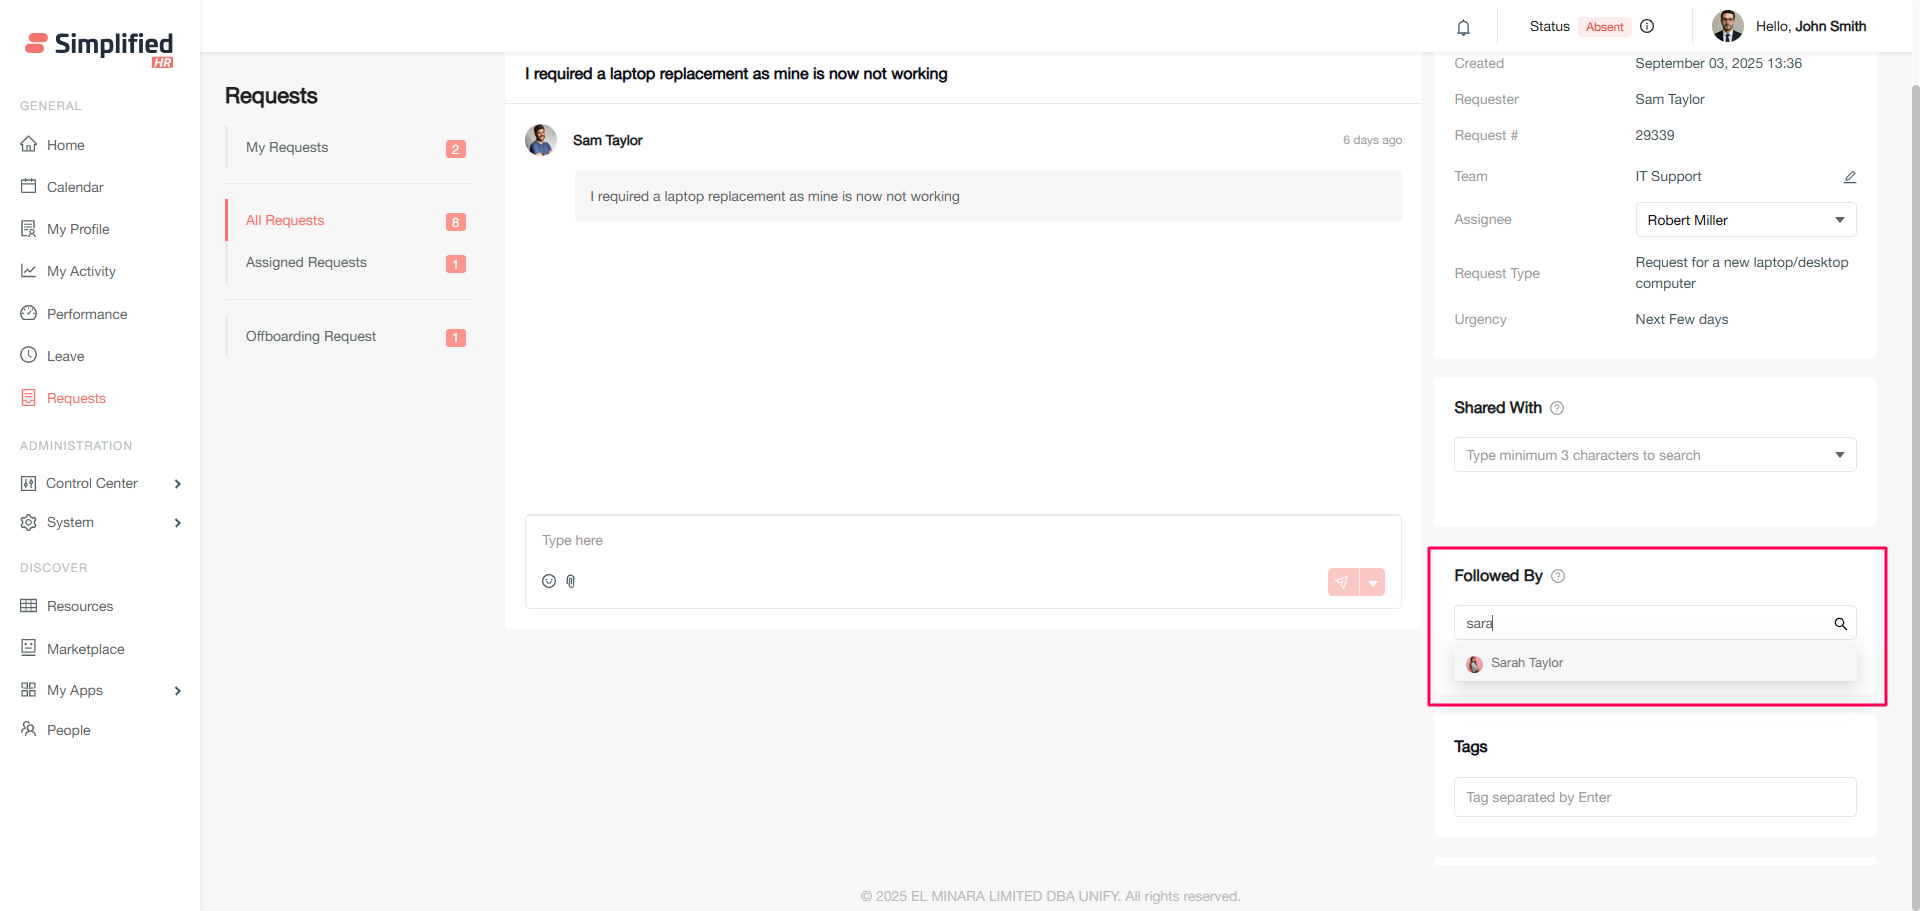
On the Share With card (used for the same action), search and select the required members to add as Followed By.
Important: Requested team members will not be available in Followed By.
Understand Followed By Permissions
Understand Followed By Restrictions
Important: For a request, added Followed By members will not be available in Share With.
Compare Share With and Followed By
Capability
Share With
Followed By
View request
Yes
Yes
Add comments to the request
Yes
No
Important: There is only one difference documented between Share With and Followed By members: Share With members can add comments to the request, but Followed By members can only see the request.
Add Request Tags
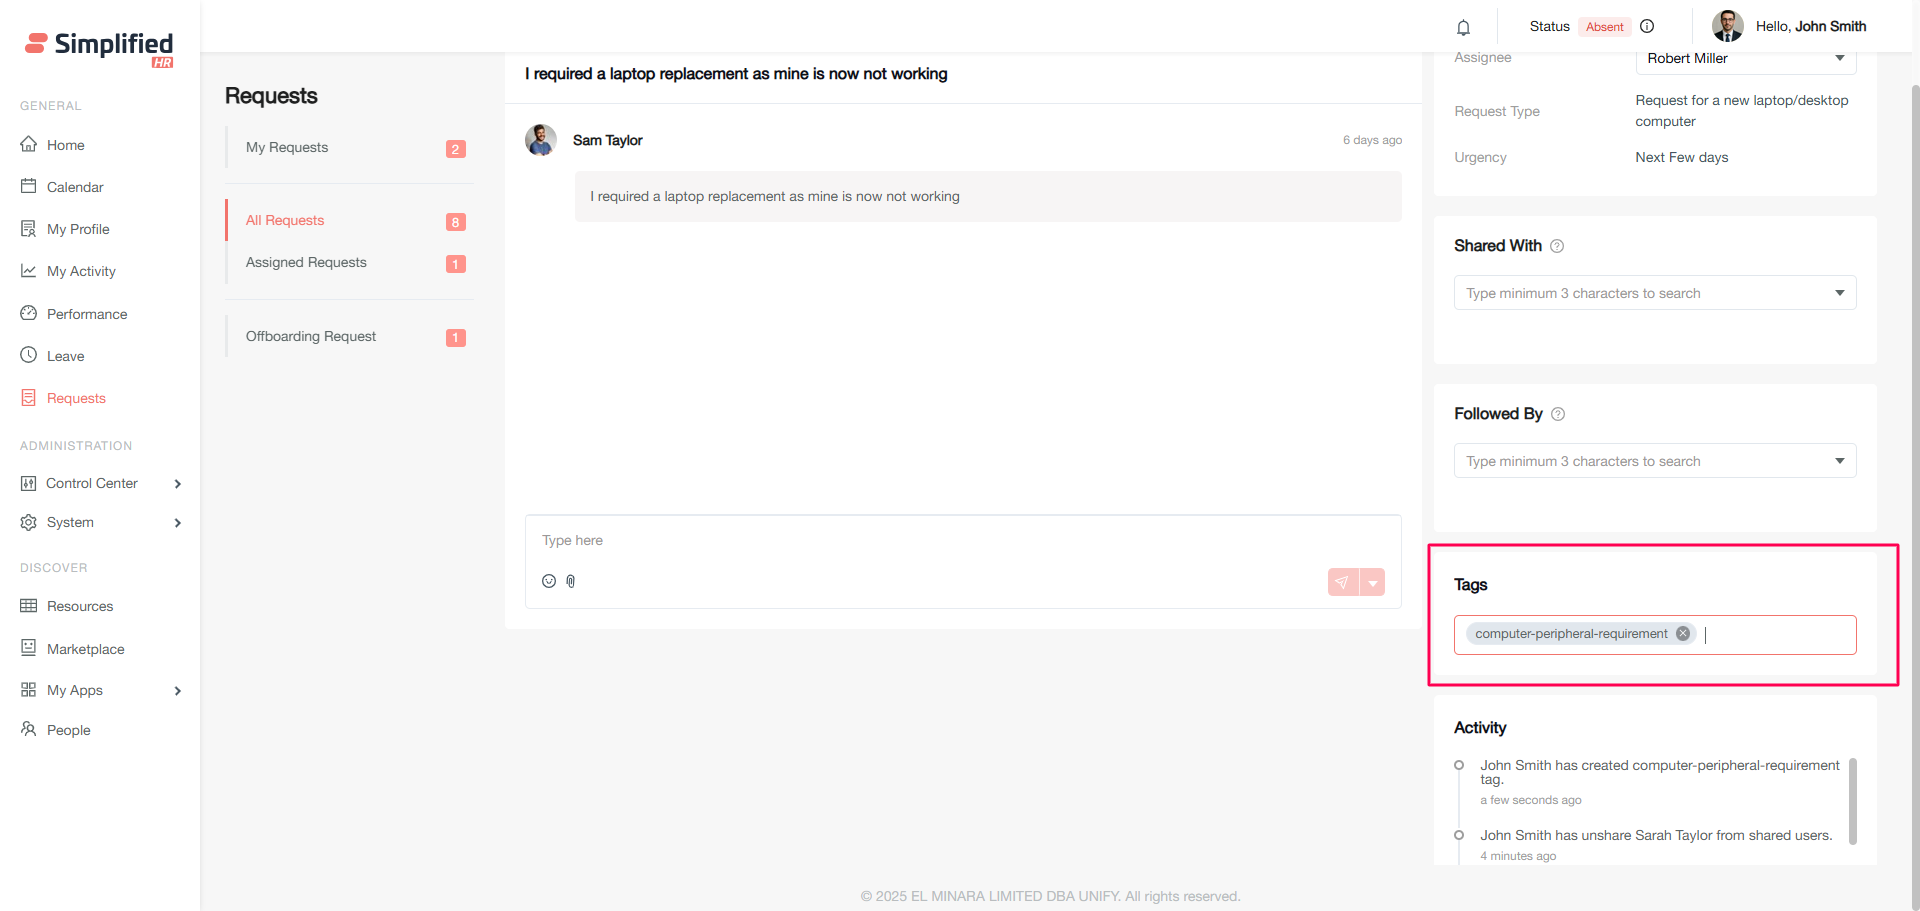
Tags are optional keywords added to a request. Updating tags helps other relevant members get a better idea of the request type or genre. On the Tags card, type the relevant text, which will easily set the genre of the request and also be filtered easily.
Update Request Tags
Tags can be added by the Requester, Assignee, Request Team members, owner, admin, or similar role members.
View Request Activity Log
A request's activity can be tracked; the latest activity shows on top.
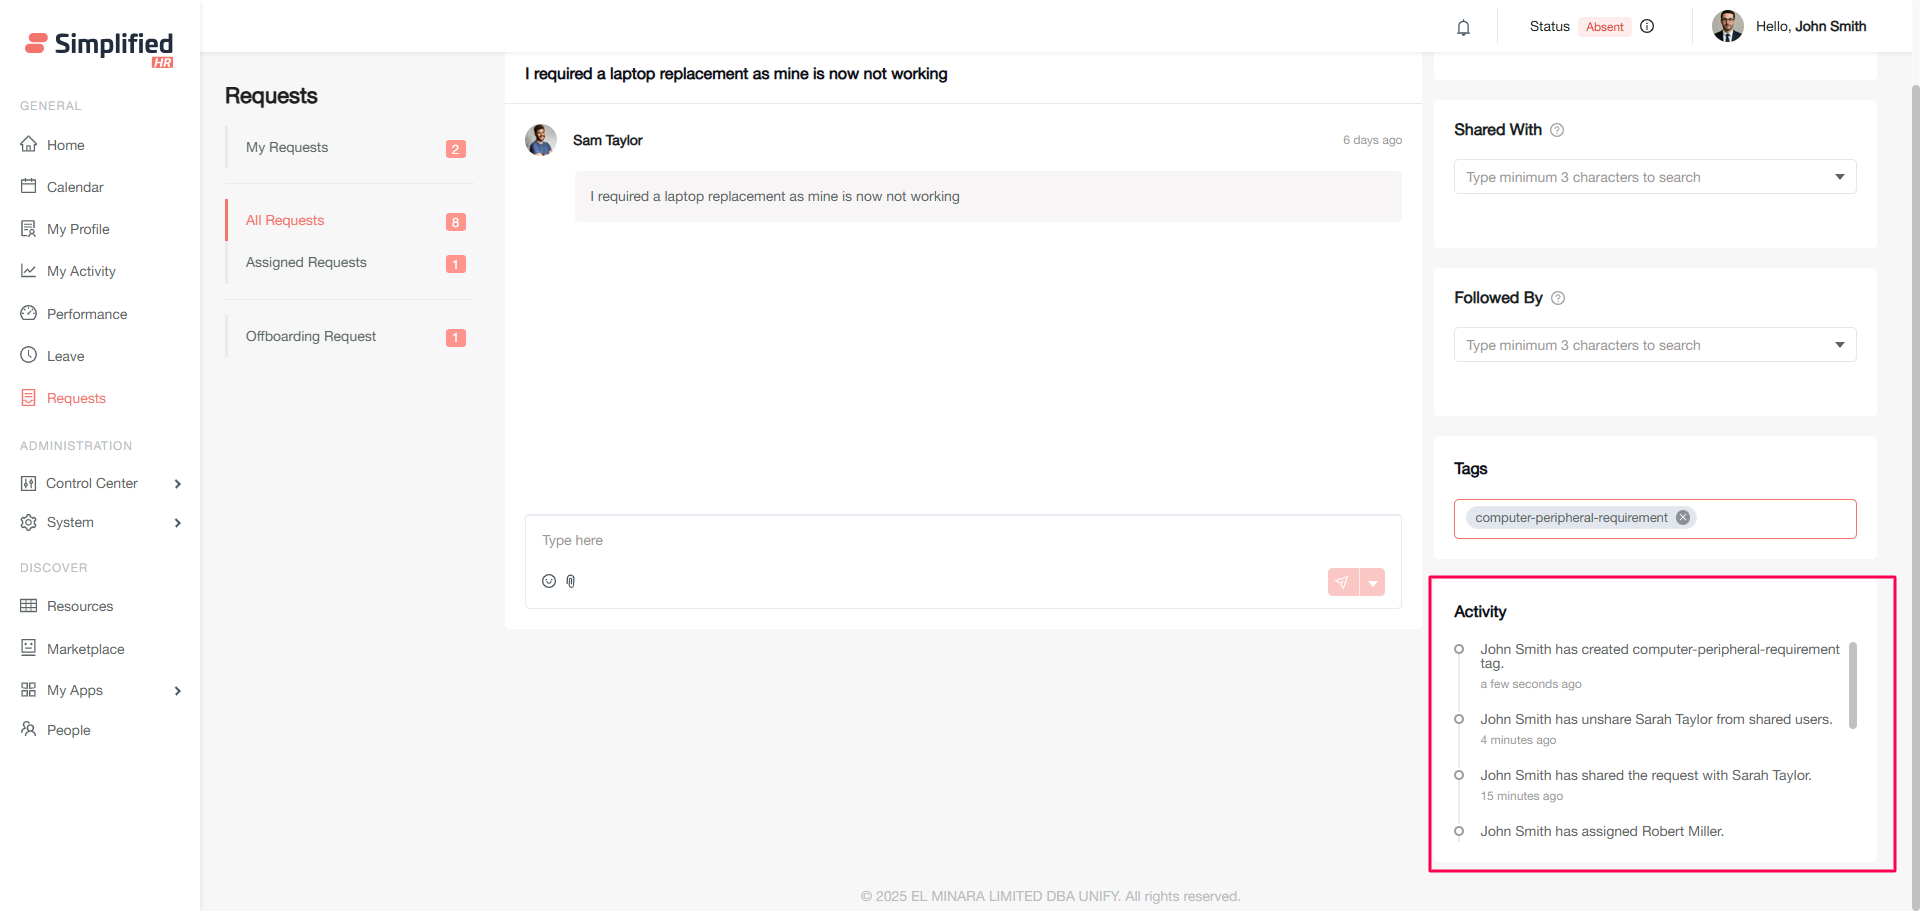
Important: Activity data gets auto-added when any tracked action is made.
Track Request Creation Activity
The activity log shows when the request is raised.
Track Comment Activity
The activity log shows who added a comment and when.
Track Assignment Activity
The activity log shows who assigned whom, and at what time.
Track Team Changes
The activity log shows who changed the existing team to what new team, and when.
Track Share With and Followed By Changes
The activity log shows who added whom as Followed By, and who added whom in Shared With, at what time.
Track Status Changes
The activity log shows who updated what status, and at what time.
Print Request
A print feature is available for each request, allowing export of the request details including all added comments.
-
Open the required request.
-
Go to Actions.
-
Select Print.
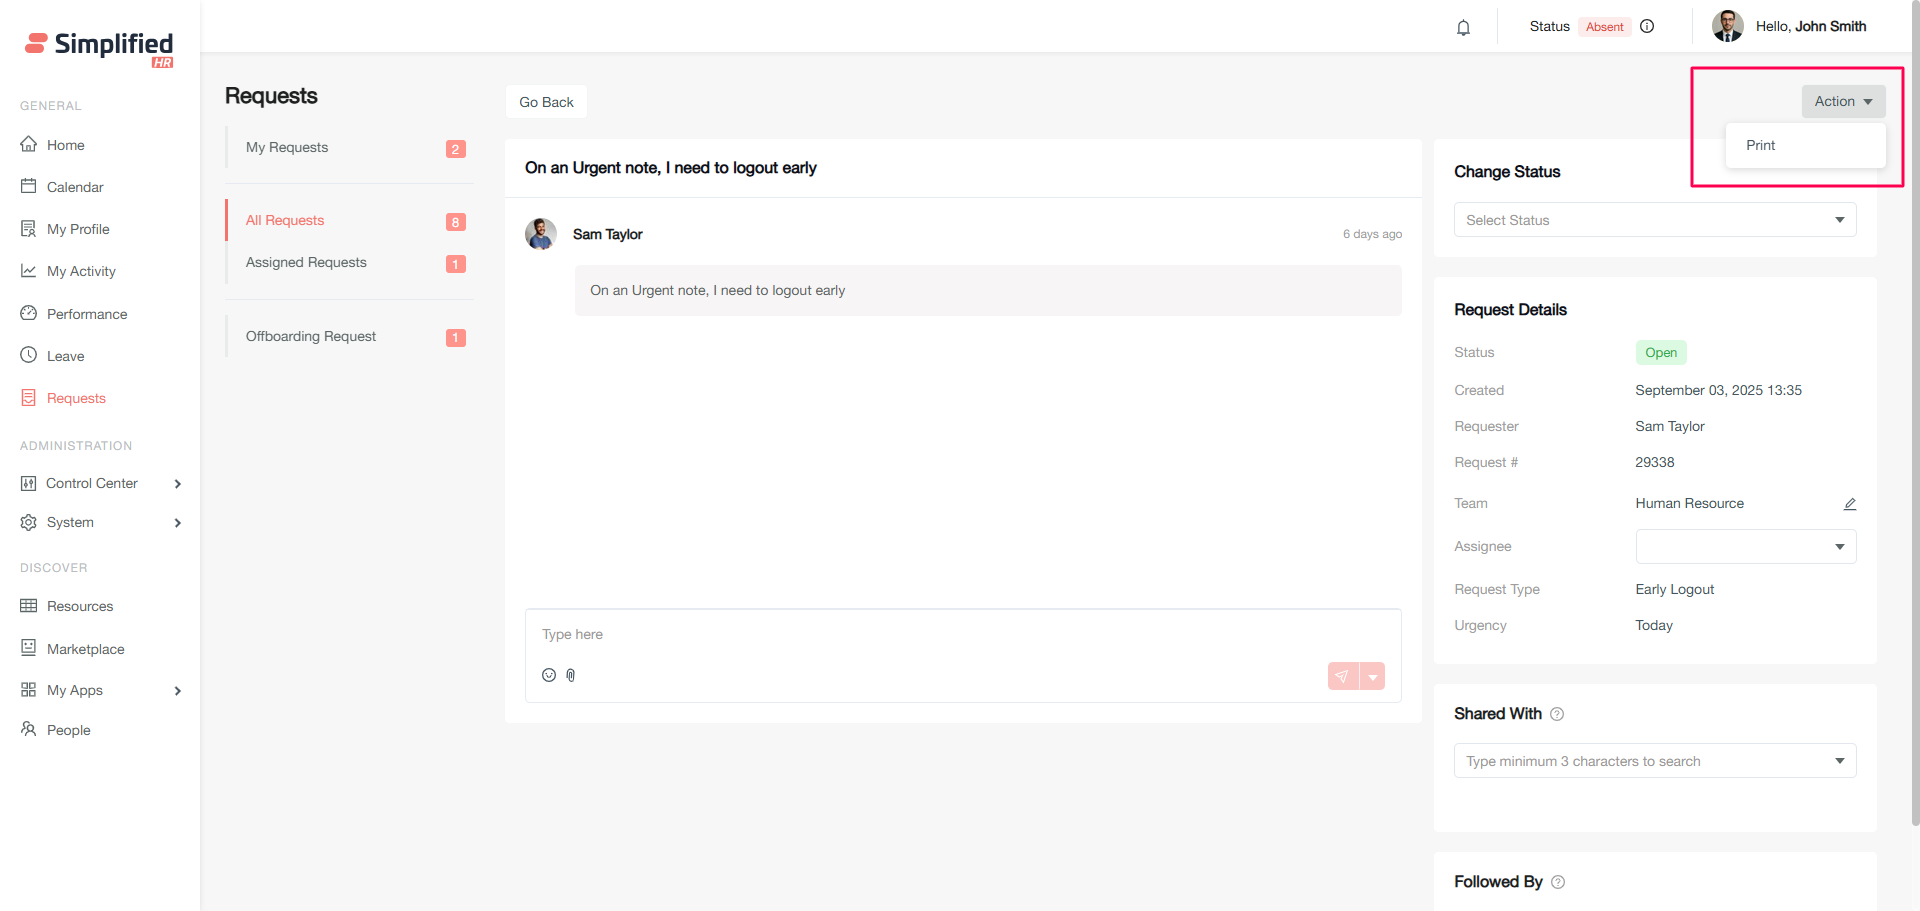
Important: Any relevant member who has access to the specific request can take a print.
Archive Request
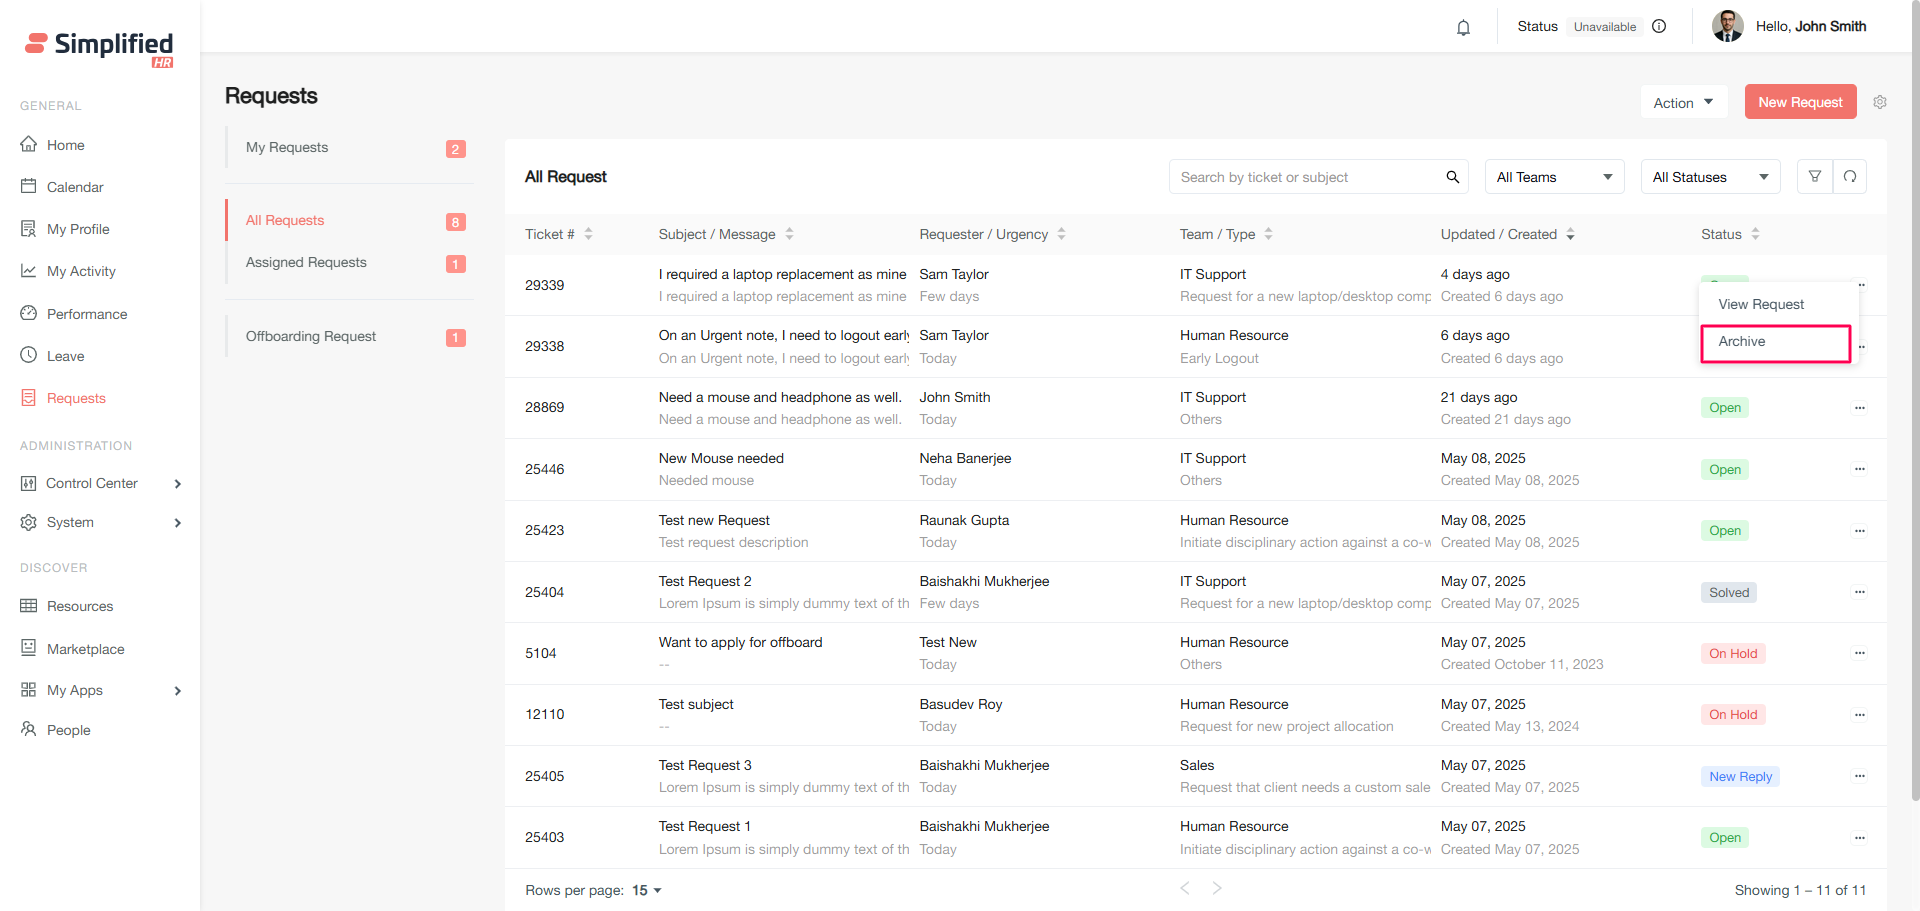
Archiving a request will hide/archive the request only from the archiver's list view. Other relevant members of the request will still be able to see the request as usual in the list.
-
Click the vertical-dot option of any required request.
-
Choose Archive.
Understand Who Can Archive Requests
An archiver of the request may be a Requester, Owner, Administrator or similar role member, Request Team members, and Assignee.
Export Requests
Request allows the data to be exported for organizational requirements. Certain permissions are required for this feature to be available.
Important: Requests will be exported as per the active request tab. For example, if a member is in the All Requests tab, then all requests will be exported.
Configure Request Export
-
Members who have access to request export click Action > Export from any of the 3 tabs of the request.
-
Enter the export name. By default, the active request tab name is populated.
-
Select what type of export is required — All records or Applied filters.
-
Search and select the member to export to.
-
Select the timezone, which will convert and export the request as per requirement.
-
Select the schedule type.
-
Select the export file type.
-
Click Save.
Export All Request Records
Requests can be exported as All records — the full list according to the active request tab.
Export Filtered Requests
Request export allows you to export the list with or without an applied filter (Applied filters option).
Configure One-Time Request Export
Configure Daily Request Export
Daily — requires a fixed time when the request will be scheduled.
Configure Weekly Request Export
Weekly — requires a fixed day when the request will be scheduled.
Configure Monthly Request Export
Monthly — requires a fixed period when the request will be scheduled (e.g., Start/middle/end of the month).
Configure Quarterly Request Export
Quarterly — requires selecting Start of the period, by default.
Configure Half-Yearly Request Export
Half Yearly — requires selecting Start of the period, by default.
Configure Yearly Request Export
Yearly — requires selecting Start of the period, by default.
Select Export Recipient
Requests can be exported to any active members in the organization.
Select Export Timezone
Timezone needs to be selected while exporting, which will convert and export the request as per requirement.
Select Request Export Format
Requests can be exported in the following formats: CSV, XLS, XLSX.
Handle Large Request Exports
Important: If exported data has a huge volume, files are exported as part files.